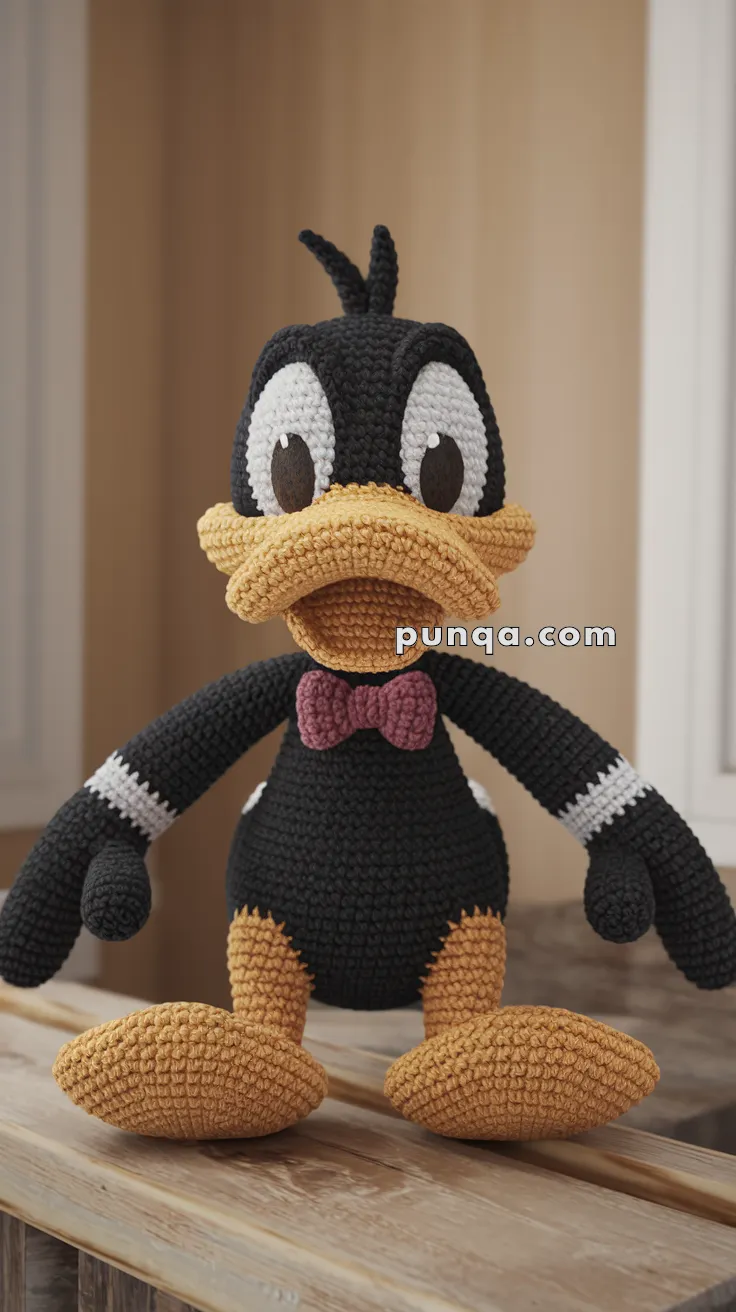
Bring a classic cartoon icon to life with the Amigurumi Daffy Duck!🦆✨ With his playful personality, wide-eyed expression, and unmistakable beak, this crochet project captures the essence of the beloved character. Whether you opt for his signature black and orange colors or add a creative twist, every stitch brings out Daffy’s energetic charm. His mischievous nature and bold attitude make him a standout addition to any collection—perfect for gifting or displaying alongside other amigurumi characters.
🧶🎭 This free crochet pattern is an exciting way to explore shaping techniques and character design. From crafting his flappy wings to refining his expressive stance, each step is a rewarding journey in bringing animation-inspired crochet to life. Whether you’re a longtime fan of classic cartoons or simply love quirky amigurumi projects, Daffy Duck promises to be a delightful creation. Grab your yarn, hook, and a dash of cartoon magic—it’s time to crochet this feisty duck! 🦆💕✨
🦆 Amigurumi Daffy Duck Crochet Pattern
Bring a classic cartoon favorite to life with this playful amigurumi duck! With tall oval eyes, a layered beak, floppy arms with white cuffs, and big flat feet, he’s full of personality and fun to make.
✨ Skill Level
Intermediate – includes shaping, layered construction, color changes, wire-supported shaping, and detailed assembly.
📏 Finished Size
Approx. 33–36 cm (13–14 in) tall using worsted-weight yarn and a 3.5 mm crochet hook.
🧶 Yarn & Materials
Worsted-weight yarn
-
Black – 120 g (head, body, arms, hair tufts)
-
Mustard / golden yellow – 90 g (beak, legs, feet)
-
White – 25 g (eyes, arm cuffs)
-
Dark brown – small amount (pupils)
-
Burgundy red – 10 g (bow tie)
Tools & Notions
-
3.5 mm crochet hook
-
Polyester fiberfill
-
Tapestry needle
-
Stitch marker
-
Scissors
-
Thin aluminum craft wire (1–1.5 mm) for beak support
(No safety eyes are used in this pattern.)
🔤 Abbreviations (US Terms)
MR – magic ring
sc – single crochet
inc – increase (2 sc in same stitch)
dec – decrease (sc2tog)
ch – chain
sl st – slip stitch
FO – fasten off
🖤 Head (Tall Oval)
With black yarn, worked in continuous rounds:
-
R1: 6 sc in MR (6)
-
R2: inc ×6 (12)
-
R3: (sc, inc) ×6 (18)
-
R4: (2 sc, inc) ×6 (24)
-
R5: (3 sc, inc) ×6 (30)
-
R6: (4 sc, inc) ×6 (36)
-
R7: (5 sc, inc) ×6 (42)
-
R8–R17: sc around (42)
-
R18: (5 sc, dec) ×6 (36)
-
R19: (4 sc, dec) ×6 (30)
-
R20: (3 sc, dec) ×6 (24)
-
R21: (2 sc, dec) ×6 (18)
-
R22: (sc, dec) ×6 (12)
Stuff firmly, shaping into a tall oval slightly wider at the forehead.
-
R23: dec ×6 (6)
FO and close.
👀 Eyes (Crocheted – Make 2)
White Eye Base (Tall Oval)
With white yarn:
-
R1: 6 sc in MR (6)
-
R2: inc ×6 (12)
-
R3: (sc, inc) ×6 (18)
-
R4: (2 sc, inc) ×6 (24)
-
R5–R7: sc around (24)
To elongate vertically:
-
Ch 1, sc across 7 sts, turn.
-
Repeat for 4 rows.
FO.
Pupils
With dark brown yarn:
-
R1: 6 sc in MR (6)
-
R2: sc around (6)
FO.
Sew pupils vertically centered on the white ovals.
Add a tiny white highlight stitch near the top edge.
Attach eyes very close together, nearly touching, slightly lower on the face so the lower edge aligns near the beak line.
🧡 Beak (Layered, Wire-Supported)
Upper Beak (Strong Projection)
With mustard yarn:
-
R1: 6 sc in MR (6)
-
R2: inc ×6 (12)
-
R3: (sc, inc) ×6 (18)
-
R4: (2 sc, inc) ×6 (24)
-
R5: (3 sc, inc) ×6 (30)
-
R6: (4 sc, inc) ×6 (36)
-
R7–R12: sc around (36)
-
R13: (4 sc, dec) ×6 (30)
-
R14: sc around (30)
Before closing, shape a U-shaped piece of thin aluminum wire to match the curve of the beak’s front edge.
Insert the wire horizontally inside the beak, positioning it near the front lip.
Stuff very firmly around the wire, ensuring it is fully enclosed and cannot shift.
FO.
Lower Beak (Flared Lip)
With mustard yarn:
-
R1: 6 sc in MR (6)
-
R2: inc ×6 (12)
-
R3: (sc, inc) ×6 (18)
-
R4: (2 sc, inc) ×6 (24)
-
R5–R7: sc around (24)
Optionally insert a short curved wire along the front edge only to help maintain the outward flare.
Stuff firmly but allow the front edge to remain slightly flattened.
FO.
Beak Assembly
-
Sew the upper beak to the face so it projects clearly forward.
-
Anchor the wire ends securely into the head stuffing for stability.
-
Attach the lower beak beneath the upper layer, leaving the sides slightly looser so the lip flares outward naturally.
💇 Hair Tufts (Make 2)
With black yarn:
-
Ch 12
-
Sl st back along chain
FO.
Sew both tufts to the top center of the head, standing upright and angled slightly backward.
🖤 Body (Narrow Barrel)
With black yarn:
-
R1: 6 sc in MR (6)
-
R2: inc ×6 (12)
-
R3: (sc, inc) ×6 (18)
-
R4: (2 sc, inc) ×6 (24)
-
R5: (3 sc, inc) ×6 (30)
-
R6: (4 sc, inc) ×6 (36)
-
R7–R13: sc around (36)
-
R14: (4 sc, dec) ×6 (30)
-
R15: (3 sc, dec) ×6 (24)
-
R16: (2 sc, dec) ×6 (18)
-
R17: (sc, dec) ×6 (12)
Stuff firmly to keep the body compact and upright.
FO.
🖤 Arms (Make 2 – With Single White Cuff)
With black yarn:
-
R1: 6 sc in MR (6)
-
R2: inc ×6 (12)
-
R3–R10: sc around (12)
-
R11: switch to white, sc around (12)
-
R12: switch back to black, sc around (12)
-
R13–R15: sc around (12)
FO. Lightly stuff and flatten slightly.
Attach just below the neckline so arms hang downward naturally.
🦵 Legs (Make 2)
With mustard yarn:
-
R1: 6 sc in MR (6)
-
R2: inc ×6 (12)
-
R3: (sc, inc) ×6 (18)
-
R4–R11: sc around (18)
-
R12: (sc, dec) ×6 (12)
FO. Stuff firmly.
🦶 Feet (Make 2 – Large & Flat)
With mustard yarn:
-
R1: 6 sc in MR (6)
-
R2: inc ×6 (12)
-
R3: (sc, inc) ×6 (18)
-
R4: (2 sc, inc) ×6 (24)
-
R5: (3 sc, inc) ×6 (30)
-
R6: (4 sc, inc) ×6 (36)
-
R7–R11: sc around (36)
-
R12: (4 sc, dec) ×6 (30)
-
R13: (3 sc, dec) ×6 (24)
-
R14: (2 sc, dec) ×6 (18)
-
R15: (sc, dec) ×6 (12)
-
R16: dec ×6 (6)
FO. Stuff very firmly and flatten into wide ovals.
Sew feet to legs facing straight forward.
🎀 Bow Tie
With burgundy yarn:
-
Ch 8
-
Sc in 2nd ch and across (7 sts)
Rows 2–5: sc across (7)
FO with long tail.
Wrap yarn tightly around the center to cinch.
Sew directly under the beak.
🧷 Assembly Order
-
Sew head to body
-
Attach legs to body base
-
Sew feet to legs
-
Attach crocheted eyes
-
Sew wire-supported layered beak
-
Add hair tufts
-
Attach arms
-
Sew bow tie under beak
🎉 Finished Duck
With his strong forward-projecting beak, tall expressive eyes, oversized feet, and signature red bow tie, your Daffy Duck amigurumi now holds its shape perfectly and captures the bold cartoon look shown in the photo. A standout handmade character full of attitude, charm, and classic animation flair 🦆🧶