Bring the magic of Disney to your crochet collection with this Amigurumi Donald Duck pattern! With his signature sailor outfit, expressive eyes, and playful personality, this design captures the charm of the beloved character in yarn form. Whether you’re crafting for a Disney fan, a themed décor piece, or simply love character-inspired amigurumi, this FREE pattern is a fantastic addition to your lineup.
Designed for intermediate crocheters, this pattern allows for customization in outfit details, facial expressions, and even tiny accessories to enhance Donald’s personality. Choose classic blue and white for an authentic look or experiment with fun colors for a unique twist! Whether displayed alongside other Disney characters or gifted to a fellow crochet enthusiast, this amigurumi Donald Duck is sure to impress. Grab your hook, select your favorite yarn, and let’s bring this feisty duck to life—one stitch at a time! 🦆✨🧶

🦆 Amigurumi Donald Duck Crochet Pattern
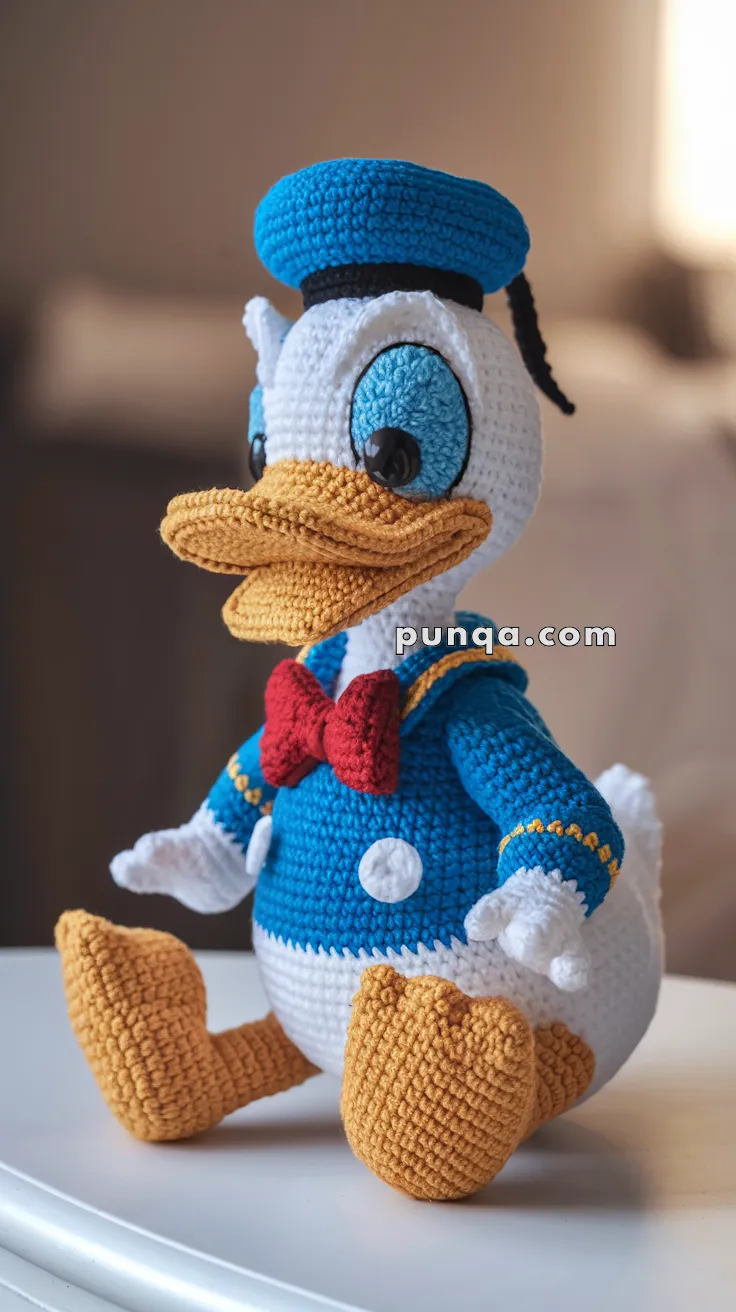
Bring classic sailor style to your crochet collection with this expressive duck amigurumi. With his oversized white head, enormous blue eyes, broad layered golden beak, rounded sailor cap, blue jacket, red bow tie, white gloves, plump body, and large webbed feet, this seated character is full of cheerful personality. 💙🎀
The pattern uses separate facial layers to create the prominent eyes and flattened beak. The body is shaped into a stable sitting pose, with short legs, oversized feet, forward-facing arms, and a small feathered tail at the back.
✨ Skill Level
Advanced
This pattern includes:
- Large-scale amigurumi shaping
- Dimensional eye construction
- A two-layer flattened beak
- Color changes
- Separate fingers and glove cuffs
- Oversized webbed feet
- Sailor jacket and collar details
- Rounded tam-style hat
- Embroidery and surface decoration
- Careful pose-based assembly
📏 Finished Size
Using DK-weight cotton yarn and a 2.75–3 mm crochet hook, the finished doll measures approximately:
- 29–32 cm (11½–12½ in) tall while seated
- 20–22 cm (8–8¾ in) wide across the feet
- 18–20 cm (7–8 in) from the front of the beak to the back of the head
The finished measurements may vary with yarn, hook size, tension, and stuffing.
🧶 Yarn Requirements
Use smooth DK cotton or a cotton-blend yarn for firm shaping and clear stitch definition.
- 🤍 White — 180–210 g
- 💙 Bright royal blue — 115–135 g
- 💛 Golden yellow or warm mustard — 100–120 g
- ❤️ Red — 20–25 g
- 🖤 Black — 15–20 g
- 🩵 Light blue — 20–25 g
Polyester fiberfill — approximately 300–380 g
🧵 Materials
- 2.75–3 mm crochet hook
- Two 12–14 mm black safety eyes, optional
- Polyester fiberfill
- Tapestry needle
- Fine embroidery needle
- Stitch markers
- Pins for positioning
- Scissors
- Optional plastic pellets for sitting stability
- Optional plastic canvas for reinforcing the feet
- Black embroidery thread
- Yellow embroidery thread for jacket trim
Safety eyes and small detachable parts are not suitable for children under three years old. Use embroidered pupils and sew all decorative pieces securely when making the doll as a young child’s toy.
🔤 Abbreviations — US Terms
- MR — Magic Ring
- sc — Single Crochet
- inc — Increase: 2 sc in the same stitch
- dec — Invisible Decrease
- sl st — Slip Stitch
- ch — Chain
- hdc — Half Double Crochet
- dc — Double Crochet
- BLO — Back Loop Only
- FLO — Front Loop Only
- FO — Fasten Off
Work in continuous rounds unless instructed otherwise.
🧠 Head
The head is large, smooth, and almost spherical, with enough width for the oversized eyes and broad beak.
Using white yarn:
R1
MR 6. (6)
R2
inc ×6. (12)
R3
(1 sc, inc) ×6. (18)
R4
(2 sc, inc) ×6. (24)
R5
(3 sc, inc) ×6. (30)
R6
(4 sc, inc) ×6. (36)
R7
(5 sc, inc) ×6. (42)
R8
(6 sc, inc) ×6. (48)
R9
(7 sc, inc) ×6. (54)
R10
(8 sc, inc) ×6. (60)
R11–23
sc around. (60)
Do not insert the eyes directly into the head. They will be fitted through the separate eye pieces.
R24
(8 sc, dec) ×6. (54)
R25
(7 sc, dec) ×6. (48)
R26
(6 sc, dec) ×6. (42)
Begin stuffing firmly.
R27
(5 sc, dec) ×6. (36)
R28
(4 sc, dec) ×6. (30)
Continue stuffing, keeping the front smooth and the sides full.
R29
(3 sc, dec) ×6. (24)
R30
(2 sc, dec) ×6. (18)
R31
(1 sc, dec) ×6. (12)
R32
dec ×6. (6)
FO and close.
Gently shape the head into a broad sphere. Press the eye area only very lightly so the separate eye pieces sit evenly.
👀 White Eye Sockets — Make 2
The white eye sockets are thick vertical ovals that project slightly from the face.
Using white yarn:
R1
Ch 10.
Starting in the second chain:
8 sc, 3 sc in the last chain.
Continue along the opposite side:
7 sc, inc. (20)
R2
inc, 7 sc, 3 inc, 7 sc, 2 inc. (26)
R3
sc around. (26)
R4
(11 sc, inc) ×2. (28)
R5–6
sc around. (28)
R7
(5 sc, dec) ×4. (24)
Lightly stuff.
FO, leaving a long sewing tail.
Flatten the back opening slightly while keeping the front rounded.
🩵 Blue Irises — Make 2
The blue irises cover most of the visible white sockets.
Using light-blue yarn:
R1
Ch 7.
Starting in the second chain:
5 sc, 3 sc in the last chain.
Continue along the opposite side:
4 sc, inc. (14)
R2
inc, 4 sc, 3 inc, 4 sc, 2 inc. (20)
R3
sc around. (20)
FO, leaving a sewing tail.
Flatten each oval.
🖤 Pupils — Make 2
Using black yarn:
R1
MR 6. (6)
R2
inc ×6. (12)
FO.
Alternatively, insert one safety eye through each blue iris before attaching it to the white socket.
Position each pupil toward the lower inner side of its iris. This creates the wide-eyed, slightly cross-focused expression.
Add one small white embroidery stitch to each pupil for a highlight if desired.
👁️ Black Eye Outlines
Using black embroidery yarn, work a neat outline around the edge of each blue iris.
Do not completely cover the white eye socket. A narrow white border should remain visible around the blue.
🪡 Assembling the Eyes
Sew one blue iris to the front of each white socket.
Place the eyes close together on the upper front of the head.
Their inner edges should almost touch, while the upper edges sit beneath the future hat brim.
Angle the lower ends slightly inward.
Pin both eyes before sewing. Attach firmly around the back edge of each white socket.
🖤 Eyebrows
Using black yarn or embroidery thread, stitch one narrow curved eyebrow above each eye.
Keep the eyebrows mostly hidden beneath the hat, with only the outer ends visible.
💛 Upper Beak
The upper beak is broad, flat, and gently curved. It projects clearly beyond the sides of the face.
Using golden-yellow yarn:
R1
Ch 17.
Starting in the second chain:
15 sc, 3 sc in the final chain.
Continue along the opposite side:
14 sc, inc. (34)
R2
inc, 14 sc, 3 inc, 14 sc, 2 inc. (40)
R3
sc around. (40)
R4
inc, 18 sc, inc, 19 sc. (42)
R5–7
sc around. (42)
R8
(5 sc, dec) ×6. (36)
Lightly stuff, concentrating the stuffing near the center and leaving the outer edges flatter.
FO, leaving a long sewing tail.
Flatten the piece into a wide oval. Curve the outer corners slightly upward.
💛 Lower Beak
The lower beak is slightly narrower and hangs beneath the upper piece.
Using golden-yellow yarn:
R1
Ch 14.
Starting in the second chain:
12 sc, 3 sc in the final chain.
Continue along the opposite side:
11 sc, inc. (28)
R2
inc, 11 sc, 3 inc, 11 sc, 2 inc. (34)
R3–5
sc around. (34)
R6
(15 sc, dec) ×2. (32)
Lightly stuff.
FO, leaving a long sewing tail.
Flatten the lower beak and shape its front edge into a soft downward curve.
🪡 Attaching the Beak
Position the lower beak first, centered beneath the eyes.
Its back edge should sit low on the face and its front edge should project forward.
Sew only around the back and side edges.
Place the upper beak above it, overlapping the lower piece by approximately one round.
The upper beak should extend slightly farther forward and wider at both sides.
Sew securely around the back edge and outer corners.
Using dark-brown or black embroidery thread, add a thin mouth line between the two layers.
🦆 Body
The body is a large egg shape with a white lower section and blue sailor jacket across the upper torso.
Begin with white yarn:
R1
MR 6. (6)
R2
inc ×6. (12)
R3
(1 sc, inc) ×6. (18)
R4
(2 sc, inc) ×6. (24)
R5
(3 sc, inc) ×6. (30)
R6
(4 sc, inc) ×6. (36)
R7
(5 sc, inc) ×6. (42)
R8
(6 sc, inc) ×6. (48)
R9
(7 sc, inc) ×6. (54)
R10–19
sc around. (54)
Begin stuffing firmly.
Switch to royal blue.
R20–29
sc around. (54)
R30
(7 sc, dec) ×6. (48)
R31–32
sc around. (48)
R33
(6 sc, dec) ×6. (42)
R34–35
sc around. (42)
R36
(5 sc, dec) ×6. (36)
R37
(4 sc, dec) ×6. (30)
Finish stuffing firmly, concentrating additional stuffing in the white lower belly.
R38
(3 sc, dec) ×6. (24)
FO, leaving a long tail for attaching the head.
The blue section should cover approximately the upper half of the body, while the rounded white belly remains clearly visible below it.
💙 Sailor Collar
The collar sits around the neck and extends slightly across the shoulders.
Using royal-blue yarn:
R1
Ch 35.
Starting in the second chain, sc across. (34)
R2–4
Ch 1, turn, sc across. (34)
FO.
Wrap the strip around the upper body beneath the head.
Overlap the ends slightly at the front and sew them down.
💛 Collar Piping
Using golden-yellow yarn, surface-crochet or embroider one narrow line along the visible outer edge of the blue collar.
Keep the line thin and even.
🤍 Shirt Buttons — Make 2
Using white yarn:
R1
MR 8.
Join with a sl st and FO.
Flatten each circle.
Sew the buttons vertically down the center front of the blue jacket.
🎀 Red Bow Tie
The bow tie is large and sits directly beneath the beak.
Using red yarn:
Main Bow
Ch 17.
Starting in the second chain, sc across. (16)
Rows 2–6
Ch 1, turn, sc across. (16)
FO.
Fold both short ends toward the center and sew them together.
Wrap red yarn firmly around the center several times.
Center Band
Ch 6.
Starting in the second chain, sc across. (5)
Wrap the strip around the center of the bow and sew it closed at the back.
Attach the bow beneath the beak, centered over the upper jacket.
💪 Sleeves — Make 2
Using royal-blue yarn:
R1
MR 6. (6)
R2
inc ×6. (12)
R3
(1 sc, inc) ×6. (18)
R4–13
sc around. (18)
R14
(4 sc, dec) ×3. (15)
R15–17
sc around. (15)
Stuff lightly.
Flatten the shoulder opening.
FO, leaving a long sewing tail.
💛 Sleeve Trim
Using golden-yellow embroidery yarn, add one narrow decorative line around each sleeve approximately two rounds above the wrist.
Small evenly spaced surface stitches create the dotted piping effect.
🤍 Glove Cuffs — Make 2
Using white yarn:
Ch enough stitches to fit around the sleeve opening, approximately 18–20 chains.
Join without twisting.
R1–2
sc around.
FO.
Slide one cuff over each sleeve end and sew securely.
🤍 Glove Palms — Make 2
Using white yarn:
R1
MR 6. (6)
R2
inc ×6. (12)
R3
(1 sc, inc) ×6. (18)
R4–6
sc around. (18)
R7
(4 sc, dec) ×3. (15)
R8
sc around. (15)
Lightly stuff.
FO, leaving a sewing tail.
🤍 Glove Fingers — Make 6
Each glove has three rounded fingers.
Using white yarn:
R1
MR 5. (5)
R2–4
sc around. (5)
FO.
Lightly stuff only if possible.
Sew three fingers side by side to the end of each palm.
Fan them slightly apart.
👍 Glove Thumbs — Make 2
Using white yarn:
R1
MR 5. (5)
R2–3
sc around. (5)
FO.
Sew one thumb to the inner side of each glove.
Attach each completed glove to a sleeve, hiding the join beneath the cuff.
🦵 Legs — Make 2
The legs are short and mostly hidden behind the oversized feet.
Using golden-yellow yarn:
R1
MR 6. (6)
R2
inc ×6. (12)
R3
(1 sc, inc) ×6. (18)
R4–8
sc around. (18)
Stuff firmly.
Flatten the upper opening.
FO, leaving a long sewing tail.
🦶 Large Webbed Feet — Make 2
The feet are broad, flattened ovals with three clearly shaped toe sections.
Using golden-yellow yarn:
R1
Ch 11.
Starting in the second chain:
9 sc, 3 sc in the final chain.
Continue along the opposite side:
8 sc, inc. (22)
R2
inc, 8 sc, 3 inc, 8 sc, 2 inc. (28)
R3
(3 sc, inc) ×7. (35)
R4
(4 sc, inc) ×7. (42)
R5–8
sc around. (42)
R9
(5 sc, dec) ×6. (36)
R10
(4 sc, dec) ×6. (30)
Stuff firmly, keeping the foot broad and slightly flat.
R11
(3 sc, dec) ×6. (24)
FO, leaving a long tail.
Flatten the upper attachment area while keeping the toe end rounded.
🪡 Toe Shaping
Using matching golden-yellow yarn, make two long sculpting stitches across the front of each foot.
Pull each stitch gently to divide the front into three rounded webbed toes.
Do not pull so tightly that the stuffing shows.
For a more pronounced shape, add a small pinch stitch at the top of each division.
🐥 Tail Feathers
The tail is made from three white feather pieces.
Center Feather
Using white yarn:
R1
MR 6. (6)
R2
inc ×6. (12)
R3–6
sc around. (12)
R7
(1 sc, dec) ×4. (8)
FO.
Side Feathers — Make 2
Using white yarn:
R1
MR 5. (5)
R2
inc ×5. (10)
R3–5
sc around. (10)
R6
dec ×5. (5)
FO.
Lightly stuff each feather.
Sew the three pieces together at their bases and attach them to the lower back of the body, with the center feather pointing upward.
🎩 Rounded Sailor Hat
The hat is a broad, flattened tam rather than a tall cylindrical cap.
Using royal-blue yarn:
R1
MR 6. (6)
R2
inc ×6. (12)
R3
(1 sc, inc) ×6. (18)
R4
(2 sc, inc) ×6. (24)
R5
(3 sc, inc) ×6. (30)
R6
(4 sc, inc) ×6. (36)
R7
(5 sc, inc) ×6. (42)
R8
(6 sc, inc) ×6. (48)
R9
(7 sc, inc) ×6. (54)
R10–12
sc around. (54)
R13
(7 sc, dec) ×6. (48)
R14
(6 sc, dec) ×6. (42)
R15
BLO sc around. (42)
Switch to black.
R16–18
sc around. (42)
FO, leaving a long sewing tail.
Stuff the blue crown very lightly, concentrating the stuffing around the outer edge.
Flatten the top gently to create a wide rounded sailor cap.
🖤 Hat Ribbon Tails
Using black yarn:
Long Tail
Ch 18.
Starting in the second chain, sl st across.
FO.
Short Tail
Ch 14.
Starting in the second chain, sl st across.
FO.
Sew both tails to the back of the black hat band.
Allow them to hang down one side of the head.
🪡 Main Assembly
Attach the Head
Center the head on the upper body.
Add extra stuffing between the pieces if necessary.
Sew firmly around the body opening several times.
The head should sit upright with a slight forward tilt.
Attach the Arms
Position the sleeves high on the blue upper body.
Angle one arm downward and slightly forward.
Bend or position the other arm so the hand rests near the side of the body.
Sew securely around each flattened shoulder opening.
Attach the Legs
Sew the short legs beneath the lower front body.
Leave enough room between them for the feet to sit naturally.
Attach the Feet
Sew each foot to the end of a leg.
Angle the feet outward and forward.
The toes should face the viewer while the flattened soles rest against the display surface.
Attach the Tail
Sew the tail-feather cluster to the lower back.
Keep the feathers visible beside the body from a side view.
Attach the Hat
Position the hat high on the crown, with the blue top tilted slightly to one side.
The black band should sit close to the upper edge of the eyes without covering them.
Sew the black band securely to the head at several points.
Add the Bow Tie and Buttons
Center the bow beneath the beak.
Place the two white buttons vertically on the blue jacket.
Check that all pieces align with the center of the face and body.
✨ Final Shaping
- Keep the head large and very round.
- Position the eyes close together and high on the face.
- Angle the irises slightly inward.
- Flatten the beak without crushing its curved edges.
- Keep the upper beak wider than the lower beak.
- Make the blue jacket clearly visible above the white belly.
- Turn the gloves slightly outward.
- Spread the three fingers on each glove.
- Angle the feet forward and slightly apart.
- Keep the sailor hat wide, rounded, and lightly tilted.
- Arrange the ribbon tails down one side of the head.
- Check that the doll sits securely without leaning backward.
💡 Stability Tips
- Add a small pouch of plastic pellets to the lower body before stuffing.
- Insert plastic-canvas ovals into the feet for flatter soles.
- Stuff the white lower body more firmly than the upper jacket.
- Reinforce the head-to-body seam several times.
- Add hidden tacking stitches between the feet and lower body if necessary.
- Avoid overstuffing the hat or beak.
🧼 Care Instructions
Spot clean gently with a damp cloth.
Allow the doll to air dry completely.
Avoid machine washing when safety eyes, plastic canvas, pellets, or other rigid supports are used.
Store the doll upright and avoid placing pressure on the beak, eyes, hat, or fingers.
🌟 Final Thoughts
Your sailor duck amigurumi is ready to bring classic cartoon charm to your handmade collection. 🦆💙
With his oversized eyes, broad layered beak, rounded blue cap, black ribbon, bright red bow tie, fitted sailor jacket, white gloves, plump belly, feathered tail, and enormous golden feet, this expressive seated character is full of personality from every angle.
Happy Crocheting! 🧶✨