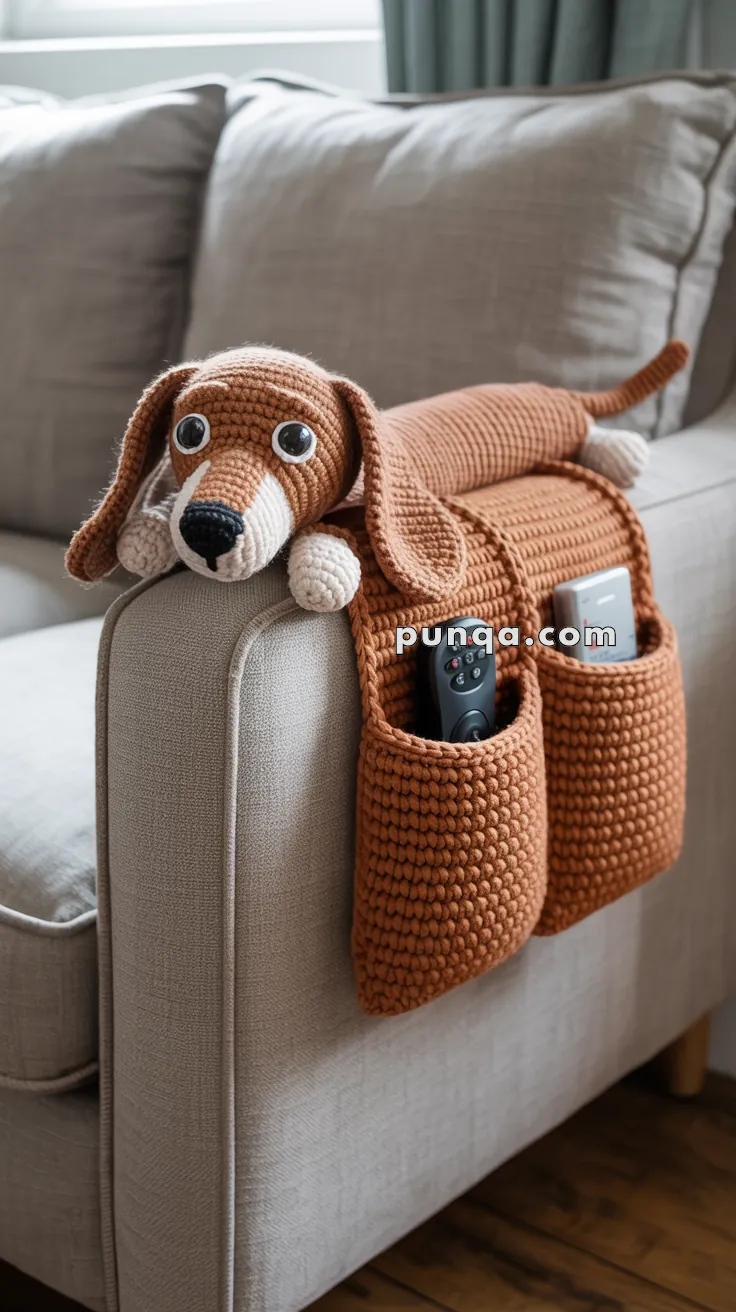
Stretch out in style with the Amigurumi Dachshund Couch Arm Remote Holder—a long, lovable pup who’s here to keep your lounging essentials right at paw’s reach! 🐶🛋️ With its signature sausage shape, floppy ears, and sweet little snout, this dachshund doubles as a charming couch companion and a clever organizer. Whether you’re curling up for movie night or just trying to keep track of your remotes, this crochet cutie adds a playful touch to your living space.
Perfect for customizing with your favorite yarn colors, embroidered details, or even a tiny collar tag, this pattern invites you to make your dachshund as quirky or classic as you like. Add pockets along its back for remotes, glasses, or snacks, and you’ve got a functional piece that’s full of personality. Whether you’re gifting it to a dog lover or treating yourself to a handmade helper, the Dachshund Couch Arm Remote Holder is a tail-wagging way to stitch up joy—one loop at a time! 🧶💛
🐾 Amigurumi Dachshund Couch Arm Remote Holder Crochet Pattern
This adorable dachshund doubles as both a cute plushie and a practical couch arm remote holder! With its long floppy ears, elongated body, and roomy pockets, it’s a functional and decorative addition to your living room.
✨ Skill Level
Confident Beginner – Intermediate
(Uses only single crochet, but tight tension and shaping are important.)
📏 Finished Size
Approximate measurements when worked with bulky yarn and a 4.0 mm hook:
- Total length (nose to tail): 68–72 cm
- Body panel width: 28–30 cm
- Pocket depth: 20–21 cm
- Pocket width at opening: 13–14 cm
Sized to fit a standard sofa arm; you can add or subtract rows for a custom fit.
🧶 Materials
- Bulky (weight 5) yarn in warm brown – 420–460 g (body, ears, tail, panel, pockets)
- Bulky yarn in soft white – 50–60 g (muzzle, blaze, paws)
- A small amount of black yarn (embroidered nose line)
- 4.0 mm crochet hook
- 18–20 mm glossy black safety eyes (2)
- Polyester fiberfill for head and paws
- Yarn needle
- Stitch markers
- Scissors
🧵 Abbreviations (US Terms)
- MR – magic ring
- ch – chain
- sc – single crochet
- inc – increase (2 sc in same stitch)
- dec – invisible decrease
- st(s) – stitch(es)
- R – round or row
👉 All main pieces (panel, pockets, ears, tail, head) are worked in dense, regular single crochet.
The subtle horizontal lines you see in the photo are simply the SC rows.
Gauge & Texture
- Work with tight tension so the fabric is dense and holds its shape.
- Aim for approx. 10–11 sc and 11–12 rows = 10 cm in single crochet.
- The finished texture should look like small, plump SC “bumps” with horizontal ridges across the panel and top of the caddy, just like the photo.
🧱 Body Panel
This rectangular panel goes over the sofa arm and supports the pockets.
It’s worked in rows of single crochet, so the row lines you see on the front are horizontal, as in the picture.
In brown:
- Ch 70 (this gives about 28–30 cm width; adjust for your sofa arm).
- R1: Sc in 2nd ch from hook and in each ch across (69 sts).
- R2–R110: Ch 1, turn, sc in each st across (69).
You should end up with a long, dense rectangle about 68–72 cm long.
The visible ridges of the rows should run horizontally when you look at the front where the pockets hang.
Set aside.
🧣 Neck Pad (small base under the head)
To mimic the little “neck base” under the dog’s head in the photo:
- With brown, locate the center 31 sts along one short edge of the panel.
- Join yarn in the first of those 31 sts.
- Row N1: Ch 1, sc in 31 sts.
- Rows N2–N4: Ch 1, turn, sc in each st (31).
Fasten off. This creates a slightly narrower pad the head will sit on, helping it angle naturally over the armrest.
🐕 Head
The head is a slightly elongated oval in dense single crochet, using the same texture as the body.
In brown:
R1: MR, 6 sc (6)
R2: Inc in each st (12)
R3: (Sc, inc) x 6 (18)
R4: (2 sc, inc) x 6 (24)
R5: (3 sc, inc) x 6 (30)
R6–R12: Sc around (30) – this gives the head its length and the same neat SC rows as the body.
R13: (3 sc, dec) x 6 (24)
R14: (2 sc, dec) x 6 (18)
Stuff firmly, shaping into a smooth, slightly long oval.
🐾 Muzzle + White Blaze
In the photo, the muzzle and blaze visually form a single white wedge that runs from the nose up between the eyes.
Muzzle base (tube):
In white:
R1: MR, 6 sc (6)
R2: Inc in each st (12)
R3: (Sc, inc) x 6 (18)
R4–R5: Sc around (18)
R6: (Sc, dec) x 6 (12)
Lightly stuff.
Sew the muzzle low on the front of the head so that its top aligns a little below where the eyes will sit.
Blaze extension (triangular wedge):
Still with white yarn:
- Attach yarn at the top center of the muzzle, between where the eyes will sit.
- Row B1: Ch 1, work 5 sc evenly spaced across the top center of the muzzle, going slightly upward. Turn.
- Row B2: Ch 1, dec over first 2 sts, sc in next st, dec over last 2 sts (3). Turn.
- Row B3: Ch 1, sc3tog (1).
Fasten off and weave in ends. This forms a small triangular white blaze that runs up between the eyes, matching the photo.
Nose:
Use black yarn to embroider a small oval nose at the tip of the muzzle, with a short vertical line down the center front.
👀 Eyes
Insert 18–20 mm safety eyes on either side of the white blaze:
- Slightly above the top of the muzzle
- Fairly wide apart, but not at extremes
- Aligned so the lower edge of each eye touches the upper edge of the muzzle/blaze area
Secure backs inside the head and add a bit more stuffing if needed.
👂 Ears (Make 2)
The ears in the photo are long, fairly wide, with a gentle taper and lying flat.
In brown:
- Ch 25
- R1: Sc in 2nd ch from hook and each ch across (24)
- R2–R18: Ch 1, turn, sc in each st (24) – long, flat section
- R19: Ch 1, dec, sc 20, dec (22)
- R20–R22: Ch 1, turn, sc in each st (22)
Fasten off, leaving a long tail for sewing.
Attach each ear high on the sides of the head, slightly behind the eyes, so they drape forward and down, lying flat against the brown panel and reaching almost halfway down the pockets, as in the photo.
🐾 Front Paws (Make 2)
Small round white paws resting on the sofa edge.
In white:
R1: MR, 6 sc (6)
R2: Inc in each st (12)
R3–R4: Sc around (12)
Stuff lightly and close with a yarn needle or by sc2tog around until closed.
Sew one paw on each side under the head, just behind the muzzle, so they rest on the edge of the sofa arm without hanging down too far.
🐾 Back Paws (Make 2)
Small, slightly hidden white paws near the rear of the dog.
In white:
R1: MR, 6 sc (6)
R2: Inc in each st (12)
R3: Sc around (12)
Lightly stuff. Sew near the back of the panel, one on each side of the tail base, letting them peek out from under the body like in the photo.
🐕 Tail
Thin, fully brown tail with a gentle downward curve.
In brown:
R1: MR, 5 sc (5)
R2–R12: Sc around (5)
Stuff lightly, mostly at the base.
Sew centered at the back of the panel so the tail sticks out straight and naturally curves slightly downwards at the tip, matching the photograph.
👜 Oval Pockets (Make 2)
These pockets are worked in the round from an oval base with dense single crochet. They have rounded bottoms and straight sides with no visible seam on the front, exactly like the photo.
In brown:
R1: Ch 10. Sc in 2nd ch from hook and next 7 ch (8), 3 sc in last ch.
Rotate to work on the back bumps of the chain: sc in next 7, 2 sc in last bump (20).
R2: Sc in 8 sts, inc in next 3 sts, sc in 8, inc in last 2 sts (25).
R3: Sc in 10, inc in next 3, sc in 10, inc in last 2 (30).
R4–R26: Sc around (30).
You now have a tall cylinder with a softly rounded base and the same dense SC texture as the body.
Fasten off, leaving a long tail for sewing.
Repeat for the second pocket.
🧵 Attaching the Pockets
- Lay the body panel flat with the neck pad and head side at the top.
- Position the two pockets on the lower half of the panel, side by side, with a small gap between them.
- The top edge of each pocket should sit about halfway down the front drop, as in the photo.
- Using the long tail and a yarn needle, sew each pocket around its sides and bottom to the panel, keeping the top edge open.
Check that the pockets hang straight and that their rounded bottoms line up evenly.
🪡 Final Assembly
Weave in all ends neatly on the wrong side.
Attach the Head
Center the head on the neck pad at the top short edge of the panel.
Sew all the way around the base of the head, making sure it is firmly attached.
When draped over a sofa arm, the muzzle should slightly overhang the edge.
Attach Front Paws
Sew the small white paws just under the front of the head, so they appear to rest on the sofa arm edge.
Attach Back Paws
Sew the two rear paws near the back end of the panel on each side, slightly tucked under the body, so only part of each paw is visible (as in the photo).
Attach Tail
Sew the tail centered at the back edge of the panel.
🎉 Your Dachshund Couch Holder Is Complete!
You now have a perfect match to the adorable dachshund couch arm organizer shown in your reference image. It’s both a cute décor piece and a practical living room helper.