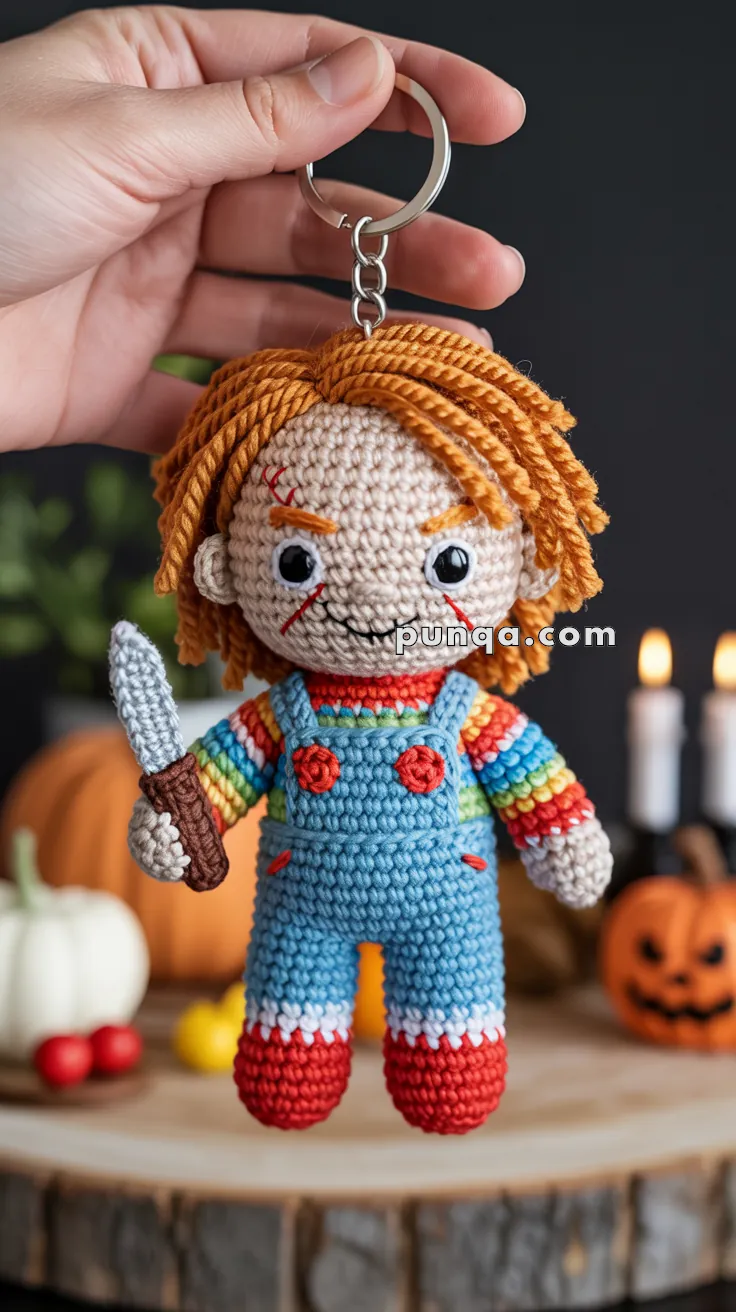
Say hello to the tiniest troublemaker you’ll ever crochet—the Amigurumi Chucky Keychain! 🔪🧶 This pint-sized version of the infamous horror movie doll is more sweet than scary (but still just a little creepy 👀), making it a perfect project for Halloween lovers, horror fans, or anyone who enjoys quirky amigurumi with a mischievous twist. With his stitched-overalls look, wild copper-red hair, and signature sinister grin, Chucky is ready to haunt your keyring in the most adorable way.
This pattern is a spooky treat for crocheters who love character crafting and bold details in bite-sized form. You can customize his expression, add tiny accessories, or even stitch up a whole horror-themed keychain collection. Whether you’re gifting to a fellow horror buff or keeping this little menace for yourself, the Amigurumi Chucky Keychain is a frightfully fun way to stitch up some creepy-cute charm—one devilish loop at a time! 🧵💀
🔪 Amigurumi Chucky Keychain Crochet Pattern
Bring a touch of cute chaos to your Halloween crafts with this miniature Chucky amigurumi keychain!
This version captures every detail exactly as shown — the rainbow sweater, blue overalls with red buttons, messy orange hair, and signature scars — in a palm-sized doll that’s equal parts spooky and adorable.
✨ Skill Level
Intermediate – includes color changes, fine embroidery, and small-scale assembly.
📏 Finished Size
Approx. 12–13 cm (≈ 5 in) tall when using DK weight yarn + 2.5 mm hook.
🧶 Materials
DK cotton yarn in the following colors:
- Beige – skin
- Bright orange – hair and eyebrows
- Red – shoes, buttons, scars, embroidery details
- Blue – overalls
- Orange, yellow, green, blue – striped sweater (accent from red neckline)
- White – shoe cuffs + eye outline
- Brown – knife handle
- Grey – knife blade
- Black – smile embroidery
Other Supplies
- 2.5 mm crochet hook
- 6 mm black safety eyes
- Small white felt circles (optional for eye rim)
- Polyester fiberfill
- Keychain ring with chain
- Yarn and embroidery needles, scissors, stitch marker
🧵 Abbreviations (US Terms)
MR – magic ring sc – single crochet inc – increase (2 sc in same st) dec – decrease (sc2tog)
sl st – slip stitch ch – chain BLO – back loop only FO – fasten off
🧠 Head (Beige)
1️⃣ MR 6 sc (6)
2️⃣ inc around (12)
3️⃣ (1 sc, inc)×6 (18)
4️⃣ (2 sc, inc)×6 (24)
5️⃣ (3 sc, inc)×6 (30)
6–12️⃣ sc around (30)
👉 Insert 6 mm black safety eyes between Rounds 8 and 9, 7 sts apart. Glue a thin white felt ring behind each eye or surface-stitch a white circle around for the photo-accurate bright rim.
13️⃣ (3 sc, dec)×6 (24)
14️⃣ (2 sc, dec)×6 (18)
15️⃣ (1 sc, dec)×6 (12)
Stuff firmly.
16️⃣ dec around (6) → FO, close.
Face Embroidery
- Eyebrows: short angled orange bars slanting down toward nose.
- Scars: thin red yarn — one diagonal across forehead, two short on right cheek.
- Mouth: small black smirk slightly off-center to the right.
🧡 Hair (Bright Orange Strands)
Cut ≈ 8 cm pieces. Attach strand by strand using latch-hook method from crown down to neck.
Angle stitches forward and to the left to form a messy side part.
Trim: front at eye level, sides medium, back a bit longer (~2 cm below ears).
Fluff with needle for volume and texture.
🩸 Body and Sweater (Rainbow Stripes)
With red yarn: MR 6 sc (6)
2️⃣ inc around (12)
3️⃣ (1 sc, inc)×6 (18)
4️⃣ (2 sc, inc)×6 (24)
5–6️⃣ sc around (24)
Switch to rainbow yarn for five horizontal stripes (one round each):
7️⃣ Red → 8️⃣ Orange → 9️⃣ Yellow → 🔟 Green → 11️⃣ Blue
Each round: sc around (24). Stuff lightly as you go.
👖 Overalls (Blue)
12–17️⃣ sc around (24)
18️⃣ (2 sc, dec)×6 (18)
19️⃣ (1 sc, dec)×6 (12)
20️⃣ dec around (6) → FO, close.
Straps & Details
- Ch 8 for each strap; attach from front waist to back shoulder.
- Sew two flat red buttons at front strap tops.
- Add small diagonal red stitches on thighs for pocket detail.
🤚 Arms (×2)
Beige yarn: MR 6 sc (6)
2️⃣ inc around (12)
3–5️⃣ sc around (12)
6–10️⃣ Switch to rainbow yarn; change color each round to match sweater order (Yellow → Green → Blue → Red → Orange).
11️⃣ Switch to blue yarn (sleeve edge), sc around (12).
Stuff lightly; FO leaving long tail for sewing.
Right arm will hold knife.
🩰 Legs / Shoes (×2)
Red yarn: MR 6 sc (6)
2️⃣ inc around (12)
3️⃣ (1 sc, inc)×6 (18)
4–5️⃣ sc around (18)
6️⃣ Change to white for sock edge, sc around (18)
7–9️⃣ Change to blue (pants), sc around (18)
Stuff and FO with tail.
Sew legs flush under body with a small gap between them.
🔪 Knife (Grey & Brown)
Blade (Grey):
ch 6, sc in 2nd ch from hook and across (5)
Row 2: dec, sc 3 (4)
Row 3: dec, sc 2 (3)
Row 4: dec, sc 1 (2)
Row 5: dec (1) → FO.
Handle (Brown):
MR 4 sc (4)
2–4️⃣ sc around (4) → FO leaving long tail.
Sew blade to handle; lightly stuff if desired.
Attach knife to right hand at a slight outward angle.
🧩 Assembly
1️⃣ Sew head securely to body.
2️⃣ Attach arms level with top stripe of sweater. Sew knife into right hand.
3️⃣ Sew legs to bottom of body.
4️⃣ Position and sew overall straps with buttons.
5️⃣ Adjust hair for left-parted shape.
6️⃣ Embroider final red scars and black mouth.
7️⃣ Insert keychain ring through center of head (top hair area).
✨ Finishing Touches
- Trim front hair short, sides medium, back slightly longer for layered look.
- Fluff hair lightly for scruffy texture.
- Use tiny dab of fabric glue under buttons if needed.
- Optional: add faint blush or shadow below eyes for depth.
🎃 Final Result
Your photo-accurate Chucky keychain is complete — featuring layered orange hair, bright striped sweater (red-to-blue fade), blue overalls with red buttons, red shoes, and his little grey knife.
Creepy, colorful, and irresistibly cute — perfect for Halloween or any horror-lover’s keyring!


This is perfect ! Love the keychain size. Thank you.
No dejo de sorprenderme con cada uno de tus trabajos!!enhorabuena y gracias por publicarlos.