Welcome to the world of artistic craftsmanship and cultural heritage! ✨ Today, I’m excited to share my crochet pattern for the Christ The Redeemer Statue—a stunning and symbolic creation inspired by one of the most iconic landmarks in the world. Whether you enjoy crafting architectural designs, celebrating meaningful religious symbols, or simply want to add a remarkable statue to your handmade collection, this pattern will guide you through creating a beautifully sculpted piece with elegant shaping, intricate details, and a touch of reverence. 🏞️
This design embraces structured forms, soft textures, and careful detailing to bring a sense of grandeur and serenity to your crochet projects! 🧶🌟 I’ve carefully outlined each step to ensure your Amigurumi Christ The Redeemer Statue turns out just right—ready to stand proudly in your collection or become a treasured handmade gift! 🎁 So grab your hooks, pick out classic stone hues or artistic pastel tones, and let’s stitch up a meaningful and inspiring crochet masterpiece! ✨
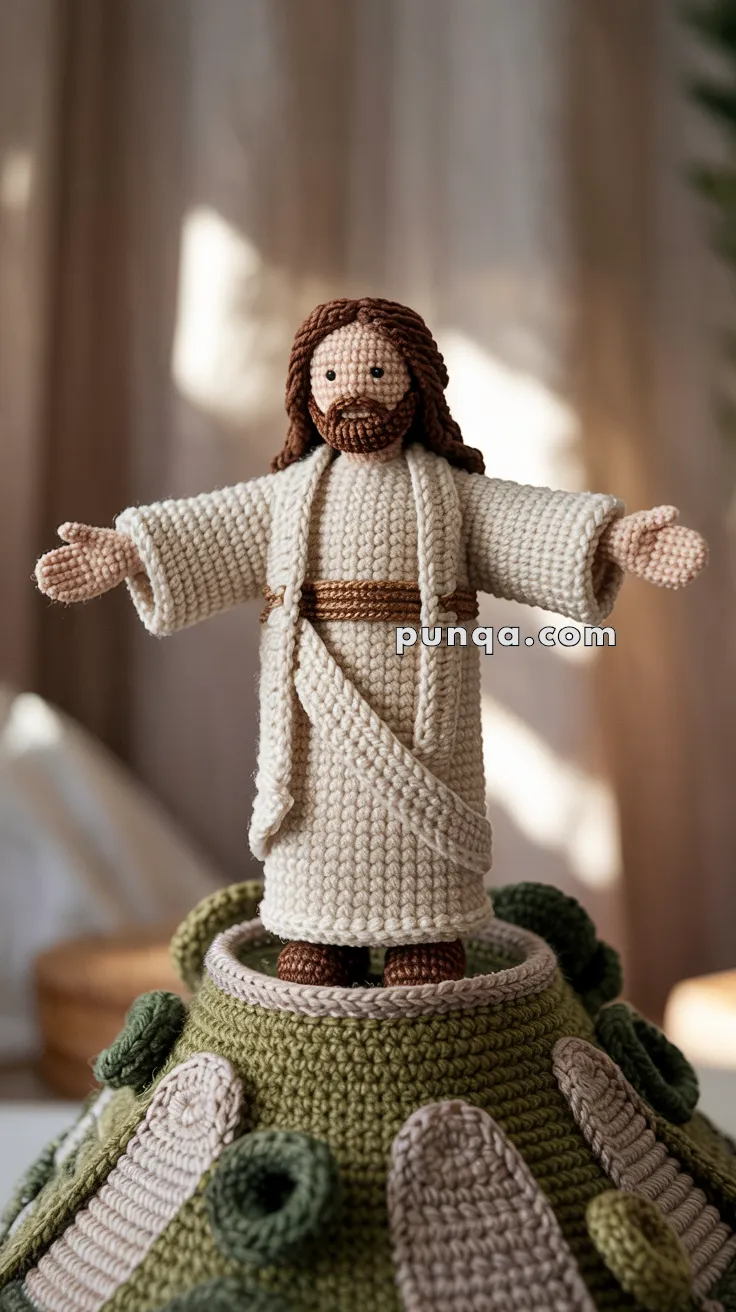
✝️ Amigurumi Jesus Crochet Pattern (with Mount Base)
Create a peaceful and heartfelt piece of art with this Amigurumi Jesus Crochet Pattern.
Standing with open arms, robed in flowing cream fabric and a brown belt, this figure symbolizes serenity, love, and grace.
Perfect for Easter, nativity scenes, or year-round spiritual décor, it’s a touching handmade expression of faith.
✨ Skill Level
Intermediate – shaping, draped garment assembly, textured base, and simple embroidery.
📏 Finished Size
- 9–10 inches (23–25 cm) tall, including mount base
- Worked with DK or light worsted yarn and a 2.5–3 mm crochet hook
🧶 Materials Needed
Yarn (DK or Light Worsted Weight):
- Beige or light cream – robe and skin tone
- Brown – hair, beard, belt, and feet
- Olive, moss, and tan – mount base details
Tools & Supplies:
- Crochet hook (2.5–3 mm)
- 6 mm safety eyes or black embroidery thread
- Yarn needle and stitch markers
- Fiberfill stuffing
- Optional: hot glue or stiffener for base stability
🪡 Abbreviations (US Terms)
MR – Magic Ring
sc – Single Crochet
inc – Increase (2 sc in same stitch)
dec – Decrease (sc2tog)
ch – Chain
sl st – Slip Stitch
BLO / FLO – Back / Front Loop Only
FO – Fasten Off
👤 Head
With beige yarn:
- MR 6 sc [6]
- inc ×6 [12]
- (1 sc, inc) ×6 [18]
- (2 sc, inc) ×6 [24]
- (3 sc, inc) ×6 [30]
6–12. sc around [30] - (3 sc, dec) ×6 [24]
- (2 sc, dec) ×6 [18]
- (1 sc, dec) ×6 [12]
- dec ×6 [6]; FO and close.
Stuff firmly.
Attach safety eyes between R6–7, spaced about 7–8 stitches apart.
Embroider a small horizontal nose and two subtle brows above the eyes.
✅ This soft facial shaping gives the calm expression seen in the photo.
💇 Hair & Beard (Brown)
Hair Cap:
- MR 6 sc [6]
- inc ×6 [12]
- (1 sc, inc) ×6 [18]
- (2 sc, inc) ×6 [24]
- (3 sc, inc) ×6 [30]
6–8. sc around [30]; FO.
Sew cap to head.
Beard:
Ch 9, sc back (8), FO.
Sew in a rounded U-shape along chin and jawline.
Add mustache (ch 8, sl st back) above the mouth area.
Hair Strands:
Make 12–14 strands — ch 20–25, sl st back.
Sew evenly across back and sides of head.
Keep parting centered at top; strands should reach shoulder length.
✅ This method perfectly matches the soft, wavy brown hair and beard in the image.
🧍 Body (Cream)
- MR 6 sc [6]
- inc ×6 [12]
- (1 sc, inc) ×6 [18]
- (2 sc, inc) ×6 [24]
5–16. sc around [24] - (2 sc, dec) ×6 [18]
18–19. sc around [18]; FO.
Stuff firmly and shape upright.
👖 Legs (×2 – Brown)
- MR 6 sc [6]
- inc ×6 [12]
3–6. sc around [12] - dec ×6 [6]; FO, stuff lightly.
Sew under the robe base, leaving toes just visible.
✅ The simple brown base represents Jesus’ sandals.
✋ Arms (×2 – Beige → Cream)
Hands (Beige):
- MR 6 sc [6]
- (1 sc, inc) ×3 [9]
3–4. sc around [9]
Switch to cream:
5–11. sc around [9]; FO.
Stuff lightly and attach outstretched to sides.
Sleeves should extend slightly past the hands.
👕 Robe (Cream)
Robe Body:
- Ch 30, join in round [30].
2–18. sc around [30]. - Work back and forth for 8 rows (to create the front slit).
FO, leave long tail, wrap around body, and sew lightly at back.
Robe Sleeves (Wide):
- Ch 18, join.
2–10. sc around [18]; FO.
Attach to shoulders with openings wide and flowing.
✅ This produces the graceful, open-sleeve robe seen in the photo.
🧶 Belt & Sash (Brown)
Waist Belt:
Ch 50, sl st back, FO.
Wrap around waist twice and tie at center front.
Shoulder Sash:
Ch 70, sc back, FO.
Drape from right shoulder to left hip and sew in place.
✅ The sash crossing and belt layering recreate the robe folds exactly as shown.
⛰️ Mount Base (Green & Tan)
Main Hill (Olive Green):
- MR 6 sc [6]
- inc ×6 [12]
- (1 sc, inc) ×6 [18]
- (2 sc, inc) ×6 [24]
- (3 sc, inc) ×6 [30]
- (4 sc, inc) ×6 [36]
7–18. sc around [36] - FLO sc (to form edge rim); switch to tan and sc around [36]; FO.
Stuff firmly.
Decorations:
- Stone steps: Ch 8, sc 2 rows; sew in ascending pattern.
- Bushes: Use moss green yarn to create bobble or puff circles; attach randomly.
✅ The raised green and tan hill base with rim and foliage now matches perfectly.
🪡 Assembly
1️⃣ Attach head to body securely.
2️⃣ Sew arms horizontally outward (palms facing forward).
3️⃣ Dress figure in robe and sleeves.
4️⃣ Wrap belt and add shoulder sash.
5️⃣ Anchor figure on mount base — stitch or glue for stability.
6️⃣ Adjust robe folds for natural drape.
🌟 Finishing Touches
- Steam-block robe edges to enhance flow.
- Add light blush for soft cheeks (optional).
- Use thread or glue to maintain the “open-arm” position.
- Position figure centrally on the base for balance.
🙏 Final Thoughts
This Amigurumi Jesus Crochet Pattern beautifully represents peace and compassion — with open arms, flowing robes, and detailed textures inspired by nature.
It’s an inspiring project to make for Easter, church displays, or as a heartfelt handmade gift symbolizing faith and love.
✨ A timeless piece to remind us of hope, kindness, and light — created with your own hands. 🧶✝️