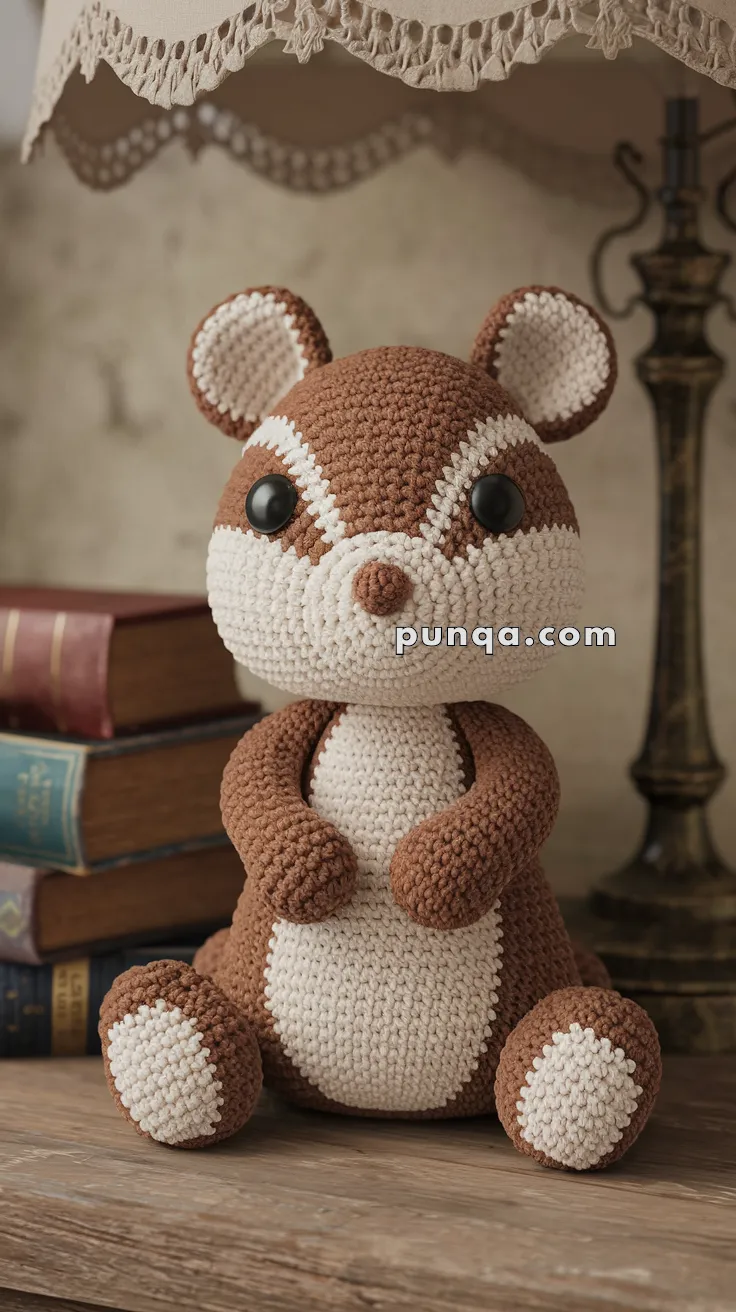
Bring the playful charm of a Chipmunk to life with this Amigurumi Chipmunk crochet pattern! 🐿️✨ With its tiny paws, bushy tail, and mischievous expression, this design captures the essence of this adorable woodland creature in yarn form. Whether you’re crafting for a nature-inspired décor piece, a heartfelt gift, or simply love forest-themed amigurumi, this FREE pattern is a delightful addition to your collection.
Designed for intermediate crocheters, this pattern allows for customization in fur textures, facial details, and even tiny accessories like embroidered acorns or a miniature forest setting to enhance its personality. Choose classic browns and creams for a realistic look or experiment with whimsical hues for a unique twist! Whether displayed as part of a woodland setup or gifted to a fellow crochet enthusiast, this amigurumi chipmunk is sure to bring smiles.
Grab your hook, select your favorite yarn, and let’s bring this charming little critter to life—one stitch at a time! 🧶✨
🐿 Amigurumi Chipmunk Crochet Pattern
This adorable amigurumi chipmunk is perfect for woodland-themed decor or as a cuddly handmade gift. Featuring its signature white belly, eye stripe markings, and rounded ears, this chipmunk is crocheted in soft shades of brown and cream with clean color changes for a neat finish.
✨ Skill Level
Intermediate – includes color changes, shaping, and precise placement.
📏 Finished Size
Approx. 9–10 inches (23–25 cm) tall using worsted-weight yarn and a 3.5 mm hook.
🧶 Materials
-
Light Brown (80 g) – main fur
-
Cream/Beige (50 g) – muzzle, facial stripes, belly, inner ears, paw pads
-
Dark Brown (20 g) – back stripes
-
Black (small amount) – for details
-
12–14 mm safety eyes
-
3.5 mm crochet hook
-
Polyfill stuffing
-
Tapestry needle & scissors
-
Pins (for alignment)
🧵 Abbreviations (US Terms)
MR – Magic Ring
sc – Single Crochet
inc – Increase (2 sc in same stitch)
dec – Decrease (sc 2 together)
sl st – Slip Stitch
BLO – Back Loop Only
FO – Fasten Off
🐿 Head (with Vertical Eye Stripes)
With light brown:
R1. MR, 6 sc (6)
R2. inc ×6 (12)
R3. (1 sc, inc) ×6 (18)
R4. (2 sc, inc) ×6 (24)
R5. (3 sc, inc) ×6 (30)
R6. (4 sc, inc) ×6 (36)
R7. (5 sc, inc) ×6 (42)
🟤 Facial Stripe Pattern (R8–14 – Brown + Cream)
These are two vertical cream stripes (6–7 stitches wide each), running straight down through each eye area.
Switch between brown and cream as follows:
R8–14:
-
sc 8 brown
-
sc 7 cream (left stripe)
-
sc 12 brown (between eyes)
-
sc 7 cream (right stripe)
-
sc 8 brown
👉 Adjust by 1–2 stitches each round to keep stripes perfectly vertical and aligned down the front.
👉 Carry unused yarn along the inside to maintain clean color edges.
Eye Placement:
Insert safety eyes between R10–11, centered vertically within each cream stripe, about 8–9 stitches apart.
R15. (5 sc, dec) ×6 (36) – start fading out cream
R16. (4 sc, dec) ×6 (30) – use brown only from here
R17. (3 sc, dec) ×6 (24)
Stuff head firmly.
R18. (2 sc, dec) ×6 (18)
R19. (1 sc, dec) ×6 (12)
R20. dec ×6 (6), FO, close.
🐽 Muzzle (Round – Cream)
Option 1: Chain Base (Rounder Oval)
Ch 10.
R1. sc in 2nd ch from hook, sc 7, 3 sc in last ch; rotate, sc 7, inc (20)
R2. inc, sc 7, inc ×3, sc 7, inc ×2 (28)
R3. sc around (28)
R4. sc around (28)
FO and flatten slightly.
OR
Option 2: Worked in Rounds (Perfectly Round)
MR, 6 sc (6)
R2. inc ×6 (12)
R3. (1 sc, inc) ×6 (18)
R4. (2 sc, inc) ×6 (24)
R5. sc around (24)
FO, stuff lightly and flatten slightly for a round cheek look.
👉 Sew to lower front of head, spanning across cheeks but not too wide horizontally.
Position top edge just below eyes.
🟤 Nose (3D Bump)
With brown:
MR, 6 sc (6)
R2. sc around (6)
FO, stuff lightly, and sew centered at top of muzzle.
🧸 Body (Brown with Cream Belly)
Start with cream for belly base:
R1. MR, 6 sc (6)
R2. inc ×6 (12)
R3. (1 sc, inc) ×6 (18)
R4. (2 sc, inc) ×6 (24)
R5. (3 sc, inc) ×6 (30)
Color Transition for Belly & Back:
R6. sc 10 cream (front belly), sc 20 brown (back) (30)
R7–15. Continue same split – 10 cream + 20 brown.
Keep cream centered down the front for a long oval belly patch.
R16. (3 sc, dec) ×6 (24)
R17. (2 sc, dec) ×6 (18)
Stuff firmly.
R18. (1 sc, dec) ×6 (12)
R19. dec ×6 (6), FO, close.
🐾 Arms (Make 2 – Brown)
R1. MR, 6 sc (6)
R2. (1 sc, inc) ×3 (9)
R3–9. sc around (9)
Stuff lightly.
FO, sew slightly under head angled inward.
🦶 Legs (Make 2 – Brown with Cream Paw Pads)
Paw Pad (Cream)
R1. MR, 6 sc (6)
R2. inc ×6 (12)
R3. (1 sc, inc) ×6 (18)
Switch to brown:
R4. BLO sc around (18)
R5–8. sc around (18)
Stuff firmly.
FO, sew to front bottom of body.
👉 Position Note:
Sew legs so the cream pads face forward and slightly downward — making them visible when the chipmunk sits.
👂 Ears (Make 2 – Larger Size)
With cream:
R1. MR, 6 sc (6)
R2. inc ×6 (12)
Switch to brown:
R3–4. sc around (12)
FO, flatten, and sew symmetrically near top of head.
🐿 Tail (Bushy Curved Shape)
With brown:
R1. MR, 6 sc (6)
R2. inc ×6 (12)
R3. (1 sc, inc) ×6 (18)
R4–8. sc around (18)
R9. (1 sc, dec) ×6 (12)
R10–12. sc around (12)
FO, lightly stuff.
👉 Position:
Sew tail to lower back, curving upward and slightly forward so it arches gently over the body.
🟤 Back Stripes (3 Total – Dark Brown)
Using dark brown yarn, surface-crochet or embroider:
-
Stripe Width: 2–3 stitches wide
-
Center Stripe: From back of head (R6) straight down spine to tail base
-
Side Stripes: 8–10 stitches apart from center on each side
-
Length: From shoulders to lower back
-
Keep all three parallel and evenly spaced for authentic chipmunk markings.
✂️ Assembly Order
1️⃣ Sew head to body, aligning facial stripes with cream belly.
2️⃣ Attach arms and legs symmetrically.
3️⃣ Sew muzzle and 3D nose.
4️⃣ Add ears on top of head.
5️⃣ Attach tail, curving upward and slightly forward.
6️⃣ Embroider three back stripes.
7️⃣ Optionally blush cheeks for warmth.
💡 Finishing Touches
-
Fade color neatly by changing yarn on the last loop of the stitch before the switch.
-
Use tapestry crochet to carry unused yarn invisibly.
-
Add a hint of pink or soft pastel blush under eyes for expression.
-
Lightly stuff muzzle before sewing for a plump cheek effect.
This chipmunk is a charming woodland friend with realistic markings and soft shaping, perfect for gifting or decorating a cozy space. 🐿🍂