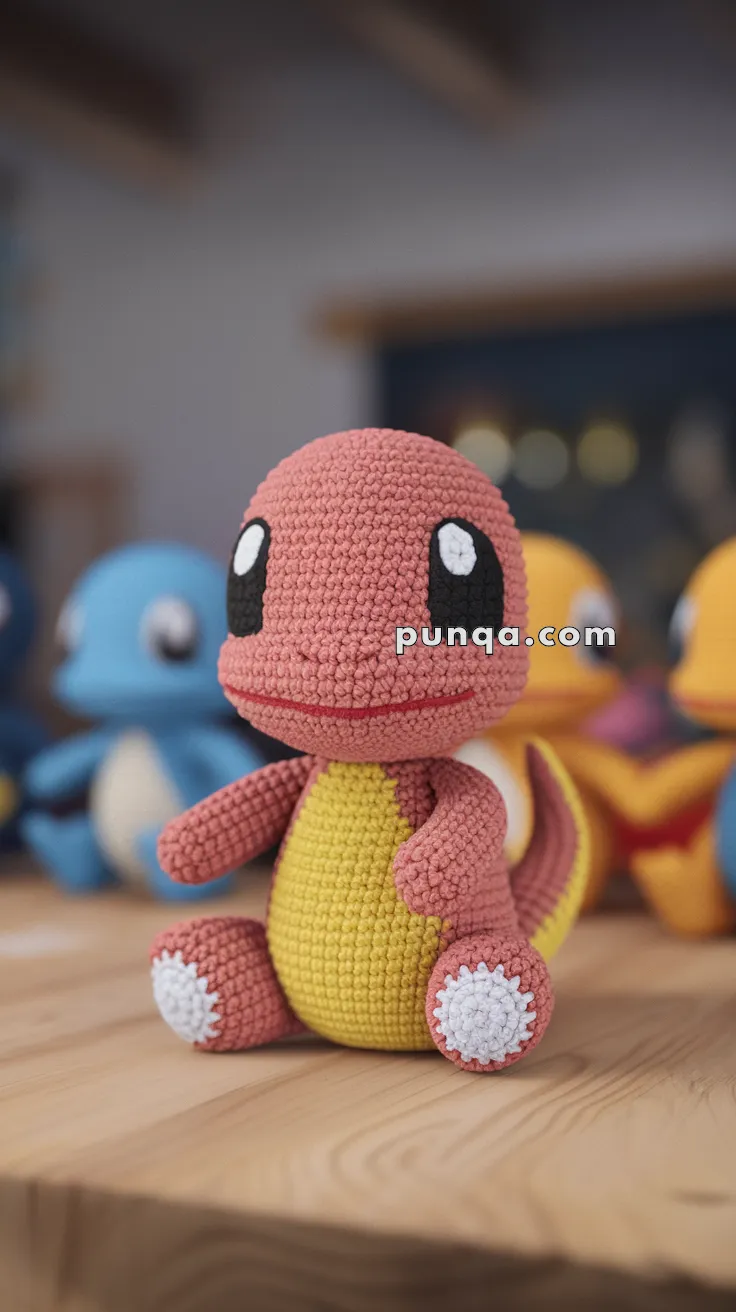
Ignite your crochet adventure with the Amigurumi Charmander—a fiery little friend that’s ready to warm hearts and spark smiles! 🔥🧶 With its signature flame-tipped tail, chubby cheeks, and playful expression, this beloved Pokémon starter comes to life in the most huggable way. Whether you’re a longtime fan or just love crafting character-inspired cuties, this pattern is a fun and nostalgic way to stitch up some elemental charm.
Perfect for customizing with felt details, safety eyes, or even a tiny Poké Ball accessory, Charmander is a joy to make and even more fun to show off. It’s a great project for confident beginners and seasoned stitchers alike, offering simple shapes with big personality. Whether perched on a shelf, gifted to a fellow trainer, or added to your evolving amigurumi Pokédex, this little fire-type is sure to be a blazing hit—one loop at a time! 🧵❤️
🔥Amigurumi Charmander Crochet Pattern
Bring your favorite fiery Pokémon to life with this adorable Charmander Amigurumi! With its big eyes, yellow belly, curved tail, and signature flame, this little dragon is perfect for Pokémon fans and crochet lovers alike. Follow the step-by-step instructions below to make your own cute Charmander friend.
✨ Skill Level
Intermediate – Requires basic amigurumi knowledge, color changes for belly and tail, oval crocheted eyes, embroidery for mouth, and flame detail using brushed yarn.
🧶 Materials
-
Worsted yarn: Orange, Yellow, White, Black, Red
-
Crochet hook: 2.5–3.0 mm
-
Polyester stuffing
-
Yarn needle
-
Stitch marker
-
Pins for positioning parts
-
Pet brush (for flame effect)
🔤 Abbreviations (US Terms)
MR = Magic Ring
sc = single crochet
inc = increase (2 sc in one stitch)
dec = decrease (sc two stitches together)
ch = chain
sl st = slip stitch
FO = fasten off
🧩 Pattern Instructions
Head (Orange)
-
MR, 6 sc (6)
-
inc around (12)
-
(1 sc, inc) x6 (18)
-
(2 sc, inc) x6 (24)
-
(3 sc, inc) x6 (30)
-
(4 sc, inc) x6 (36)
-
(5 sc, inc) x6 (42)
-
(6 sc, inc) x6 (48)
9–20. sc around (48) -
(6 sc, dec) x6 (42)
-
(5 sc, dec) x6 (36)
-
(4 sc, dec) x6 (30)
-
(3 sc, dec) x6 (24)
-
(2 sc, dec) x6 (18)
Stuff firmly, shaping into an oval. FO.
Body (Orange with Yellow Belly)
-
MR, 6 sc (6)
-
inc around (12)
-
(1 sc, inc) x6 (18)
-
(2 sc, inc) x6 (24)
-
(3 sc, inc) x6 (30)
-
(4 sc, inc) x6 (36)
7–12. sc around (36)
13–18. Front 18 stitches in Yellow (belly), back 18 stitches in Orange. Carry yarn inside. -
(4 sc, dec) x6 (30)
-
(3 sc, dec) x6 (24)
-
(2 sc, dec) x6 (18)
Stuff well. FO.
Arms (Make 2 – Orange)
-
MR, 6 sc (6)
-
(1 sc, inc) x3 (9)
3–6. sc around (9)
Lightly stuff. FO, leave tail for sewing.
Legs (Make 2 – Orange + White Sole)
Sole (White):
-
MR, 6 sc (6)
-
inc around (12)
-
(1 sc, inc) x6 (18)
FO, leave tail for sewing.
Leg (Orange):
-
MR, 6 sc (6)
-
(1 sc, inc) x3 (9)
-
(2 sc, inc) x3 (12)
4–8. sc around (12)
Stuff firmly. Sew white sole to bottom. FO.
Tail (Orange with Yellow Stripe)
-
MR, 6 sc (6)
-
(1 sc, inc) x3 (9)
-
(2 sc, inc) x3 (12)
4–6. sc around (12)
7–20. Bottom 4 stitches in Yellow, rest Orange (total 12). Continue stripe to tip. -
(2 sc, dec) x3 (9)
22–24. sc around (9)
Lightly stuff and curve upward. FO.
Tail Flame (Red + Yellow)
Base Flame (Red):
-
MR, 6 sc (6)
-
inc around (12)
-
sc around (12)
FO.
Small Flame (Yellow):
-
MR, 5 sc (5)
-
sc around (5)
FO.
Attach yellow flame onto red flame. Sew to tail tip. Brush yarn with pet brush to fluff into fire effect.
Eyes (Black with White Reflection – Make 2)
-
Ch 6, sc in 2nd ch, sc 3, 3 sc in last, continue on other side (10)
-
sc around (12–14 depending on tension) to form oval
FO, leave tail.
Sew vertically. Embroider small white reflection dot.
Mouth (Red Embroidery)
-
With red yarn, embroider a thin curved smile under the eyes.
🧵 Assembly
-
Sew head to body.
-
Attach arms below neck, angled slightly forward.
-
Position legs so Charmander can sit.
-
Sew tail to lower back, curve upward, and attach flame.
-
Sew oval eyes vertically on the face.
-
Embroider red smile.
🎀 Finishing Touches
-
Make sure yellow belly lines up with the yellow tail stripe.
-
Position so Charmander sits stably with legs and tail.
-
Fluff flame until it looks like glowing fire.
💖 Final Notes
Your crochet Charmander is now complete! This little fiery lizard makes a wonderful gift for Pokémon fans or a cute desk buddy for yourself. With its bright belly, big eyes, and signature tail flame, it’s sure to spark joy every time you see it.