Ignite your crochet game with the Amigurumi Charizard, a fiery and fun project that brings one of Pokémon’s most iconic creatures to life—one stitch at a time! 🔥🧶 With his bold orange body, majestic wings, and signature flame-tipped tail, this dragon-like plush is a must-make for fans of adventure, nostalgia, and handmade magic. Whether perched on a shelf or gifted to a fellow trainer, Charizard is ready to soar into your collection with fierce charm and cuddly charisma.
This pattern is perfect for crocheters who love character crafting and crave a challenge with rewarding results. You can customize your Charizard with shading details, poseable wings, or even a battle-ready expression to match your style. Whether you’re stitching for fandom love, cosplay flair, or just to flex your crochet skills, the Amigurumi Charizard is a blazing way to celebrate creativity—one epic loop at a time! 🧵💥
🔥 Amigurumi Charizard Crochet Pattern
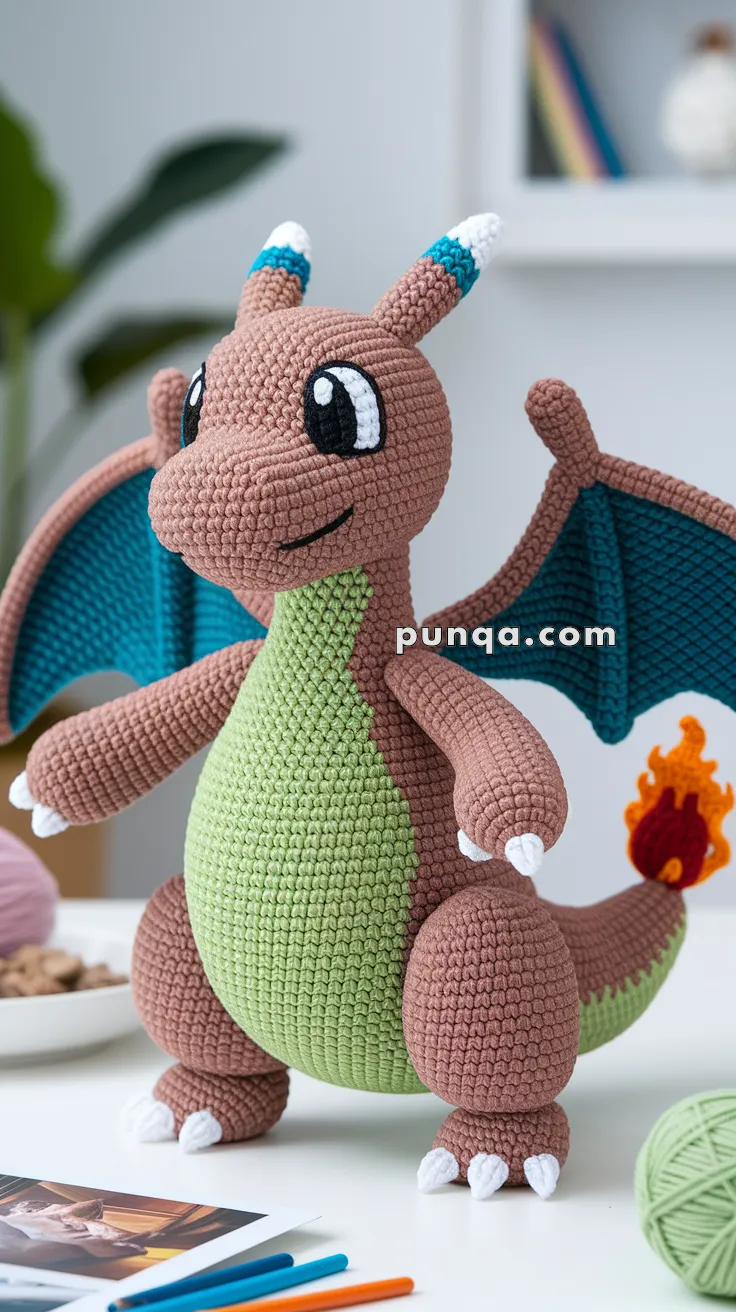
Take flight into handmade magic with this Amigurumi Charizard! With its big oval anime eyes, teal and white horn tips, bold wings, striped belly, and fiery tail, this design is crafted to match Charizard’s iconic look.
Whether you’re a Pokémon fan or making this as a gift, this legendary dragon will be the centerpiece of any collection.
✨ Skill Level
Advanced – shaping, color changes, layered parts, and assembly.
📏 Finished Size
Approx. 28–30 cm (11–12 in) tall when made with worsted yarn and 3.5 mm hook.
🧶 Materials
- Light brown yarn (main body, head, limbs, outer wings, tail)
- Green yarn (belly patch)
- Teal yarn (wing interiors, horn stripes)
- White yarn (horn tips, claws, eye whites)
- Black yarn (eye pupils, smile embroidery)
- Small amount of gray (optional – inner ear shading)
- Yellow & red yarn (tail flame)
- Fiberfill stuffing
- Crochet hook: 3.5 mm
- Yarn needle
- Stitch markers
- Scissors
📖 Abbreviations (US Terms)
MR = magic ring
sc = single crochet
inc = increase (2 sc in same st)
dec = decrease (sc2tog)
ch = chain
sl st = slip stitch
hdc = half double crochet
dc = double crochet
tr = treble crochet
FO = fasten off
🧵 Pattern Instructions
Head (light brown)
- MR, 6 sc (6)
- inc ×6 (12)
- (sc, inc) ×6 (18)
- (2 sc, inc) ×6 (24)
- (3 sc, inc) ×6 (30)
- (4 sc, inc) ×6 (36)
- (5 sc, inc) ×6 (42)
8–20. sc around (42) - (5 sc, dec) ×6 (36)
- (4 sc, dec) ×6 (30)
👉 Begin stuffing. - (3 sc, dec) ×6 (24)
- (2 sc, dec) ×6 (18)
FO, close.
Eyes (make 2)
- With black: MR, 6 sc → oval base.
- Switch to black ovals: work rows instead of rounds:
- Row 1: ch 5, sc across.
- Row 2: inc at start, sc across, inc at end.
- Row 3–4: sc rows to elongate.
- Switch to white: crochet around perimeter for border.
- Embroider a small white highlight dot.
👉 Sew tall ovals onto face.
Smile
With black yarn, embroider a simple curve beneath the eyes.
Horns (make 2)
With light brown:
- MR, 4 sc (4)
- sc around (4)
- (sc, inc) ×2 (6)
4–12. sc around (6) → lengthened.
Switch to teal:
13–15. sc around (6)
Switch to white:
16–17. sc around (6)
FO, stuff lightly.
Ears (make 2, flat triangles)
With light brown:
- ch 6, turn.
- sc across (5)
- sc dec, sc, sc dec (3)
- sc3tog (1)
FO.
👉 Sew behind horns angled outward.
Body (light brown)
- MR, 6 sc (6)
- inc ×6 (12)
- (sc, inc) ×6 (18)
- (2 sc, inc) ×6 (24)
- (3 sc, inc) ×6 (30)
- (4 sc, inc) ×6 (36)
- (5 sc, inc) ×6 (42)
8–25. sc around (42) - (5 sc, dec) ×6 (36)
- (4 sc, dec) ×6 (30)
- (3 sc, dec) ×6 (24)
👉 Stuff firmly. FO.
Belly Patch (green, tall oval)
- MR, 6 sc (6)
- inc ×6 (12)
- (sc, inc) ×6 (18)
- (2 sc, inc) ×6 (24)
- (3 sc, inc) ×6 (30)
- (4 sc, inc) ×6 (36)
7–12. sc around (36)
👉 Elongate by adding 4–6 extra rows straight (instead of only increases).
FO, sew to body front.
Arms (make 2, light brown)
- MR, 6 sc (6)
- inc ×6 (12)
- (sc, inc) ×6 (18)
4–14. sc around (18)
👉 Slightly wider than standard to look chunky. - (sc, dec) ×6 (12)
FO, stuff, sew to sides.
Legs (make 2, light brown)
- MR, 6 sc (6)
- inc ×6 (12)
- (sc, inc) ×6 (18)
- (2 sc, inc) ×6 (24)
5–10. sc around (24) - (2 sc, dec) ×6 (18)
- (sc, dec) ×6 (12)
Stuff firmly. FO.
Claws (white, make 6 small cones for hands & 6 for feet)
- MR, 4 sc (4)
- sc around (4)
- (sc, inc) ×2 (6)
- sc around (6)
FO. Sew 3 per hand and 3 per foot.
Tail (light brown)
- MR, 6 sc (6)
- inc ×6 (12)
- (sc, inc) ×6 (18)
4–20. sc around (18)
Stuff and close.
Tail Flame (3D layered)
- Yellow base: ch 6, work (sc, hdc, dc, tr, dc, hdc, sc) → flame shape.
- Red outer flames: make 2 larger shapes, sew behind yellow.
👉 Attach securely at tail tip.
Wings (make 2)
Outer frame (light brown):
- ch 25.
- Work dc along chain, turning at end with 3 dc in tip.
- On return row, create curved edge by using hdc and sc.
FO.
Inner panel (teal):
Repeat frame but slightly smaller, sew into brown frame.
👉 Sew wings to back angled outward.
🪡 Assembly
- Sew head to body securely.
- Attach belly patch.
- Sew arms, legs, claws.
- Attach tail + flame.
- Sew wings on back.
- Add horns, ears, and embroider smile.
- Position and sew eyes.
🌟 Final Look
Your Amigurumi Charizard is complete! 🔥🐉
It features:
- Tall oval eyes with anime-style highlights
- Extended striped horns with teal and white tips
- Triangular ears angled back
- Big belly patch in green
- Chunky arms and feet with claws
- 3D flame at tail tip
- Large teal and brown wings with curved edges
Just like the photo — strong, fierce, and absolutely adorable for display or gifting.