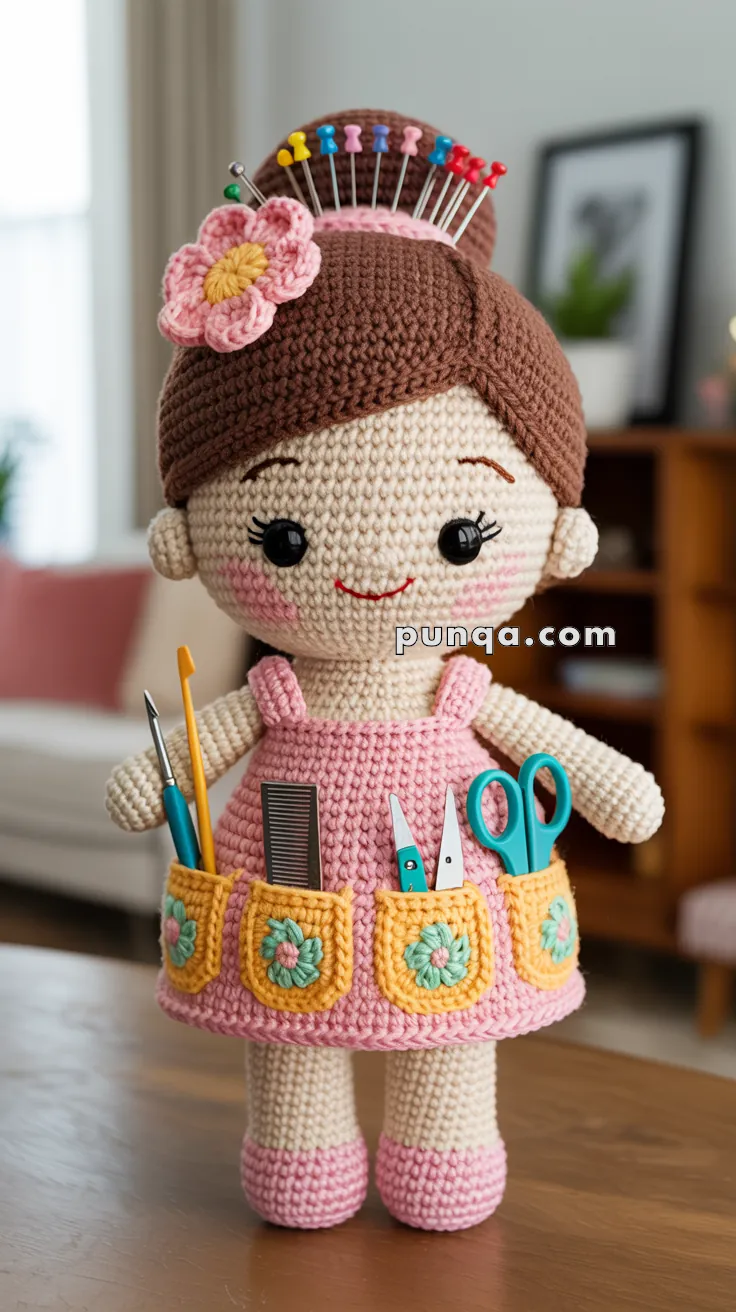
Meet the Amigurumi Caddy Doll, your new crafty companion who’s as adorable as she is useful! 🧶💐 With her sweet smile, flower-adorned bun (that cleverly doubles as a pincushion), and apron pockets roomy enough for scissors, hooks, and combs, she’s designed to bring both charm and convenience to your creative space. Whether she’s perched on your desk or nestled in your sewing nook, this doll is ready to lend a helping hand—and look cute doing it!
Perfect for crocheters who love functional projects with personality, this pattern invites you to play with soft textures, cheerful colors, and thoughtful details that make her truly one-of-a-kind. Customize her outfit, add tiny accessories, or stitch up a matching set for your crafting crew! The Amigurumi Caddy Doll is a delightful way to stitch up joy, organization, and a whole lot of handmade heart—one loop at a time! 🧵🌸
🧵 Amigurumi Sewing Caddy Doll Crochet Pattern
Meet your new crochet companion! This adorable caddy doll keeps your scissors, hooks, and pins organized while brightening up your craft space. With her charming updo hairstyle, flared pink dress, and tool-holding apron pockets, she’s the perfect blend of cute and practical.
✨ Skill Level
Intermediate – requires amigurumi shaping, color changes, granny squares, embroidery, and assembly.
📏 Finished Size
Approx. 28–30 cm (11–12″) tall when using worsted weight yarn and a 3.0 mm hook.
🧶 Materials
- Worsted weight yarn:
- 3.0 mm crochet hook
- 8–10 mm safety eyes (or black yarn for embroidered eyes)
- Yarn needle & scissors
- Polyfill stuffing
- Straight pins for bun pincushion
- Stitch markers
- Optional: fabric blush or pink chalk
🪡 Abbreviations (US Terms)
- MR = Magic Ring
- sc = single crochet
- inc = increase (2 sc in same st)
- dec = decrease (sc2tog)
- sl st = slip stitch
- hdc = half double crochet
- dc = double crochet
- ch = chain
- st = stitch
- BLO = back loop only
- FLO = front loop only
- FO = fasten off
👧 HEAD
With beige:
- MR, 6 sc [6]
- inc ×6 [12]
- (sc, inc) ×6 [18]
- (2 sc, inc) ×6 [24]
- (3 sc, inc) ×6 [30]
- (4 sc, inc) ×6 [36]
- (5 sc, inc) ×6 [42] 8–14. sc around [42] (7 rounds)
- (5 sc, dec) ×6 [36]
- (4 sc, dec) ×6 [30]
- (3 sc, dec) ×6 [24]
- (2 sc, dec) ×6 [18]
Insert safety eyes between rounds 11–12, about 7–8 stitches apart.
Stuff head very firmly for a rounded shape.
- (sc, dec) ×6 [12]
- dec ×6 [6]
FO, close opening. Set aside.
👀 Face Embroidery
Eyes: With black yarn, embroider 3–4 straight stitches above each safety eye for eyelashes.
Eyebrows: Embroider small curved lines with brown or black yarn above eyes.
Mouth: With red yarn, embroider a curved smile line below eyes (centered, about round 14).
Cheeks: With pink yarn, make 2–3 long horizontal stitches on each side, or use fabric blush.
💇 HAIR CAP
With brown:
- MR, 6 sc [6]
- inc ×6 [12]
- (sc, inc) ×6 [18]
- (2 sc, inc) ×6 [24]
- (3 sc, inc) ×6 [30]
- (4 sc, inc) ×6 [36]
- (5 sc, inc) ×6 [42] 8–14. sc around [42] (7 rounds)
FO, leave long tail for sewing.
💇 Bangs/Fringe
With brown yarn and tapestry needle:
Using surface crochet or loop stitch technique across the front of the hair cap (rounds 8–10), create textured bangs:
- Insert hook from front to back between stitches
- Pull up loop of brown yarn
- Create 10–12 loops across forehead area
- Trim loops to 1–1.5 cm length for fringe effect
- Style bangs to sweep across forehead
Alternative method:
- Ch 3, sl st in 2nd ch from hook, sl st in next ch (creates small bump)
- Repeat this process 8–10 times
- Sew these pieces side by side across the forehead area of the hair cap for textured bangs
🌀 BUN PINCUSHION
With brown:
- MR, 6 sc [6]
- inc ×6 [12]
- (sc, inc) ×6 [18]
- (2 sc, inc) ×6 [24]
- (3 sc, inc) ×6 [30] 6–10. sc around [30] (5 rounds)
- (3 sc, dec) ×6 [24]
- (2 sc, dec) ×6 [18]
- (sc, dec) ×6 [12]
Stuff extremely firmly so pins can be inserted and held securely.
- dec ×6 [6]
FO, close tightly. Sew to top-center-back of hair cap.
🌸 HAIR FLOWER
Round 1 (Center): With yellow, MR, 6 sc, join with sl st to first sc. [6]
Round 2 (Petals): Switch to pink.
- (ch 2, 2 hdc in same st, ch 2, sl st in next st) ×6
FO, weave in ends. Sew to side of bun.
👗 BODY & BODICE
With beige:
- MR, 6 sc [6]
- inc ×6 [12]
- (sc, inc) ×6 [18]
- (2 sc, inc) ×6 [24]
- (3 sc, inc) ×6 [30] 6–8. sc around [30] (3 rounds)
Switch to pink (bodice of dress):
9–11. sc around [30] (3 rounds) 12. (3 sc, dec) ×6 [24] ← creates waist shaping 13. sc around [24] 14. (2 sc, dec) ×6 [18] ← narrows waist further 15–16. sc around [18] (2 rounds)
Stuff body firmly. Do not FO yet.
👗 SKIRT (worked directly onto body)
Continue with pink yarn from round 16 of body:
- Working in FLO of round 16: (2 sc, inc) ×6 [24]
- sc around [24]
- (3 sc, inc) ×6 [30]
- sc around [30]
- (4 sc, inc) ×6 [36] 22–23. sc around [36] (2 rounds)
- (5 sc, inc) ×6 [42] 25–27. sc around [42] (3 rounds)
FO, weave in ends.
🙌 ARMS (make 2)
With beige:
- MR, 6 sc [6]
- (sc, inc) ×3 [9] 3–12. sc around [9] (10 rounds)
Switch to pink (sleeve):
13–16. sc around [9] (4 rounds)
Stuff lightly (arms should be soft and poseable).
FO, leave long tail for sewing. Flatten opening and sew to sides of body at shoulder level (around rounds 9–10 of body).
🦵 LEGS (make 2)
With beige:
- MR, 6 sc [6]
- inc ×6 [12]
- (3 sc, inc) ×3 [15] 4–9. sc around [15] (6 rounds)
Switch to pink (dress/bloomers):
10–16. sc around [15] (7 rounds)
Stuff legs moderately.
FO, leave long tail. Sew to bottom of body, positioned for sitting or standing.
👟 FLAT SHOES (make 2)
With pink:
Sole:
- Ch 6, starting in 2nd ch from hook: 4 sc, 3 sc in last ch, continue on other side of chain: 3 sc, inc [12]
- inc, 3 sc, inc ×3, 3 sc, inc ×2 [18]
- sc, inc, 3 sc, (sc, inc) ×3, 3 sc, (sc, inc) ×2 [24]
- BLO: sc around [24]
Sides: 5–6. sc around [24] (2 rounds)
Top shaping: 7. 6 sc, dec ×6, 6 sc [18] 8. 6 sc, dec ×3, 6 sc [15]
Stuff bottom lightly to create flat sole.
FO, sew shoes to bottom of legs.
🌼 GRANNY SQUARE POCKETS (make 3)
Round 1 (flower center): With aqua or mint, MR, ch 2 (counts as first hdc), 11 hdc in ring, join with sl st to top of ch-2. [12 hdc] FO.
Round 2 (square base): Join yellow in any st.
- Ch 3 (counts as dc), 2 dc in same st (this is first corner)
- dc in next 2 sts
- (2 dc, ch 2, 2 dc) in next st (corner)
- dc in next 2 sts
- (2 dc, ch 2, 2 dc) in next st (corner)
- dc in next 2 sts
- (2 dc, ch 2, 2 dc) in next st (corner)
- dc in next 2 sts
- 2 dc in same st as beginning ch-3, ch 2, join with sl st to top of ch-3. (completes 4th corner)
Round 3 (border):
- Ch 1, sc in each dc around, placing (sc, ch 2, sc) in each corner ch-2 space. Join with sl st to first sc.
FO, weave in ends.
Each square should measure approximately 4–5 cm (1.5–2″) per side.
🎀 APRON BELT with POCKETS
With yellow:
Ch 51
Row 1: sc in 2nd ch from hook, sc across [50] Rows 2–3: ch 1, turn, sc across [50]
FO, leave long tails.
Attach granny squares: Position 3 granny square pockets evenly spaced across the belt (front center section). Sew bottom and side edges of each pocket to the belt, leaving tops open.
Wrap belt around doll’s waist (over skirt, at rounds 19–21 of skirt section), overlap ends at back, and sew securely.
👗 OPTIONAL BODICE STRAPS (make 2)
With pink:
Ch 22
Row 1: sc in 2nd ch from hook, sc across [21]
FO, leave tails for sewing.
Sew one end to front of bodice (round 11, about 6 sts from center) and the other end to back of bodice at same level, creating shoulder straps over the beige body.
🎀 ASSEMBLY
- Attach head to body: Sew head securely to top of body, aligning face forward.
- Attach hair cap: Position hair cap on head with bangs at front. Sew around entire edge, ensuring bun is positioned at back-top.
- Sew flower: Attach pink flower to side of bun.
- Attach arms: Sew arms to sides of body at shoulder level (rounds 9–10 of body).
- Attach legs: Sew legs to bottom of body in sitting or standing position.
- Attach shoes: Sew shoes to bottom of legs, ensuring they sit flat.
- Add apron belt: Wrap yellow belt with pockets around waist (over skirt) and secure at back.
- Add bodice straps (optional): Sew pink straps from front to back over shoulders for a two-piece dress look.
- Final details:
- Insert decorative pins into bun pincushion
- Place scissors, comb, and crochet hooks in granny square pockets
- Add any additional embroidery or embellishments
💡 Tips & Tricks
- Firm stuffing in the head and bun is essential for structure and pin-holding
- Waist shaping is created by decreasing in the body before working the skirt
- Bangs can be created with loop stitch, surface crochet, or sewn chain pieces
- Granny squares should be sewn securely to belt on 3 sides (bottom and sides), leaving top open for tools
- Belt placement should be visible over the dress, positioned around the waist area where the skirt flares
- Straps are optional but add a nice detail to make the dress look more like a two-piece outfit
Your sewing caddy doll is complete! She’s ready to keep your crafting tools organized and add a cheerful touch to your workspace. Enjoy your new crafty companion! 🧵✨


un grand merci il y a longtemps que je cherchais!!merci
super merci à vous