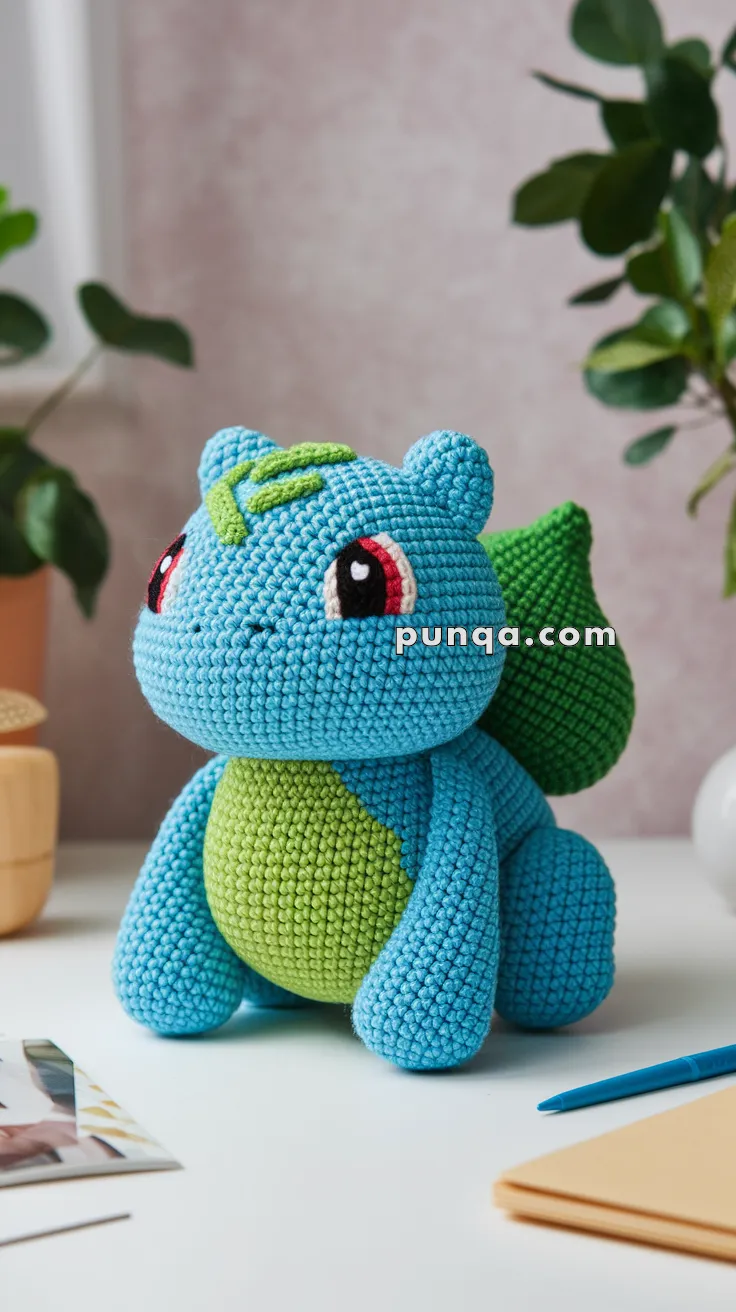
Welcome to the lush world of Grass-type Pokémon amigurumi! 🌱✨ Today, I’m delighted to share my free crochet pattern for Amigurumi Bulbasaur—the beloved Seed Pokémon in perfectly adorable yarn form! Whether you’re a first-generation trainer, love crafting plant-inspired creatures, or simply want to add some wholesome charm to your collection, this pattern will guide you through stitching your very own pocket-sized starter with its iconic bulb back, bright eyes, and sweet smile.
This design celebrates Bulbasaur’s cheerful nature through soft curves and botanical details! 🧶💚 I’ve carefully outlined each step to help you create its speckled bulb, sturdy legs, and optional vine whip accessory. Perfect for display, gifting to fellow Pokémon lovers, or keeping as a sunny companion for your gardening tools! So grab your hooks, pick out leafy greens and creamy ivories, and let’s stitch up a Pokémon that grows happiness with every stitch! ✨
🌱 Amigurumi Bulbasaur Crochet Pattern
Bring your favorite grass-type starter to life with this soft, round, and incredibly adorable amigurumi Bulbasaur! With vibrant body tones and a leafy back bulb, it’s a perfect companion for any Pokémon fan and a cute project to show off your stitching skills.
✨ Skill Level
Intermediate – Includes shaping, multiple pieces, simple embroidery, and bulb construction.
📏 Finished Size
Approx. 6–8 inches (15–20 cm) tall when made with worsted-weight yarn and a 3.5 mm hook.
🧶 Materials
-
Yarn (Worsted weight):
-
Light blue or turquoise (Body, head, legs, ears)
-
Lime or bright green (Belly, bulb, top leaf detail)
-
Red, black, and white (Eyes)
-
-
Crochet Hook: 3.5 mm
-
Safety eyes OR embroidery thread
-
Tapestry needle
-
Polyfill stuffing
-
Stitch markers
🧵 Abbreviations (US Terms)
-
MR – Magic Ring
-
sc – Single Crochet
-
inc – Increase (2 sc in same stitch)
-
dec – Decrease (sc 2 together)
-
sl st – Slip Stitch
-
ch – Chain
-
FO – Fasten Off
🧠 Head
With light blue yarn:
-
MR, 6 sc
-
inc x6 (12)
-
(1 sc, inc) x6 (18)
-
(2 sc, inc) x6 (24)
-
(3 sc, inc) x6 (30)
-
(4 sc, inc) x6 (36)
7–14. sc around (36) -
(4 sc, dec) x6 (30)
-
(3 sc, dec) x6 (24)
-
(2 sc, dec) x6 (18)
-
(1 sc, dec) x6 (12)
-
dec x6 (6)
FO and close. Stuff firmly.
🐾 Body
With light blue yarn:
-
MR, 6 sc
-
inc x6 (12)
-
(1 sc, inc) x6 (18)
-
(2 sc, inc) x6 (24)
5–11. sc around (24) -
(2 sc, dec) x6 (18)
-
(1 sc, dec) x6 (12)
-
dec x6 (6)
FO and stuff. Sew head to body.
💪 Legs (Make 4)
With light blue yarn:
-
MR, 6 sc
-
inc x6 (12)
-
(1 sc, inc) x6 (18)
4–5. sc around (18) -
(1 sc, dec) x6 (12)
-
sc around (12)
FO, stuff lightly and sew two legs in front and two in back, slightly curved.
🦷 Ears (Make 2)
With light blue yarn:
-
MR, 4 sc
-
(1 sc, inc) x2 (6)
-
sc around
-
(2 sc, inc) x2 (8)
-
sc around
FO, flatten and sew to top corners of head.
🌿 Bulb (Back bulb)
With green yarn:
-
MR, 6 sc
-
inc x6 (12)
-
(1 sc, inc) x6 (18)
-
(2 sc, inc) x6 (24)
-
(3 sc, inc) x6 (30)
6–10. sc around (30) -
(3 sc, dec) x6 (24)
-
(2 sc, dec) x6 (18)
-
(1 sc, dec) x6 (12)
-
dec x6 (6)
FO and close. Stuff and sew firmly to the back of the body.
🍃 Leaf Detail (Top swirl)
With green yarn:
ch 12, sc in 2nd ch from hook, hdc, dc in next 2, hdc, sc to end.
FO and sew in spiral shape on top of bulb.
👀 Eyes
Option 1: Safety Eyes
Insert red safety eyes with black and white felt details.
Option 2: Embroider Eyes
-
Use red yarn or felt for the base, black for pupils, and white for shine
-
Outline with black thread and add eyebrows or dots if desired
😄 Mouth & Nose
-
Embroider a small curved mouth with black thread
-
Add two vertical nostrils above the mouth
✂️ Final Assembly
-
Sew ears and limbs securely
-
Attach bulb so it’s centered and stands proud
-
Add embroidery details as shown: eye outlines, mouth, and top swirl
-
Weave in all loose ends
💡 Customization Ideas
-
Use fuzzy yarn for a baby Bulbasaur look
-
Add spots to the back and sides using green felt circles
-
Make a shiny version in teal/pink tones
Your new little Bulbasaur is ready to chill on your desk or venture into battle in the cutest way possible! 🌿🌟