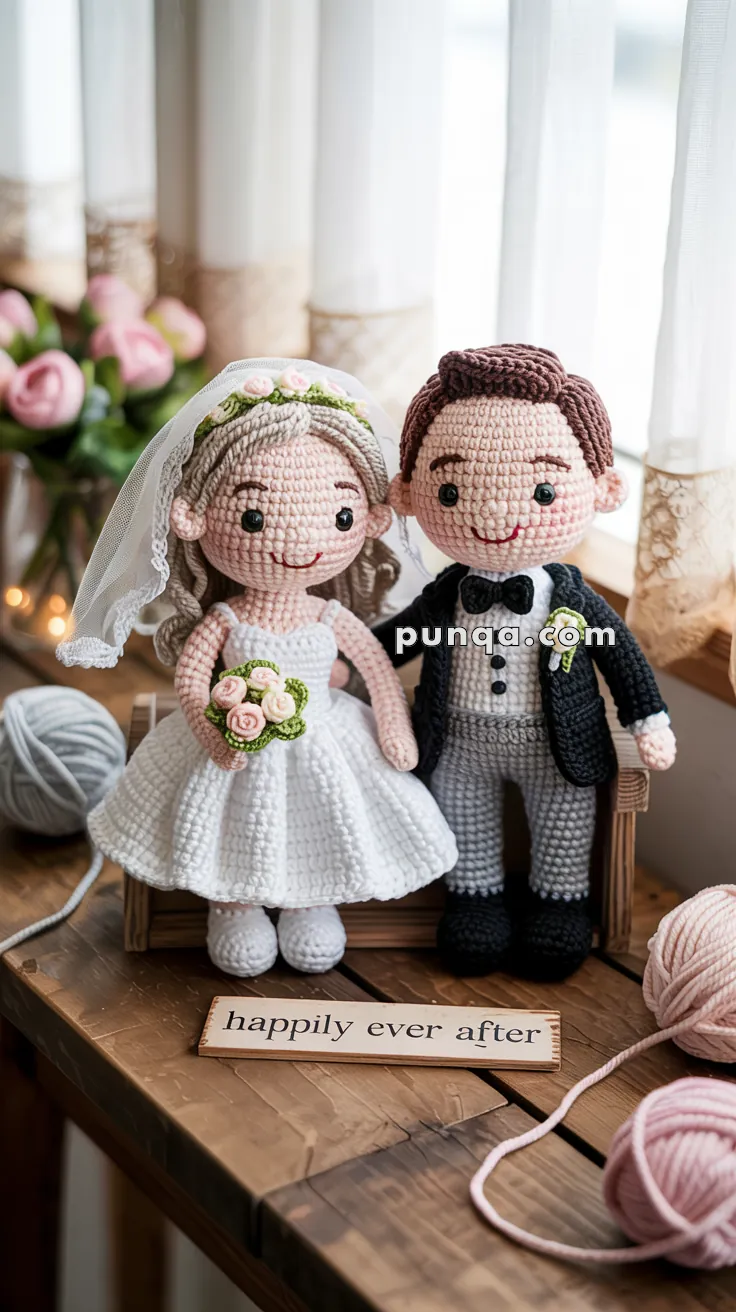
Welcome to the romantic and elegant world of amigurumi! 💍✨ Today, I’m excited to share my free crochet pattern for an Amigurumi Bride & Groom—a beautifully detailed and sentimental creation perfect for wedding keepsakes, bridal gifts, or anyone who enjoys crafting charming and meaningful plush designs! 🧶 Whether you love stitching up delicate figures, experimenting with flowing gowns and tailored suits, or simply want to add a stunning bride and groom duo to your handmade lineup, this pattern will guide you through crafting a beautifully sculpted plush with intricate lace details, a classic tuxedo, and a touch of wedding-day magic! 👰🤵
This design embraces soft whites, elegant blacks, and intricate shaping to bring a timeless and heartfelt presence to your crochet projects! 🧶✨ I’ve carefully outlined each step to ensure your Amigurumi Bride & Groom turn out just right—ready to become a treasured wedding gift or a heartfelt handmade keepsake! 🎁 So grab your hooks, pick out dreamy bridal shades, and let’s stitch up a breathtaking bride and groom duo! 💍
💍 Amigurumi Bride & Groom Crochet Pattern
This elegant crocheted wedding couple captures a joyful bride in a full flowing gown and a dapper groom in a classic tuxedo. With rounded expressive faces, visible ears, neat hairstyles, long relaxed arms, sturdy legs, and layered clothing, this pair is designed to stand beautifully together as a heartfelt handmade keepsake.
✨ Skill Level
Intermediate — includes shaping, garment layering, hair attachment, and detailed assembly.
📏 Finished Size
Approximately 22–26 cm (9–10 in) tall using DK yarn and a 2.5–3.0 mm hook.
🧶 Materials
DK or light worsted yarn:
- Skin tone — heads, necks, hands, ears
- White — bride dress, shoes, veil edge, groom shirt
- Black — groom jacket, shoes, bow tie
- Gray — groom pants
- Brown — groom hair
- Light brown/blonde — bride hair
- Pink, cream, green — bouquet and crown
Other supplies:
- 6–8 mm safety eyes
- Polyester stuffing
- Yarn needle
- Stitch marker
- Soft tulle or lace for veil
🪡 Abbreviations (US Terms)
MR — magic ring
sc — single crochet
inc — increase
dec — decrease
ch — chain
sl st — slip stitch
BLO — back loop only
FO — fasten off
👰 Bride
Head with Ears and Neck
Using skin tone:
R1: MR 6
R2: inc ×6 (12)
R3: (sc, inc) ×6 (18)
R4: (2 sc, inc) ×6 (24)
R5: (3 sc, inc) ×6 (30)
R6–10: sc around (30)
Insert eyes between R7–8.
Ears (worked in R9):
Sc 12, ch 2, sl st into next stitch (ear made), sc 13, ch 2, sl st into next stitch.
R11: sc around (30)
R12: (3 sc, dec) ×6 (24)
R13: (2 sc, dec) ×6 (18)
Stuff firmly.
Neck
R14–15: sc around (18)
R16: (sc, dec) ×6 (12)
FO with long tail.
Embroider gentle eyebrows and a small curved smile.
Hair Cap and Hairstyle
Using light brown/blonde:
R1: MR 6
R2: inc ×6 (12)
R3: (sc, inc) ×6 (18)
R4: (2 sc, inc) ×6 (24)
R5: (3 sc, inc) ×6 (30)
R6–7: sc around
FO and sew snugly to the head.
Attach multiple yarn strands around the lower edge and crown. Arrange into soft waves framing the face and trim evenly.
Body (Upper Torso)
Using white:
R1: MR 6
R2: inc ×6 (12)
R3: (sc, inc) ×6 (18)
R4–8: sc around
Stuff firmly.
Arms (Make 2 — long relaxed arms)
Using skin tone:
R1: MR 6
R2–10: sc around (6)
Stuff lightly. Sew high on the torso so the hands fall naturally near the skirt.
Legs with Shoes (Make 2)
Using white:
R1: MR 6
R2: inc ×6 (12)
R3–6: sc around (12)
Stuff lightly and sew centered under the torso.
Dress Skirt Attachment
Join white yarn at the waist:
R1: inc in each stitch (36)
R2: (5 sc, inc) around
R3: (6 sc, inc) around
R4–5: sc around
R6: (ch 3, sl st) around to form a soft ruffled hem.
Gently shape the skirt outward with your fingers.
Veil and Floral Crown
Attach gathered tulle behind the hairline.
For the crown:
Ch 24 with green, join to ring.
Make 3 tiny rolled flowers and sew evenly spaced.
Attach crown at the top of the head.
Bouquet
Make 3 small rolled flowers and 3 leaves.
Wrap stems with green yarn and sew into the bride’s hand.
🤵 Groom
Head with Ears and Neck
Work exactly as the bride’s head and neck.
Embroider thicker eyebrows and a wider smile.
Hair Cap
Using brown:
Work the same hair cap as the bride.
Add short strands at the front and shape into a neat side-swept style.
Body (Torso Base)
Using gray:
R1: MR 6
R2: inc ×6 (12)
R3: (sc, inc) ×6 (18)
R4–8: sc around
Stuff firmly.
Jacket Overlay
Using black:
Ch 14, join to round.
Work 6 rounds sc to create an open jacket tube.
Sew around torso, leaving front open.
Arms (Make 2)
Skin tone:
R1: MR 6
R2–4: sc around
Switch to black:
R5–10: sc around
Stuff lightly and sew to shoulders.
Legs (Make 2)
Gray:
R1: MR 6
R2: inc ×6 (12)
R3–5: sc around
Switch to black:
R6–7: sc around
Stuff and sew beneath torso.
Shirt Front and Bow Tie
Surface stitch a white vertical panel down the chest.
Bow tie:
Ch 7, sc 6 for 3 rows.
Wrap center and sew at neckline.
Add two embroidered buttons.
Boutonniere
Make one tiny flower and leaf. Sew to the jacket lapel.
🧷 Assembly
Sew heads securely to torsos using the neck opening.
Attach arms evenly at shoulder level.
Position legs so both dolls stand flat.
Shape the bride’s skirt evenly.
Optional: stitch the couple’s hands together.
💖 Final Thoughts
This wedding couple combines smooth shaping, layered garments, and expressive details to create a warm, timeless handmade keepsake. The flowing gown, tailored tuxedo, soft hairstyles, and gentle smiles give the pair a joyful presence that feels celebratory and full of charm.
Displayed together, they beautifully capture the feeling of a special day and make a meaningful gift or treasured decoration. 💕🧶✨