Welcome to the bold and chivalrous world of amigurumi! ⚔️✨ Today, I’m excited to share my free crochet pattern for an Amigurumi Black Knight—a striking and adventurous creation perfect for medieval enthusiasts, fantasy lovers, or anyone who enjoys crafting detailed and heroic plush designs! 🧶 Whether you love stitching up legendary warriors, experimenting with armor textures, or simply want to add a valiant Black Knight to your handmade lineup, this pattern will guide you through crafting a beautifully sculpted plush with a classic helmet, a sturdy shield, and a touch of knightly mystery! 🏰
This design embraces deep blacks, shining silvers, and intricate shaping to bring a powerful and noble presence to your crochet projects! 🧶✨ I’ve carefully outlined each step to ensure your Amigurumi Black Knight turns out just right—ready to stand guard in your collection or become a treasured handmade gift! 🎁 So grab your hooks, pick out bold hues, and let’s stitch up a fearless Black Knight! ⚔️
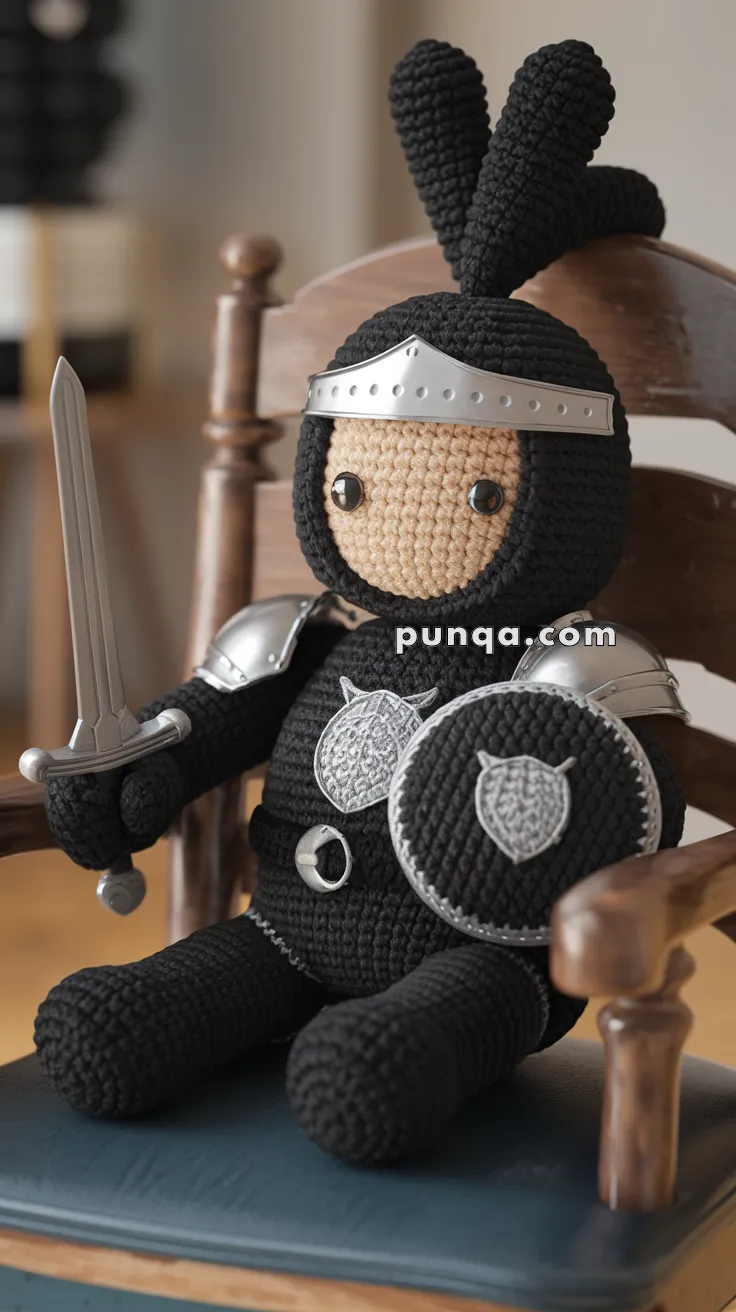
🖤 Amigurumi Black Knight – Free Crochet Pattern
Defend the realm with style! This brave Black Knight is armored in black with shining silver accents, complete with a sword, shield, and plume-topped helmet. Ideal for imaginative play or themed collections, this knight is ready to guard your yarn kingdom! 🏰✨
✨ Skill Level
Intermediate – Involves shaping, sewing parts, color changes, and some surface detail.
📏 Finished Size
Approx. 11–12 inches (28–30 cm) tall using DK yarn and a 2.5–3 mm hook.
🧶 Materials
-
Yarn (DK weight):
-
Beige (face & hands)
-
Black (armor, helmet, limbs)
-
Gray or silver (shield detail, belt, emblem)
-
-
2.5 mm crochet hook
-
Safety eyes (8 mm)
-
Fiberfill stuffing
-
Tapestry needle
-
Scissors
-
Optional: silver metallic embroidery thread, faux mini sword and armor (or crocheted)
🔤 Abbreviations (US Terms)
-
MR – Magic Ring
-
sc – Single crochet
-
inc – Increase
-
dec – Decrease
-
sl st – Slip stitch
-
ch – Chain
-
FO – Fasten off
🧑🎤 Head (Beige)
-
MR, 6 sc
-
inc x6 → (12)
-
(1 sc, inc) x6 → (18)
-
(2 sc, inc) x6 → (24)
-
(3 sc, inc) x6 → (30)
-
(4 sc, inc) x6 → (36)
7–15. sc around -
(4 sc, dec) x6 → (30)
-
(3 sc, dec) x6 → (24)
-
(2 sc, dec) x6 → (18)
Insert eyes between Rounds 10–11, ~8 sts apart
Stuff firmly -
(1 sc, dec) x6 → (12)
-
dec x6 → (6)
FO and close hole
⚫ Body (Black)
-
MR, 6 sc
-
inc x6 → (12)
-
(1 sc, inc) x6 → (18)
-
(2 sc, inc) x6 → (24)
-
(3 sc, inc) x6 → (30)
-
(4 sc, inc) x6 → (36)
7–14. sc around -
(4 sc, dec) x6 → (30)
-
(3 sc, dec) x6 → (24)
17–18. sc around
FO and leave tail for sewing. Stuff firmly.
⚫ Arms (Make 2 – Black with Beige hands)
-
With beige: MR, 6 sc
-
inc x6 → (12)
-
sc around
Switch to black
4–10. sc around
Stuff lightly
FO, leave tail for sewing
⚫ Legs (Make 2 – Black)
-
MR, 6 sc
-
inc x6 → (12)
-
(1 sc, inc) x6 → (18)
4–10. sc around
FO first leg
Make second leg and don’t cut yarn -
ch 2, join to first leg and sc around both legs (18+18+2) → (38)
12–18. sc around for waist
FO and sew to body
🪖 Helmet (Black)
-
MR, 6 sc
-
inc x6 → (12)
-
(1 sc, inc) x6 → (18)
-
(2 sc, inc) x6 → (24)
-
(3 sc, inc) x6 → (30)
6–13. sc around -
(4 sc, dec) x5 → (25)
-
sc around
FO. Add a front panel using silver felt or crochet a silver strip:
Ch 21, sc in 2nd ch and across, sew across front as a visor band
🪶 Plume (Black – Make 2)
-
Ch 15, sl st in 2nd ch from hook, sc across
Roll slightly and sew to top center of helmet
🛡️ Shield (Black Circle + Appliqué)
-
MR, 6 sc
-
inc x6 → (12)
-
(1 sc, inc) x6 → (18)
-
(2 sc, inc) x6 → (24)
-
(3 sc, inc) x6 → (30)
-
(4 sc, inc) x6 → (36)
FO
Use gray to embroider or applique a silver emblem
Back it with felt for sturdiness
Sew to hand or stitch a strap to attach
🗡️ Sword (Optional Crochet)
Blade: Ch 16, sl st back across
Handle: Wrap black yarn around toothpick or make small black tube (ch 4, join, sc rounds)
Attach sword to hand or belt
🧵 Assembly
-
Sew head to body
-
Attach arms on each side
-
Sew legs if separate
-
Position helmet snugly on head
-
Attach plume and visor
-
Add shield and sword
-
Embroider chest armor detail or sew small gray applique (emblem/crest)
-
Optionally sew on gray circles or felt for shoulder armor
🪄 Final Notes
This mighty knight stands tall and ready to protect your crochet realm! Change colors for different factions or customize the crest for family gifts or fantasy collections. Add a tiny dragon friend or castle background for even more fun! 🐉🏰