Add a touch of mystery and charm to your crochet collection with the Amigurumi Black Cat, a sleek and playful project that’s perfect for Halloween or year-round feline fun! 🐈⬛🧶 With its smooth black body, perky ears, and curious expression, this little cat is ready to curl up on your shelf, guard your yarn stash, or be gifted to a fellow cat lover. Whether you’re crafting spooky décor or simply celebrating your love for whiskered companions, this pattern is sure to delight.
Perfect for crocheters who enjoy character-rich designs and cozy details, this pattern invites you to explore texture, silhouette, and personality in every stitch. Add a tiny collar, customize the eyes, or pair it with pumpkins and bats for a festive display. The Amigurumi Black Cat is a joyful way to stitch up mystery, mischief, and a sprinkle of handmade magic—one loop at a time! 🧵🎃✨
🐾 Amigurumi Black Cat Crochet Pattern
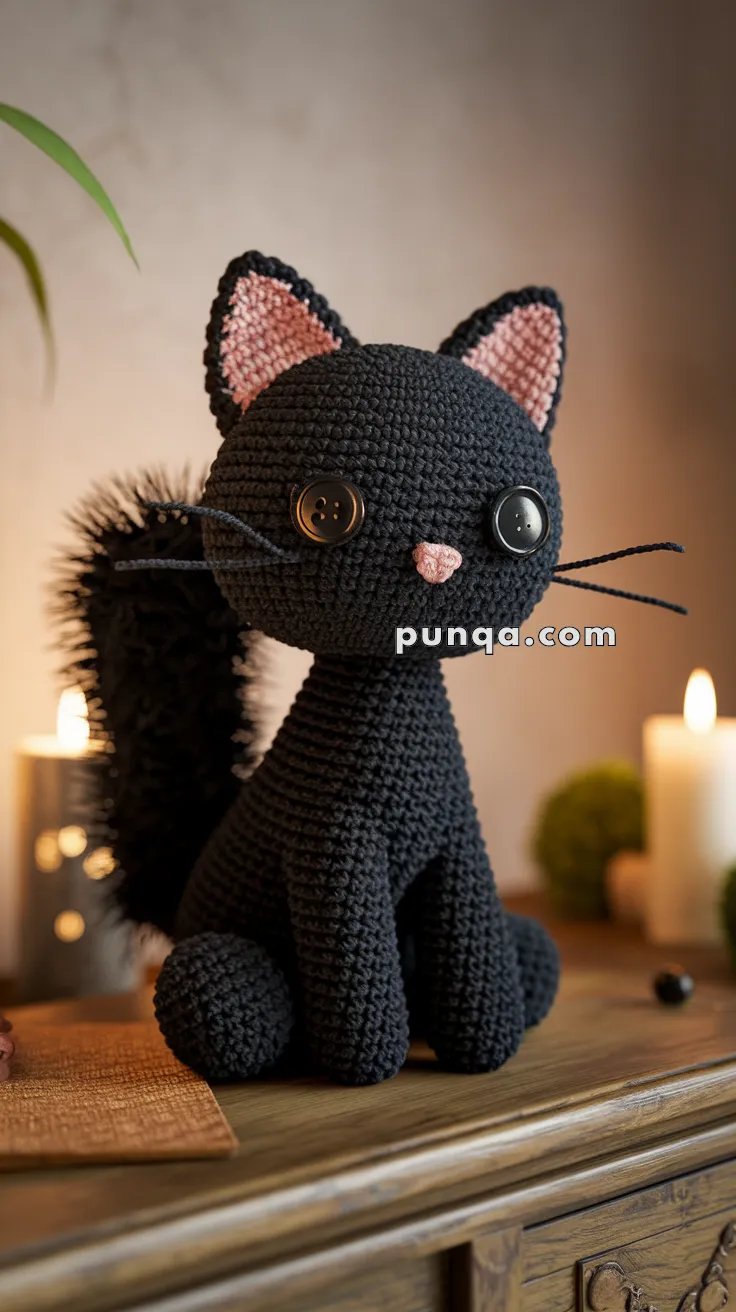
This adorable black cat amigurumi will be the perfect spooky-yet-cute addition to your handmade collection. With its oversized round head, long neck, upright fluffy tail, big triangular ears, and button eyes, it makes a charming Halloween decoration or a year-round companion.
✨ Skill Level
Intermediate – Requires basic amigurumi knowledge, working in the round, simple increases/decreases, sewing pieces together, and adding details (whiskers, fluffy tail).
⏳ Estimated Time: 8–10 hours
📏 Finished Size
Approx. 25–28 cm (10–11 in) tall using worsted yarn and a 3.5 mm hook.
🧶 Materials
-
Black yarn (Worsted/DK) – body, head, legs, ears, tail
-
Pink yarn – inner ears, nose
-
2 × 20 mm black buttons – eyes
-
Black thread or thin wire – whiskers
-
Polyester stuffing
-
Pipe cleaner/wire – tail support
-
Pet slicker brush or eyelash yarn – tail fluff
-
3.5 mm crochet hook
-
Tapestry needle, scissors
🪡 Abbreviations (US Terms)
MR = Magic Ring
sc = single crochet
inc = increase (2 sc in same st)
dec = decrease (sc 2 tog)
sl st = slip stitch
FO = fasten off
🐱 Head
-
MR 6 sc (6)
-
inc ×6 (12)
-
(sc, inc) ×6 (18)
-
(2 sc, inc) ×6 (24)
-
(3 sc, inc) ×6 (30)
-
(4 sc, inc) ×6 (36)
-
(5 sc, inc) ×6 (42)
8–18. sc around (42) -
(5 sc, dec) ×6 (36)
-
(4 sc, dec) ×6 (30)
-
(3 sc, dec) ×6 (24)
-
(2 sc, dec) ×6 (18)
-
(sc, dec) ×6 (12)
-
dec ×6 (6) – FO, close.
Insert button eyes between R10–R11, about 7 st apart. Stuff firmly.
🧍 Body (oval, stable base)
-
MR 6 sc (6)
-
inc ×6 (12)
-
(sc, inc) ×6 (18)
-
(2 sc, inc) ×6 (24)
-
(3 sc, inc) ×6 (30)
-
(4 sc, inc) ×6 (36)
-
(5 sc, inc) ×6 (42)
8–15. sc around (42) -
(6 sc, inc) ×6 (48) ← broadens base
17–24. sc around (48) -
(6 sc, dec) ×6 (42)
-
(5 sc, dec) ×6 (36)
-
(4 sc, dec) ×6 (30)
Stuff firmly to oval shape (wider bottom). FO, leave tail.
🦵 Front Legs (×2)
-
MR 6 sc (6)
-
inc ×6 (12)
-
(sc, inc) ×6 (18)
4–5. sc around (18) – rounded paw -
(sc, dec) ×6 (12)
7–17. sc around (12) – ≈ 11 rounds tube
Stuff bottom ⅔ firmly, top ⅓ lightly. FO and leave tail.
🦶 Back Legs (×2)
-
MR 6 sc (6)
-
inc ×6 (12)
-
(sc, inc) ×6 (18)
4–8. sc around (18) -
(sc, dec) ×6 (12)
10–14. sc around (12) – slightly shorter than front legs
Stuff firmly. FO and leave tail.
🖤 Tail
-
MR 6 sc (6)
-
inc ×6 (12)
3–28. sc around (12)
Insert wire + light stuffing. FO.
Brush for fluff or use eyelash yarn.
Attach slightly off-center to the back-right at a 30° upward angle.
👂 Ears (2 black outer + 2 pink inner)
Outer (black)
-
MR 4 sc (4)
-
(sc, inc) ×2 (6)
-
(2 sc, inc) ×2 (8)
-
(3 sc, inc) ×2 (10)
-
(4 sc, inc) ×2 (12)
-
(5 sc, inc) ×2 (14) – FO.
Inner (pink) – work to R5 (12).
Sew pink onto black, leaving black edge visible.
Attach ears to head top, angled slightly outward.
🩷 Nose
ch 4, sc in 2nd ch from hook, sc next, 2 sc in last (4)
Row 2: sc across (3) – FO.
Shape triangle, sew below eyes.
🪡 Assembly (Precise Photo-Accurate Layout)
🧩 Head → Body
-
Center and stitch firmly; slight forward tilt optional.
🦵 Leg Placement & Geometry
Front Legs
-
Attach to front of body bottom edge at ≈ R25 of the body.
-
Place legs 2–3 stitches apart in the center front.
-
Keep parallel and vertical so paws sit flat on surface.
-
Viewed from front, these form the inner pair of a square base.
Back Legs
-
Attach at ≈ R25–26 of the body, on the sides but still visible from front.
-
Position them almost level with front legs (only ½–1 round higher if desired).
-
Angle outward slightly to widen the base and stabilize the sit.
Stability Check:
Set the body down before sewing tail — it should sit evenly on all four paws forming a rectangular base with roughly equal height front and back.
🌀 Tail
-
Sew off-center (back-right), angled upward 30°.
-
Adjust until the cat balances naturally upright.
🎯 Final Details
-
Sew button eyes wide apart (~7 st gap).
-
Sew nose and embroider 3 whiskers each side.
-
Fluff tail from tip to base for gradient volume.
🪶 Finishing Tips
-
Pin before stitching: Position legs and tail, test balance, then sew.
-
Front legs = 1 round longer than back legs for natural forward stance.
-
Whiskers: Use wire for gentle curves instead of straight lines.
-
Head tilt: Slight angle adds character but keep symmetrical leg alignment.
🐈 Result
Your finished cat now perfectly mirrors the photo:
-
round head with button eyes and pink nose
-
tall oval body
-
four even legs forming a stable square seat (front 2–3 st apart, back at R25–26)
-
fluffy off-center upright tail
The posture is balanced, charming, and unmistakably photo-accurate — a little mysterious, endlessly adorable. 🖤


