Say hello to the tiniest bundles of joy—this Amigurumi Baby Boy & Baby Girl Dolls crochet pattern is full of sweetness, snuggles, and handmade charm! 🍼🧶 With their soft features, cozy outfits, and adorable expressions, these little dolls are perfect for baby shower gifts, nursery décor, or simply adding a dose of cuteness to your amigurumi collection. Whether you’re crafting a sleepy-eyed newborn or a playful little crawler, these baby dolls are stitched with love and ready to melt hearts.
Designed with gentle shaping and customizable details, you can personalize each doll with different skin tones, hair styles, and tiny accessories like pacifiers, bows, or blankets. Dress them in pastel onesies, add embroidered names, or create a whole set of siblings for extra fun. Whether nestled in a crib display, gifted to a new parent, or starring in a handmade storybook scene, these Baby Boy & Baby Girl Amigurumi Dolls are a joyful and satisfying project—perfect for stitching up a little love, one loop at a time! 💖🧸✨
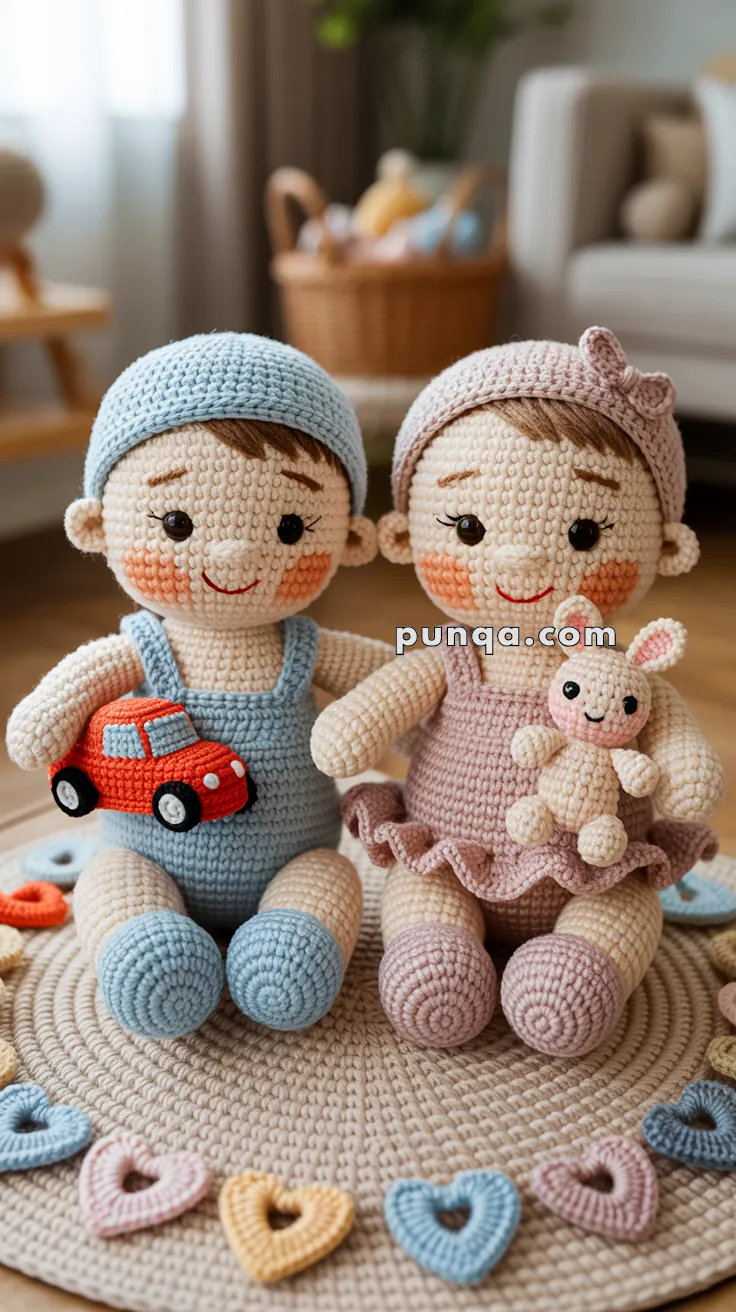
🍼 Amigurumi Baby Boy & Baby Girl Crochet Patterns
These two sweet babies are ready for cuddles! The baby boy wears a blue romper and holds a red toy car, while the baby girl wears a pink frilly dress with a bow and carries her bunny plushie.
✨ Skill Level
Intermediate to Advanced – Requires amigurumi shaping, embroidery skills, and garment construction.
📏 Finished Size
Approximately 26–28 cm (10–11″) tall when sitting, using worsted weight yarn and 2.75mm hook.
🧶 Materials
For Both Dolls:
- Skin tone/beige yarn (worsted weight) – 150g total
- Polyester fiberfill stuffing
- 2.75mm (C) crochet hook (main work)
- 2.5mm (B) crochet hook (fine details)
- Yarn needle (blunt tip for sewing)
- Embroidery needle (sharp)
- Stitch markers
- Pins for assembly
- Black embroidery thread (eyelashes, car details)
- Brown embroidery yarn (eyebrows)
- Red/coral embroidery yarn (smiles)
Baby Boy Specific:
- Light blue yarn – 80g (romper, hat, shoes)
- Red/orange yarn – 20g (car appliqué)
- White yarn – 10g (car windows)
- Black yarn – 10g (car wheels, tires)
Baby Girl Specific:
- Dusty pink/mauve yarn – 80g (dress, hat, shoes)
- Cream/ivory yarn – 15g (bunny body)
- Pink yarn – 10g (bunny ears/cheeks, bow)
- Tiny black beads or thread (bunny eyes)
🔤 Abbreviations (US Terms)
- MR = Magic Ring
- sc = single crochet
- inc = increase (2 sc in same st)
- dec = invisible decrease (sc2tog)
- hdc = half double crochet
- dc = double crochet
- ch = chain
- sl st = slip stitch
- BLO = back loops only
- FLO = front loops only
- R = Round
- st(s) = stitch(es)
- FO = fasten off
👶 SHARED BODY PARTS
HEAD (Make 1 per doll)
With skin tone yarn and 2.75mm hook:
- R1: MR, 6 sc (6)
- R2: inc × 6 (12)
- R3: (sc, inc) × 6 (18)
- R4: (2 sc, inc) × 6 (24)
- R5: (3 sc, inc) × 6 (30)
- R6: (4 sc, inc) × 6 (36)
- R7: (5 sc, inc) × 6 (42)
- R8: (6 sc, inc) × 6 (48)
- R9-18: sc around (48) – 10 rounds
- R19: (6 sc, dec) × 6 (42)
- R20: (5 sc, dec) × 6 (36)
- R21: (4 sc, dec) × 6 (30)
- R22: (3 sc, dec) × 6 (24)
- R23: (2 sc, dec) × 6 (18)
- Stuff head very firmly
- R24: (sc, dec) × 6 (12)
- R25: dec × 6 (6)
- FO, close opening with needle.
Shape the face: Gently squeeze and mold to create slightly flatter face front.
EARS (Make 2 per doll)
With skin tone yarn:
- R1: MR, 6 sc (6)
- R2: sc around (6)
- R3: sc around (6)
- FO, leaving long tail.
Don’t stuff. Flatten slightly and sew to sides of head at R12-14, about 8 stitches from center front.
BODY (Make 1 per doll)
With skin tone yarn (will be covered by clothes):
- R1: MR, 6 sc (6)
- R2: inc × 6 (12)
- R3: (sc, inc) × 6 (18)
- R4: (2 sc, inc) × 6 (24)
- R5: (3 sc, inc) × 6 (30)
- R6: (4 sc, inc) × 6 (36)
- R7-16: sc around (36) – 10 rounds
- R17: (4 sc, dec) × 6 (30)
- R18-20: sc around (30) – 3 rounds
- R21: (3 sc, dec) × 6 (24)
- R22-23: sc around (24) – 2 rounds
- R24: (2 sc, dec) × 6 (18)
- Stuff body firmly
- R25: (sc, dec) × 6 (12)
- R26: dec × 6 (6)
- FO, close opening.
ARMS (Make 2 per doll)
With skin tone yarn:
- R1: MR, 6 sc (6)
- R2: inc × 6 (12)
- R3: (sc, inc) × 6 (18)
- R4-5: sc around (18) – 2 rounds
- R6: (sc, dec) × 6 (12)
- R7-20: sc around (12) – 14 rounds
- Stuff lightly (arms should be soft and poseable)
- R21: dec × 6 (6)
- FO, leaving long tail for sewing.
Don’t close completely – leave small opening.
LEGS (Make 2 per doll)
Start with shoe color (blue for boy, pink for girl):
Shoe Section:
- R1: MR, 6 sc (6)
- R2: inc × 6 (12)
- R3: (sc, inc) × 6 (18)
- R4: (2 sc, inc) × 6 (24)
- R5: (3 sc, inc) × 6 (30)
- R6: BLO sc around (30) – creates shoe sole ridge
- R7-8: sc around (30) – 2 rounds
- R9: 9 sc, (dec) × 6, 9 sc (24) – shapes toe
- R10: 7 sc, (dec) × 5, 7 sc (19)
- R11: sc around (19)
Switch to skin tone yarn:
- R12-24: sc around (19) – 13 rounds
- Stuff leg firmly
- R25: (sc, dec) × 6, sc (13)
- R26: dec × 6, sc (7)
- FO, leaving long tail.
👦 BABY BOY DOLL
FACE EMBROIDERY
With head firmly stuffed and shaped, embroider features:
Placement Guide:
- Eyes: R13-14, approximately 8-9 stitches apart
- Eyebrows: R11-12, above eyes
- Cheeks: R15-17, below and slightly outside eyes
- Mouth: R18, centered between cheeks
Closed Eyes (Make 2):
Using black embroidery thread:
- Mark eye positions with pins
- Crescent shape: Embroider curved line (like upside-down smile) spanning 3-4 stitches wide
- Work 2-3 rows of back stitch to create thick crescent
- Eyelashes: From outer corner of each eye, create 3-4 straight stitches extending outward and slightly upward (2-3mm long)
Eyebrows (Make 2):
Using brown yarn or embroidery thread:
- Position above each eye at R11-12
- Embroider 3-4 straight horizontal stitches (about 4 stitches wide)
- Make slightly curved/arched shape
- Angle: outer edge slightly higher than inner edge
Rosy Cheeks (Make 2):
Using peachy-pink or coral yarn:
Method 1 – Embroidered (Recommended):
- Mark cheek circles (about 5 stitches diameter)
- Use satin stitch to fill circles completely
- Build up 2-3 layers for dimension
- Keep edges smooth and rounded
Method 2 – Crocheted Appliqué:
- With pink yarn: MR, 6 sc, inc × 6 (12), FO
- Sew flat circles onto cheeks
- Optional: add tiny highlights with white thread
Smile:
Using red or coral embroidery thread:
- Position at R18, centered between cheeks
- Create small curved smile (3-4 stitches wide)
- Use back stitch or stem stitch
- Keep subtle and sweet
BLUE HAT/CAP
With light blue yarn and 2.75mm hook:
- R1: MR, 6 sc (6)
- R2: inc × 6 (12)
- R3: (sc, inc) × 6 (18)
- R4: (2 sc, inc) × 6 (24)
- R5: (3 sc, inc) × 6 (30)
- R6: (4 sc, inc) × 6 (36)
- R7: (5 sc, inc) × 6 (42)
- R8: (6 sc, inc) × 6 (48)
- R9-15: sc around (48) – 7 rounds
- R16: FLO sc around (48) – creates brim ridge
- R17-18: sc around (48) – 2 rounds for brim
- FO, leaving long tail.
Sew firmly to head, covering approximately R1-10 of head.
BLUE ROMPER
Worked in two pieces (front and back), then joined:
FRONT PANEL:
With light blue yarn:
- Ch 19
- Row 1: sc in 2nd ch from hook, sc across (18), ch 1, turn
- Row 2-12: sc across (18), ch 1, turn – 11 rows
- Row 13 (begin armhole shaping): sl st 2, sc 14, ch 1, turn (14)
- Row 14-18: sc across (14), ch 1, turn – 5 rows
- Row 19 (neck shaping): sc 5, ch 1, turn
- Row 20: sc 5, FO
Rejoin yarn on other side:
- Row 19b: sc 5, ch 1, turn
- Row 20: sc 5, FO
BACK PANEL:
Same as front, but no neck shaping:
- Work Rows 1-18 same as front
- FO after Row 18
STRAPS (Make 2):
- Ch 20, sl st in 2nd ch from hook, sl st across (19)
- FO, leaving tails for sewing
ASSEMBLY:
- Place front and back panels on body
- Sew side seams from bottom to armholes
- Attach straps from front top corners to back top corners
- Sew romper onto body securely
- Optional: work 1 round sc around armholes and neck for clean finish
CAR APPLIQUÉ
Worked flat, then sewn onto romper front:
Car Body (Red/Orange):
- Ch 13
- Row 1: sc in 2nd ch from hook, sc across (12), ch 1, turn
- Row 2-7: sc across (12), ch 1, turn – 6 rows total
- FO, leaving long tail
Windows (White – Make 2):
- Ch 5
- Row 1: sc in 2nd ch from hook, sc across (4), ch 1, turn
- Row 2-3: sc across (4), ch 1, turn
- FO
Position and sew windows onto top half of car body (side by side with small gap between).
Wheels (Black – Make 2):
- R1: MR, 6 sc (6)
- R2: inc × 6 (12)
- FO, leaving long tail
Car Assembly:
- Sew windows onto red car body
- Use black embroidery thread to outline windows
- Sew wheels to bottom corners of car
- Add door lines with black thread (vertical line between windows)
- Sew entire car appliqué centered on romper front at chest level
👧 BABY GIRL DOLL
FACE EMBROIDERY
Same as boy – see detailed instructions above:
- Closed crescent eyes with lashes
- Brown eyebrows
- Peachy-pink cheeks
- Red smile
PINK HAT/BONNET WITH BOW
Hat Base:
With dusty pink yarn:
- R1: MR, 6 sc (6)
- R2: inc × 6 (12)
- R3: (sc, inc) × 6 (18)
- R4: (2 sc, inc) × 6 (24)
- R5: (3 sc, inc) × 6 (30)
- R6: (4 sc, inc) × 6 (36)
- R7: (5 sc, inc) × 6 (42)
- R8: (6 sc, inc) × 6 (48)
- R9-15: sc around (48) – 7 rounds
- R16: FLO sc around (48)
- R17-18: sc around (48)
- FO, leaving long tail
Bow:
With dusty pink yarn:
Bow Loops (Make 2):
- Ch 12, join with sl st to form ring
- R1: sc around (12)
- R2-3: sc around (12)
- FO
Center Wrap:
- Ch 6
- Row 1: sc in 2nd ch from hook, sc across (5)
- Row 2-3: sc across (5), ch 1, turn
- FO, leaving long tail
Bow Assembly:
- Stack two loops side by side
- Pinch center together
- Wrap center piece around pinched middle and sew secure
- Sew completed bow to top side of hat
Sew hat onto head.
PINK DRESS
Worked top-down onto body:
Bodice:
With dusty pink yarn, join to body at R17 (chest level):
- R1: Join yarn, sc 30 around body (30)
- R2-4: sc around (30) – 3 rounds
- R5: sc 7, ch 6 (strap), skip 8 sts, sc 7, ch 6 (strap), skip 8 sts (16 sc + 12 ch)
- R6: sc around, including ch sts (28)
- R7-8: sc around (28)
Skirt:
- R9: Working in FLO, (2 sc, inc) × 9, sc (37)
- R10: sc around (37)
- R11: (3 sc, inc) × 9, sc (46)
- R12: sc around (46)
- R13: (4 sc, inc) × 9, sc (55)
- R14: sc around (55)
Ruffle Edge:
- R15: (sc, hdc, dc, hdc, sc) in same st, skip 1 st repeat around
- FO
The dress should have a fitted bodice and flared ruffled skirt.
BUNNY TOY
Small amigurumi bunny (approximately 6-7 cm tall):
Head:
With cream/ivory yarn and 2.5mm hook:
- R1: MR, 6 sc (6)
- R2: inc × 6 (12)
- R3: (sc, inc) × 6 (18)
- R4-7: sc around (18) – 4 rounds
- R8: (sc, dec) × 6 (12)
- Stuff
- R9: dec × 6 (6)
- FO, close opening
Body:
With cream yarn:
- R1: MR, 6 sc (6)
- R2: inc × 6 (12)
- R3-6: sc around (12) – 4 rounds
- R7: dec × 6 (6)
- Stuff
- FO, leaving tail to sew to head
Ears (Make 2):
With cream yarn:
- Ch 7
- Row 1: sc in 2nd ch from hook, sc 5 (6), ch 1, turn
- Row 2: sc across (6), ch 1, turn
- Row 3: dec, sc 2, dec (4), ch 1, turn
- Row 4: dec × 2 (2)
- FO
Inner Ear (Make 2) – Pink:
- Ch 5
- Row 1: sc in 2nd ch from hook, sc 3 (4)
- Row 2: dec × 2 (2)
- FO
Sew pink inner ears onto cream ears, then sew ears to top of head.
Arms (Make 2):
With cream yarn:
- R1: MR, 4 sc (4)
- R2-5: sc around (4) – 4 rounds
- FO, leaving tail
Don’t stuff. Sew to body sides.
Legs (Make 2):
With cream yarn:
- R1: MR, 5 sc (5)
- R2-3: sc around (5)
- FO
Stuff lightly, sew to bottom of body.
Bunny Face:
- Eyes: Tiny black beads or French knots
- Nose: Tiny pink triangle (embroidered)
- Cheeks: Small pink circles (embroidered satin stitch)
- Smile: Tiny curved line below nose
🎨 FINAL ASSEMBLY
For Both Dolls:
- Attach head to body: Sew securely, head tilted slightly forward
- Attach arms: Sew to body sides at R18-19 (shoulder level), positioned slightly forward
- Attach legs: Sew to bottom front of body, angled slightly outward for sitting position
- Position dolls: Bend legs forward, arms slightly bent
- Final checks: Ensure all parts secure, weave in ends
Baby Boy Specific:
- Ensure car appliqué is centered and flat
- Position arms so they can appear to “hold” car
Baby Girl Specific:
- Sew or tuck bunny into one arm
- Adjust dress ruffles
💡 Tips for Success
- Stuffing: Head should be very firm; body firm but not hard; limbs soft and poseable
- Face embroidery: Practice on scrap fabric first; use sharp needle for clean stitches
- Even tension: Keep stitches consistent for smooth surface
- Blocking: Lightly steam clothing pieces before attaching for crisp look
- Positioning: Dolls should sit independently – adjust leg angle if needed
📐 Size Adjustments
- Smaller dolls (20cm): Use 2.25mm hook, DK weight yarn
- Larger dolls (35cm): Use 3.5mm hook, add 5-8 rounds to body and legs
✨ Now you have two adorable baby dolls – the boy with his car and the girl with her bunny. Perfect as nursery décor or a gift set!