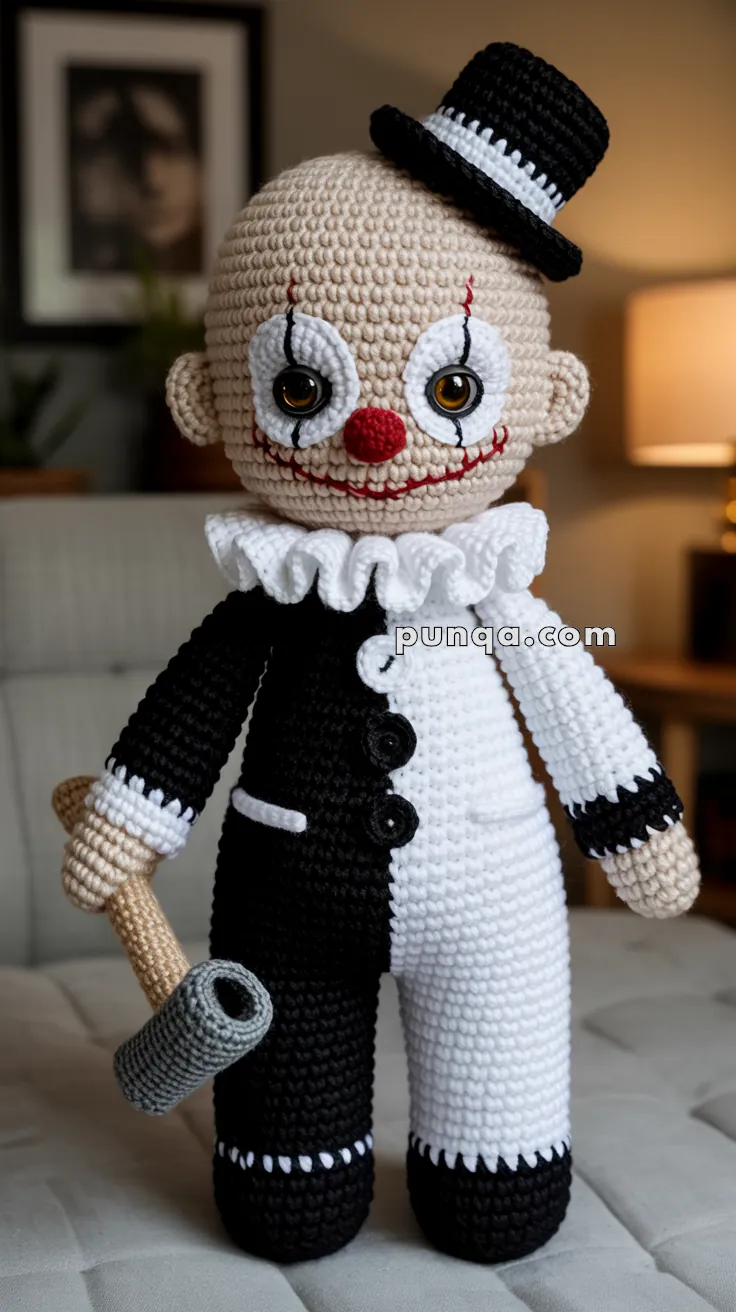
Step into the twisted world of horror with the Amigurumi Art the Clown, a spine-chilling crochet creation inspired by the cult classic Terrifier! 🎪🧶 With his stark black-and-white costume, exaggerated grin, and eerie stare, this tiny terror brings a dose of frightful fun to your handmade lineup. Whether you’re crafting for Halloween, a horror movie fan, or just love bold character designs, Art is sure to make a haunting impression—one sinister stitch at a time.
Perfect for crocheters who enjoy edgy themes and expressive details, this pattern invites you to play with dramatic contrasts, textured accents, and creepy little touches like ruffles, gloves, or a tiny prop weapon. Make him as a spooky display piece or pair him with other horror-inspired amigurumi for a full fright-night ensemble. The Amigurumi Art the Clown is a thrilling way to stitch up chills, character, and a whole lot of handmade mischief—loop by loop! 🧵🎃
🤡 Amigurumi Art the Clown Crochet Pattern
Bring eerie detail into yarn form with this Art the Clown Amigurumi Doll, inspired by Terrifier. With his bald head, stitched red grin, split black-and-white suit, ruffled collar, tilted top hat, and mallet, he’s a spooky addition to your crochet collection.
✨ Skill Level
Intermediate–Advanced – involves shaping, color changes, embroidery, and small accessories.
📏 Finished Size
Approx. 11–12 inches (28–30 cm) tall with DK or worsted yarn and a 2.5–3.5 mm hook.
🧶 Materials
- DK or worsted yarn:
- Beige/skin tone – head & hands
- White – half of suit, collar, hat stripe, eye whites, pocket
- Black – half of suit, hat, buttons, face details
- Red – nose, smile embroidery
- Grey – mallet head
- Light brown – mallet handle
- 10–12 mm safety eyes (gold or brown recommended)
- Crochet hook: 2.5–3.5 mm
- Polyfill stuffing
- Tapestry needle
- Black embroidery thread – mouth stitches, eye streaks
- Stitch marker
🔤 Abbreviations (US Terms)
- MR = Magic Ring
- sc = single crochet
- inc = increase (2 sc in same st)
- dec = decrease (sc2tog)
- sl st = slip stitch
- ch = chain
- FO = fasten off
- FLO = front loop only
- BLO = back loop only
🪡 Pattern Instructions
👩 Head (Beige)
- MR, 6 sc [6]
- inc ×6 [12]
- (1 sc, inc) ×6 [18]
- (2 sc, inc) ×6 [24]
- (3 sc, inc) ×6 [30]
- (4 sc, inc) ×6 [36]
7–14. sc around [36]
👉 Insert safety eyes between R10–11, spaced 7 sts apart. Attach crocheted eye whites (see below) behind them. - (4 sc, dec) ×6 [30]
- (3 sc, dec) ×6 [24]
- (2 sc, dec) ×6 [18]
- (1 sc, dec) ×6 [12]
- dec ×6 [6], FO, close, stuff firmly.
👀 Eye Whites (Make 2, White)
- Ch 6.
- R1: sc in 2nd ch from hook, sc in next 3, 3 sc in last. Rotate, sc across other side, 2 sc in final. [10]
- R2: inc, sc 3, inc ×3, sc 3, inc ×2 [16]
- R3: sc around [16]. FO.
👉 Place behind safety eyes before attaching to head.
👂 Ears (Make 2, Beige)
- MR, 6 sc [6]
- (1 sc, inc) ×3 [9]
- sc around [9]
- FO, flatten slightly. Sew to sides of head at eye level.
😈 Face Details
- Nose: MR, 6 sc in red. Sew to center.
- Smile: Embroider wide red grin across lower face.
- Stitches: Add vertical black embroidery lines over the red grin.
- Eye makeup: Use black and red thread to embroider streaks above and below each eye.
🖤 Body (Split Suit)
Work bottom-up, black on left, white on right. Carry yarn along inside or make halves separately and sew.
- MR, 6 sc (3 black, 3 white) [6]
- (sc, inc) ×3 each side [12]
- (2 sc, inc) ×3 each side [18]
- (3 sc, inc) ×3 each side [24]
- (4 sc, inc) ×3 each side [30]
- (5 sc, inc) ×3 each side [36]
7–20. sc around [36] - (4 sc, dec) ×6 [30]
- (3 sc, dec) ×6 [24]
- (2 sc, dec) ×6 [18]
FO, stuff, sew to head.
Buttons (Black, make 3): MR, 6 sc, sl st, FO. Sew down front seam.
Pocket (White, make 1):
- Ch 6.
- R1–5: sc across [5]. FO.
- Sew to black side below top button.
🤲 Arms (Make 2)
Start with beige (hands):
- MR, 6 sc [6]
2–5. sc around [6]
Switch to sleeve color (one black, one white):
6–15. sc around [6]
FO, stuff lightly, sew to body sides.
👖 Legs (Make 2 – one black, one white)
- MR, 6 sc [6]
- inc ×6 [12]
- (1 sc, inc) ×6 [18]
4–15. sc around [18] - (1 sc, dec) ×6 [12]
- sc around [12]
FO, stuff, sew to body bottom.
👉 Add tiny seam stitches at cuffs with contrasting yarn.
⛪ Ruffled Collar (White)
- Ch 40, join [40]
- sc around [40]
- (sc, inc) ×20 [60]
- (sc, inc) ×30 [90]
FO, sew evenly around neck.
🎩 Top Hat
Hat Top (Black):
- MR, 6 sc [6]
- inc ×6 [12]
- (1 sc, inc) ×6 [18]
- (2 sc, inc) ×6 [24]
5–11. sc around [24]
Brim (Black):
12. FLO, (3 sc, inc) ×6 [30]
13. (4 sc, inc) ×6 [36]
Hat Band (White):
14. sc around [36]
FO, sew slightly tilted onto head.
🔨 Mallet Accessory
Handle (Brown):
- MR, 6 sc [6]
2–12. sc around [6]
FO, stuff lightly.
Head (Grey):
- MR, 6 sc [6]
- inc ×6 [12]
- (1 sc, inc) ×6 [18]
4–6. sc around [18] - (1 sc, dec) ×6 [12]
- dec ×6 [6]
FO, stuff, sew to handle.
Attach to one hand.
🧷 Final Assembly
- Sew head firmly to body.
- Attach arms (one holding mallet).
- Sew legs securely at bottom.
- Add collar, sewing evenly.
- Tilt and sew top hat.
- Attach buttons and pocket.
- Embroider final makeup details for full creepy look.
🌟 Closing Thoughts
This Art the Clown Amigurumi is the perfect mix of spooky and playful. With his split costume, eerie stitched grin, ruffled collar, tilted top hat, and mallet, he’ll be a creepy conversation piece in any collection — ideal for Halloween or fans of Terrifier.