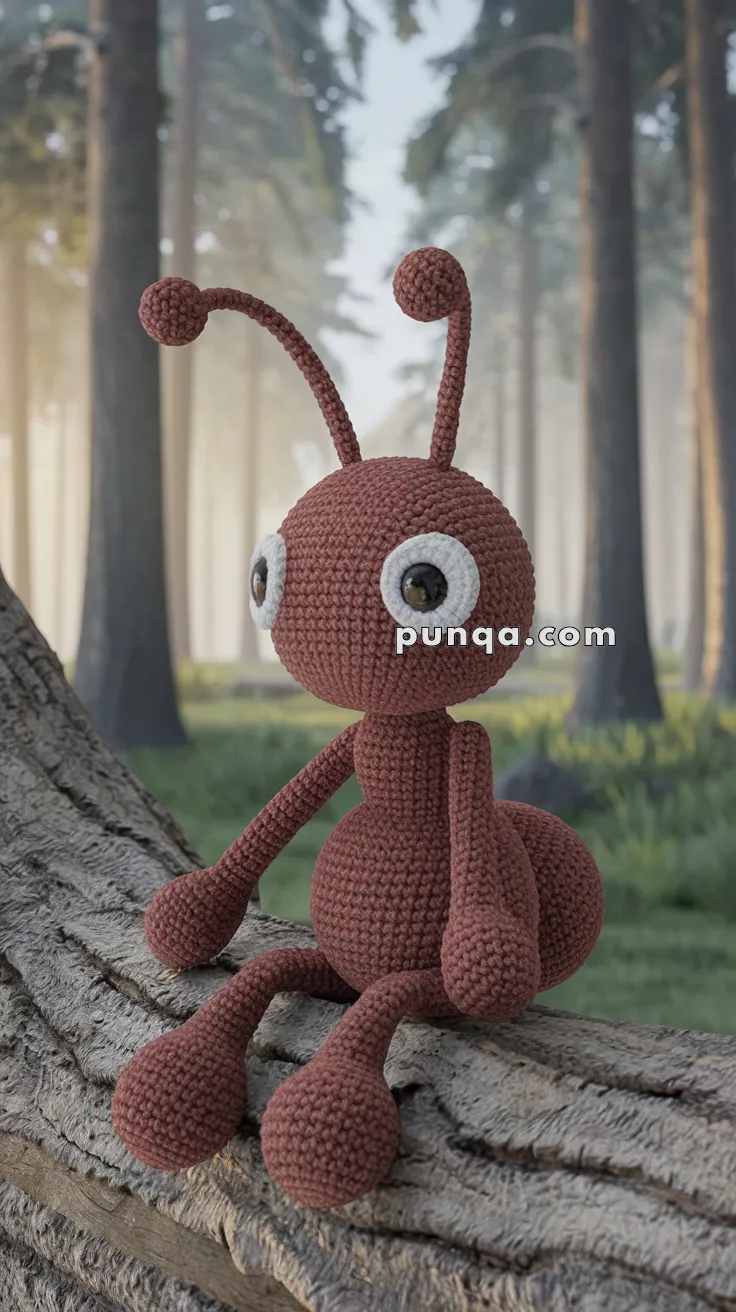
March into cuteness with the Amigurumi Ant, a delightful crochet creation that’s full of charm and character! 🐜🧶 With its rich brown body, big expressive eyes, bobbly limbs, and a rounded, detailed back, this tiny insect is anything but ordinary. Whether you’re crafting a fun addition to your bug-themed collection or looking for a quirky handmade gift, this ant is sure to bring a smile to anyone who sees it.
Perfect for crocheters who love playful shapes and imaginative designs, this pattern invites you to explore texture and personality in every stitch. Add a tiny leaf, pair it with other garden critters, or create a whole colony for a whimsical display. The Amigurumi Ant is a joyful way to stitch up curiosity, creativity, and a sprinkle of handmade magic—one loop at a time! 🧵✨🌿
🐜 Amigurumi Ant Crochet Pattern
Meet your forest friend — a charming crocheted ant with big eyes, bobbly limbs, and a rounded, detailed back. Whether you want to make a woodland creature for storytelling, decoration, or playtime, this little ant is sure to march right into your heart!
✨ Skill Level
Intermediate — includes shaping, segmented construction, flexible limbs, antenna wiring (optional), and detailed assembly.
📏 Finished Size
Approx. 23–25 cm (9–10 inches) tall when seated
Using DK or light worsted yarn with a 3.0 mm hook
🧶 Materials
Yarn
-
Brown (main body, limbs, antennae) — approx. 60 g
-
White (eye whites) — approx. 8 g
-
Black or dark brown (pupils) — small amount
Supplies
-
3.0 mm crochet hook
-
10–12 mm safety eyes or black beads
-
Polyester fiberfill
-
Yarn needle
-
Stitch marker
-
Scissors
-
Optional: thin floral wire for antenna shaping
🧵 Abbreviations (US Terms)
MR – Magic Ring
sc – Single crochet
inc – Increase
dec – Decrease
sl st – Slip stitch
FO – Fasten off
🪶 Design Notes
-
The ant has three clearly defined segments: head, thorax, abdomen
-
Limbs are long and slim with rounded hands/feet
-
Antennae are long, curved, and expressive with round tips
-
Eyes sit slightly outward on the sides of the head
-
The seated posture is achieved through angled leg placement
🧠 Head (Brown)
R1: MR 6
R2: inc ×6 → 12
R3: (1 sc, inc) ×6 → 18
R4: (2 sc, inc) ×6 → 24
R5: (3 sc, inc) ×6 → 30
R6: (4 sc, inc) ×6 → 36
R7–13: sc around (36)
R14: (4 sc, dec) ×6 → 30
R15: (3 sc, dec) ×6 → 24
R16: (2 sc, dec) ×6 → 18
Insert safety eyes between R9–10, positioned slightly toward the sides.
R17: (1 sc, dec) ×6 → 12
Stuff firmly
R18: dec ×6 → 6
FO and close.
👀 Eye Whites (Make 2)
R1: MR 6
R2: inc ×6 → 12
R3: (1 sc, inc) ×6 → 18
Insert safety eye in center.
Sew eye whites to head so they protrude slightly.
🪶 Antennae (Make 2)
Ball Tip
R1: MR 6
R2: (1 sc, inc) ×3 → 9
R3: sc around (9)
R4: (1 sc, dec) ×3 → 6
Lightly stuff.
Stalk
Continue from ball:
R5–18: sc around (6) — approx. 9 cm long
FO leaving long tail.
Optional shaping:
Insert floral wire before closing. Bend into dramatic curved shape like in photo.
🪶 Thorax (Middle Segment)
R1: MR 6
R2: inc ×6 → 12
R3: (1 sc, inc) ×6 → 18
R4: (2 sc, inc) ×6 → 24
R5–9: sc around (24)
R10: (2 sc, dec) ×6 → 18
R11: (1 sc, dec) ×6 → 12
Stuff firmly
FO.
🪶 Abdomen (Back Segment)
R1: MR 6
R2: inc ×6 → 12
R3: (1 sc, inc) ×6 → 18
R4: (2 sc, inc) ×6 → 24
R5: (3 sc, inc) ×6 → 30
R6: (4 sc, inc) ×6 → 36
R7–12: sc around (36)
R13: (4 sc, dec) ×6 → 30
R14: (3 sc, dec) ×6 → 24
R15: (2 sc, dec) ×6 → 18
Stuff very firmly
R16: (1 sc, dec) ×6 → 12
R17: dec ×6 → 6
FO and close.
🦵 Limbs (Make 4)
These form both arms and legs.
R1: MR 6
R2: inc ×6 → 12
R3–5: sc around (12)
R6: (2 sc, dec) ×3 → 9
R7–16: sc around (9)
R17: (1 sc, dec) ×3 → 6
Stuff only the lower bulb section.
Leave upper section unstuffed for flexibility.
FO leaving long tail.
🧵 Assembly
-
Sew thorax to head (slightly tilted forward)
-
Attach abdomen to back of thorax
-
Attach arms to upper sides of thorax, angled downward
-
Attach legs between thorax and abdomen, angled forward
-
Sew eye whites onto head
-
Attach antennae on top of head, angled outward
-
Bend antennae into expressive curves
-
Shape limbs into relaxed seated pose
💡 Finishing Touches
-
Steam lightly to smooth curves
-
Shape limbs into resting position
-
Adjust antenna curves for personality
-
Optional: embroider tiny dot mouth
🌲 Final Look
Your forest ant is now complete — with long curved antennae, oversized curious eyes, soft rounded segments, and relaxed limbs that let it sit naturally on shelves, branches, or storybook scenes.
A perfect woodland companion full of charm and character. 🐜🌿
Happy crocheting! 🧶✨