Bring the heartwarming friendship of Winnie the Pooh and Piglet to life with this Amigurumi Pooh & Piglet Bookend Set crochet pattern! Inspired by the beloved duo from the Hundred Acre Wood, this charming design captures Pooh’s cuddly shape, Piglet’s tiny stature, and their timeless bond in every stitch. Whether you’re crafting for Disney fans, adding a whimsical touch to your bookshelf, or simply enjoy making character-inspired amigurumi designs, this pattern lets you stitch up a delightful bookend set bursting with personality! Perfect for keeping your favorite stories in place, this crochet creation brings a touch of handmade nostalgia to your collection. 🍯✨
Designed for customization, this pattern allows you to experiment with different shades of yellow and pink, embroidered details, or even tiny accessories like a honey pot or a miniature scarf for extra flair. Craft a classic Pooh & Piglet set with their signature colors, create a playful version with pastel hues, or even stitch up a full set of Hundred Acre Wood-inspired amigurumi for an enchanting display! Whether gifted as a thoughtful keepsake, displayed as a charming accent, or made simply for the joy of crafting, this Amigurumi Pooh & Piglet Bookend Set is a fun and creative project—perfect for bringing a touch of handmade storybook magic to every stitch! 🧶💖✨
🧸 Amigurumi Pooh & Piglet Bookend Set Crochet Pattern
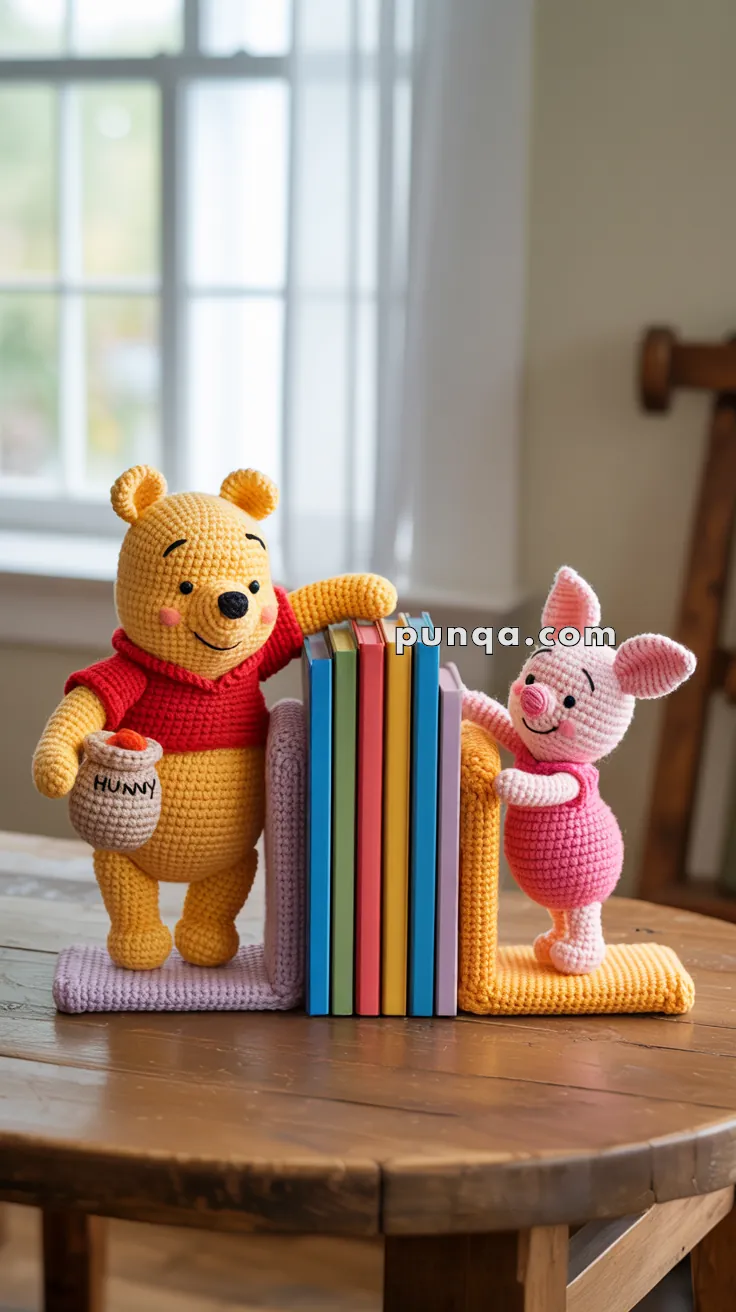
Bring the magic of the Hundred Acre Wood to your bookshelf with this delightful Pooh & Piglet Bookend Set! Each character is carefully crafted to stand upright, leaning toward your favorite stories, just as in the photo — Pooh proudly holding his little “HUNNY” pot, and Piglet standing shyly with his rosy cheeks and pink stripes.
✨ Skill Level
Intermediate – ideal for crocheters comfortable with amigurumi, shaping, assembly, and reinforcing structures.
📏 Finished Size
- Pooh height: 24–25 cm
- Piglet height: 20–21 cm
- Bookend base: ~13 × 13 cm (before folding)
🧶 Materials (With Gram Estimates)
- Yellow (Pooh body): 90–100 g
- Red (Pooh shirt): 25–30 g
- Black (features + lettering): 10–15 g
- Light Pink (Piglet body): 60–70 g
- Dark Pink (Piglet suit): 20 g
- Medium Pink (Piglet snout & ear centers): 10 g
- Lavender (Pooh base): 40–50 g
- Golden Peach (Piglet base): 40–50 g
- Beige (honey pot): 20–25 g
- Tan (honey rim & drip): 10 g
- 2.5–3 mm crochet hook
- Safety eyes: 10 mm for Pooh, 8 mm for Piglet
- Polyester fiberfill stuffing
- Weighted pellets or flat stones
- Cardboard/plastic sheets for bookends
- Yarn needle, stitch markers, scissors
- Blush (optional)
🪡 Abbreviations (US Terms)
MR – Magic Ring
sc – single crochet
inc – increase
dec – decrease
sl st – slip stitch
ch – chain
st – stitch
FLO – front loop only
BLO – back loop only
FO – fasten off
🧸 Winnie the Pooh
🐻 Head (Yellow)
- MR 6
- inc ×6 (12)
- (sc, inc) ×6 (18)
- (2 sc, inc) ×6 (24)
- (3 sc, inc) ×6 (30)
- (4 sc, inc) ×6 (36)
7–14. sc around (36)
Insert 10 mm safety eyes between R10–11, only 6 stitches apart for Pooh’s close-set expression.
- (4 sc, dec) ×6 (30)
- (3 sc, dec) ×6 (24)
- (2 sc, dec) ×6 (18) — stuff firmly
- (sc, dec) ×6 (12)
- dec ×6 (6)
FO.
Face embroidery:
- Short eyebrows (2–3 stitches)
- Long upward smiling mouth
- Flattened oval nose
- Add blush if desired
🐻 Ears ×2 (Yellow – Smaller & Round)
- MR 6
- inc ×6 (12)
- sc around (12)
Flatten and sew high on the head, slightly toward the back.
🐻 Body (Yellow with Short Red Shirt)
- MR 6
- inc ×6 (12)
- (sc, inc) ×6 (18)
- (2 sc, inc) ×6 (24)
- (3 sc, inc) ×6 (30)
6–8. sc around (30)
Switch to red for Pooh’s short shirt.
9–11. sc around (30)
Switch back to yellow.
- (3 sc, dec) ×6 (24)
- (2 sc, dec) ×6 (18)
Important: Pooh’s belly is round in the photo — do NOT taper further.
14–15. sc around (18)
FO and stuff firmly.
🐻 Arms ×2 (Yellow)
- MR 6
- (sc, inc) ×3 (9)
3–10. sc around (9)
Stuff lightly.
Attach:
- Left arm angled across body to hold the honey pot
- Right arm angled outward to rest on books
🐻 Legs ×2 (Yellow – Short & Round)
- MR 6
- inc ×6 (12)
3–4. sc around (12) - (2 sc, dec) ×3 (9)
6–7. sc around (9)
Stuff lightly and FO.
Attach legs close together to match the photo.
🫙 Honey Pot (Beige with Tan Rim & Honey Drip)
- MR 6
- inc ×6 (12)
- (sc, inc) ×6 (18)
4–5. sc around (18) - BLO sc around
- (sc, dec) ×6 (12)
Stuff softly.
Pot rim: sl st around the BLO ridge with tan yarn.
Honey blob:
- MR 4
- sc around (4)
Sew to pot top.
Embroider HUNNY in black.
Attach pot under Pooh’s left arm so he “holds” it.
🐷 Piglet
🐷 Head (Light Pink)
- MR 6
- inc ×6 (12)
- (sc, inc) ×6 (18)
- (2 sc, inc) ×6 (24)
- (3 sc, inc) ×6 (30)
- (4 sc, inc) ×6 (36)
7–12. sc around (36)
Insert 8 mm eyes between R9–10, spaced 5 sts apart.
- (4 sc, dec) ×6 (30)
- (3 sc, dec) ×6 (24)
- (2 sc, dec) ×6 (18)
Stuff. - (sc, dec) ×6 (12)
- dec ×6 (6)
FO.
Attach head tilted slightly upward.
🐷 Ears ×2 (Tall & Thin)
Ch 7
Row 1: sc 6
Rows 2–14: sc 6
Row 15: dec, sc 2, dec (4)
Row 16: sc 4
FO.
Sew ears standing straight up, tall and slender.
🐷 Snout (Small Round)
- MR 5
- sc around (5)
Sew on. Add tiny nostrils in dark pink.
🐷 Body (Solid Dark Pink – No Stripes)
This is a major accuracy point — Piglet wears a solid dark pink suit in the photo.
- MR 6
- inc ×6 (12)
- (sc, inc) ×6 (18)
- (2 sc, inc) ×6 (24)
- (3 sc, inc) ×6 (30)
6–10. sc around (30) - (3 sc, dec) ×6 (24)
- (2 sc, dec) ×6 (18)
- (sc, dec) ×6 (12)
Stuff firmly. - dec ×6 (6)
FO.
🐷 Arms ×2 (Lifted High)
- MR 6
- (sc, inc) ×3 (9)
3–11. sc around (9)
FO.
Attach both arms raised high, pressing on the books exactly like in the photo.
🐷 Legs ×2 (With Foot Pads)
- MR 5
- inc ×5 (10)
- sc around (10)
- (3 sc, dec) ×2 (8)
5–7. sc around (8)
FO.
Add tiny oval pads in white or cream.
Attach legs slightly inward and angled forward.
📚 L-Shaped Bookend Bases
🟣 Pooh’s Base – Lavender
🟠 Piglet’s Base – Golden Peach
To match the thickness in the photo, each bookend uses 4 panels.
Panels (Make 4 per character)
Ch 26
Row 1: sc in 2nd ch from hook and across (25)
Rows 2–30: sc across (25)
FO.
Assembly
- Pair panels into two thick layers (vertical + horizontal).
- Insert cardboard/plastic sheets.
- Add pellets or stones to bottom.
- Sew around edges with tight sc.
- Fold sharply to form a 90° “L” base.
- Stitch characters deeply into the base for stability.
✨ Final Assembly
Pooh
- Head slightly forward/right
- Left arm holding honey pot
- Right arm resting on book stack
- Legs placed close together
- Fully anchored to lavender base
Piglet
- Head tilted slightly upward
- Arms raised high, pressing on books
- Ears tall and vertical
- Legs angled inward
- Anchored to peach base
Place both bookends facing inward so Pooh and Piglet look like they’re holding the books together.
🎉 Your Pooh & Piglet Bookend Crochet Set Is Complete!
And that’s it — your handmade Pooh & Piglet bookend set is ready to bring a little extra heart to your shelves. These two friends look so sweet leaning into your favorite stories, and they make any reading nook instantly more magical. Whether you made them as a keepsake, a nursery gift, or a cheerful touch for your own home, may they bring you the same joy they brought to create. 💛📚🌸