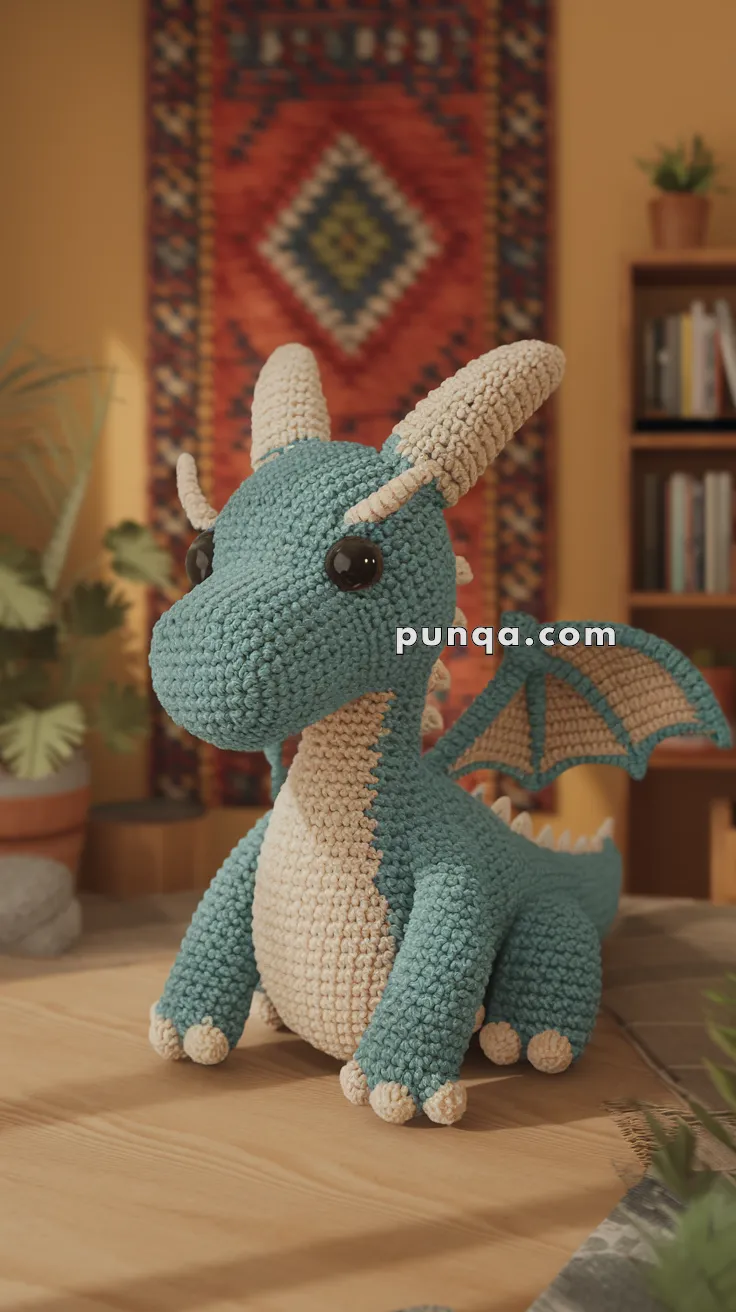
Take your crochet skills on a mythical adventure with this Amigurumi Dragon pattern! Whether you’re enchanted by fantasy creatures or just love crafting bold and majestic designs, this free pattern lets you bring a fierce yet lovable dragon to life. With its expressive eyes, detailed wings, and playful curled tail, this dragon is the perfect addition to any handmade collection. Whether you make it as a treasured gift, a whimsical decor piece, or a magical companion, this little dragon is sure to capture hearts and imaginations alike!
Designed for creativity and personalization, this pattern allows you to play with fiery reds, cool blues, or earthy greens to make your dragon uniquely yours. Add special touches like glittery horns, embroidered scales, or even tiny wings for an extra magical effect! Whether it’s guarding your shelf, soaring through playtime adventures, or serving as a lucky charm, this amigurumi dragon is a fun and rewarding project. So grab your hook, gather your yarn, and let’s stitch up a legendary creature—one loop at a time! 🐉🧶✨
🐉 Amigurumi Dragon Crochet Pattern
Bring a little magic into your home with this cuddly dragon! Whether you’re making it as a gift or for your own fantasy collection, this dragon will become a treasured handmade friend.
✨ Skill Level
Intermediate – requires shaping, color changes, sewing pieces, and optional wire reinforcement for horns and wings.
📏 Finished Size
Approx. 12–14 inches (30–35 cm) tall when made with medium (worsted) yarn and 3.5 mm hook.
🧶 Materials
-
Worsted weight yarn in:
-
Teal (main body)
-
Cream (belly, claws, spikes, inner ears)
-
-
3.5 mm crochet hook
-
12 mm safety eyes (black)
-
Stuffing (polyfill)
-
Yarn needle for sewing
-
Stitch markers
-
Optional: thin floral wire (for wings & horns)
🔑 Abbreviations (US Terms)
-
MR = Magic Ring
-
sc = single crochet
-
inc = increase (2 sc in same st)
-
dec = decrease (sc2tog)
-
ch = chain
-
st(s) = stitch(es)
-
sl st = slip stitch
-
hdc = half double crochet
🐲 Pattern Instructions
Head (Teal)
-
MR 6 sc
-
inc around (12)
-
(sc, inc) x6 (18)
-
(2 sc, inc) x6 (24)
-
(3 sc, inc) x6 (30)
-
(4 sc, inc) x6 (36)
7–14. sc around (36) → elongates snout -
(4 sc, dec) x6 (30)
-
(3 sc, dec) x6 (24)
-
(2 sc, dec) x6 (18)
-
(sc, dec) x6 (12)
-
dec around (6), FO.
📌 Eyes: Place safety eyes between R10–11, spaced ~8 sts apart, forward-facing.
Body (Teal, worked bottom-up)
-
MR 6 sc
-
inc around (12)
-
(sc, inc) x6 (18)
-
(2 sc, inc) x6 (24)
-
(3 sc, inc) x6 (30)
-
(4 sc, inc) x6 (36)
-
(5 sc, inc) x6 (42)
8–20. sc around (42) -
(5 sc, dec) x6 (36)
-
(4 sc, dec) x6 (30)
-
(3 sc, dec) x6 (24)
-
(2 sc, dec) x6 (18)
FO, leaving long tail. Stuff firmly.
Belly Patch (Cream, Oval)
-
Ch 9, sc across, 3 sc in last st, rotate, sc across other side, 2 sc in last st (20)
-
Work around oval with inc at ends.
3–8. Continue oval rounds until ~12–14 cm tall.
FO and sew centered on belly.
Arms (x2)
-
MR 6 sc (Teal)
-
inc around (12)
3–6. sc around (12) -
(2 sc, dec) x3 (9)
8–10. sc around (9)
FO. Stuff lightly.
Claws: With Cream, make 3 small claws per arm: MR 4 sc, sl st, FO. Sew to tips.
Legs (x2)
-
MR 6 sc (Teal)
-
inc around (12)
-
(sc, inc) x6 (18)
-
(2 sc, inc) x6 (24)
5–8. sc around (24) -
(2 sc, dec) x6 (18)
10–12. sc around (18)
FO. Stuff firmly.
Claws: With Cream, make 4 claws per leg (same method as arms). Sew to feet.
Tail (Teal)
-
MR 6 sc
-
(sc, inc) x3 (9)
-
sc around (9)
-
(2 sc, inc) x3 (12)
5–10. sc around (12) -
(3 sc, inc) x3 (15)
12–25. sc around (15) -
(sc, dec) x5 (10)
27–30. sc around (10) → tapering
FO. Stuff firmly.
Spikes: Make 10–12 cream spikes (small cones: MR 4, inc, sc rounds until ~2–3 cm tall). Sew from head down tail.
Horns (x2) (Cream)
-
MR 6 sc
-
(sc, inc) x3 (9)
3–12. sc around (9) -
(2 sc, inc) x3 (12)
14–18. sc around (12)
15–20. (3 sc, inc) x3 (15)
FO, lightly stuff. Insert optional wire for bend.
Ears (x2) (Teal)
-
Ch 8, sc back along chain.
-
Inc at both ends, sc along sides.
3–6. Continue oval/leaf shape until ~6 cm tall. FO.
Inner Ear: Same shape, smaller (Cream). Sew inside teal ears.
Wings (x2)
Outer (Teal):
-
Ch 20, work back with sc, dec at end.
-
Continue rows decreasing 1 st each side until triangle.
Inner (Cream): Repeat with smaller base chain (ch 15).
Sew cream panel into teal frame. Reinforce edge with wire if desired.
🧵 Assembly
-
Sew head to body firmly.
-
Attach legs to bottom sides of body, arms slightly forward.
-
Sew tail centered at back base.
-
Add belly patch.
-
Sew horns on top, ears beside.
-
Attach spikes along spine from head to tail.
-
Attach wings on back, angle upward.
✨ Final Touches
-
Embroider nostrils and a tiny smile.
-
Shape wings and horns with wire for strength.
-
Adjust stuffing so dragon sits upright.
Your magical crochet dragon is complete! With its big eyes, cream belly, long tail, and proud wings, it looks ready to take flight. This dragon makes the perfect fantasy friend or a whimsical gift for anyone who loves mythical creatures.
Let your imagination soar – every stitch brings this dragon to life! 🐉💖