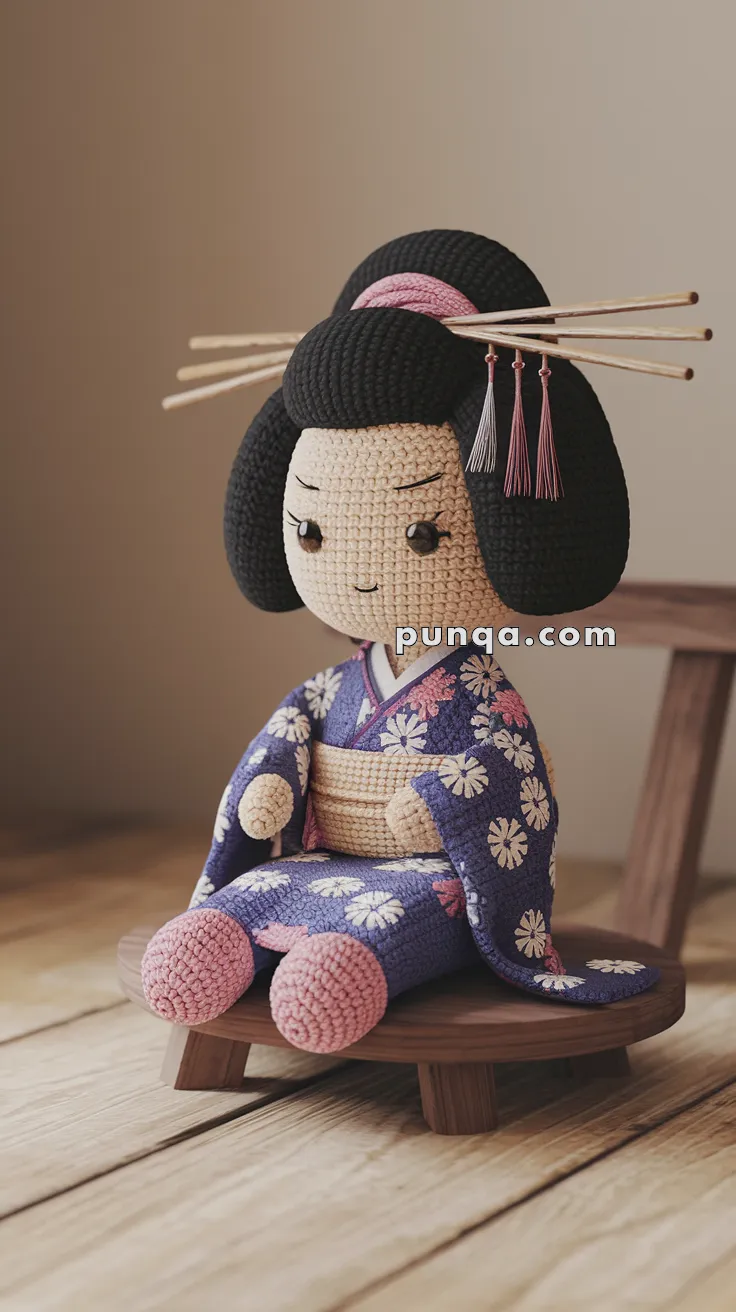
Hey there! Have you ever seen those adorable little crochet dolls called amigurumi? They’re incredibly cute, and creating them is just as delightful as admiring them! One of the most captivating themes for amigurumi is the geisha doll. The appeal of crafting a geisha amigurumi is undeniable. There’s something enchanting about capturing the grace and elegance of a geisha in a tiny, huggable form. 🌸 The vibrant kimonos, delicate features, and intricate hairstyles make these projects a joy to work on, offering both a challenge and a creative outlet for crochet enthusiasts like us.
The process of making a geisha doll amigurumi is a blend of tradition and creativity. It starts with selecting the perfect yarn colors to bring your vision to life. From there, it’s all about getting into the rhythm of crocheting, stitch by stitch, as your geisha begins to take shape in your hands. 🧶 Designing the kimono is perhaps the most exciting part, as you can play with colors and patterns that reflect the traditional Japanese attire. Adding details like tiny obi belts and delicate accessories brings your doll to life, turning it into a miniature work of art. It’s a joyful journey from start to finish, full of creativity and a dash of patience.
🎎 Amigurumi Geisha Crochet Pattern
Create a serene and elegant Geisha doll with traditional Japanese details — from her layered kimono and obi to her sculpted hairstyle with ornamental pins. Perfect as a display piece or collector’s doll.
✨ Skill Level
Advanced — includes layered clothing, structured hair construction, and seated shaping.
📏 Finished Size
Approx. 10–12 in (25–30 cm) tall when seated, using DK yarn and a 2.5–3.0 mm hook.
🧶 Materials
Yarn (DK weight):
-
Light peach (skin) – 40 g
-
Black (hair) – 60 g
-
Indigo violet (outer kimono) – 70 g
-
Pale pink (inner kimono, feet) – 30 g
-
Beige (obi belt) – 25 g
-
Red (collar edge, lip line) – small amount
-
Gold (hairpins) – small amount
-
Light pink & lilac embroidery thread (tassels) – 1 m each
-
White & pale pink (embroidery for flowers) – optional
Tools:
-
Crochet hook: 2.5–3.0 mm
-
8–10 mm safety eyes
-
Stitch markers
-
Yarn needle
-
Fiberfill stuffing
-
Cardboard or felt base for stability (optional)
-
Wooden skewers or chopsticks (for hairpins)
🧵 Abbreviations (US Terms)
MR – Magic Ring
sc – Single Crochet
inc – Increase (2 sc in same stitch)
dec – Decrease (sc2tog)
ch – Chain
sl st – Slip Stitch
FO – Fasten Off
BLO – Back Loop Only
🧍♀️ Head & Face
Skin tone yarn:
R1: MR, 6 sc
R2: inc ×6 (12)
R3: (1 sc, inc) ×6 (18)
R4: (2 sc, inc) ×6 (24)
R5: (3 sc, inc) ×6 (30)
R6–12: sc around (30)
Insert safety eyes between R8–9, about 7 sts apart.
R13: (3 sc, dec) ×6 (24)
R14: (2 sc, dec) ×6 (18)
R15: (1 sc, dec) ×6 (12)
R16: dec ×6 (6)
FO and close. Stuff firmly.
Face details:
-
Embroider eyebrows slightly angled upward.
-
Add a small red stitched smile.
-
Use light pink yarn or blush for cheeks.
💇 Hair
Black yarn:
R1: MR, 6 sc
R2: inc ×6 (12)
R3: (1 sc, inc) ×6 (18)
R4: (2 sc, inc) ×6 (24)
R5: (3 sc, inc) ×6 (30)
R6–12: sc around (30)
FO. Pin and sew onto head snugly.
Side Buns (×2):
MR, 6 sc
R2: inc ×6 (12)
R3–5: sc around (12)
Stuff lightly, flatten slightly, sew on both sides of head near ears.
Back Bun (Large):
MR, 6 sc
R2: inc ×6 (12)
R3: (1 sc, inc) ×6 (18)
R4–8: sc around (18)
FO. Stuff and sew at center back of head.
Hair Accent (Pink Insert):
ch 12, sc back along chain, FO. Sew in a curved arc between top and back bun.
Ornamental Pins:
Insert 3 thin wooden sticks diagonally through bun.
Attach tassels (light pink & lilac) on the left side only.
👘 Body Base
Skin tone:
R1: MR, 6 sc
R2: inc ×6 (12)
R3: (1 sc, inc) ×6 (18)
R4: sc around (18)
R5: (2 sc, inc) ×6 (24)
Switch to pale pink (inner kimono).
R6–8: sc around (24)
FO. Stuff firmly.
🩰 Inner Kimono (Pale Pink)
Attach yarn at waistline.
ch 1, sc around, join with sl st.
Work 6 rounds evenly to form soft base.
FO and weave ends.
🌸 Outer Kimono (Indigo Violet)
Join indigo yarn at top of pink layer.
ch 1, sc around.
Work 10 rounds evenly.
To widen the base, (5 sc, inc) ×6 (72).
Continue 8–10 more rounds for desired length.
Front opening:
Mark center front; work back-and-forth for 10 rows to create the open overlap.
Leave small gap showing the pink inner layer beneath.
Sleeves (×2):
MR, 6 sc
R2: inc ×6 (12)
R3: (1 sc, inc) ×6 (18)
R4–8: sc around (18)
FO.
Attach sleeves angled slightly downward from shoulders for natural drape.
Optional: embroider white and pink flowers with lazy daisy stitches.
🎀 Obi Belt (Beige)
ch 45, sc across (44).
Work 4 rows.
FO and wrap around waist twice.
Sew ends flat at back (no bow).
Add horizontal embroidery line at center for crease effect.
✋ Arms
Skin tone:
R1: MR, 6 sc
R2: (1 sc, inc) ×3 (9)
R3–6: sc around (9)
Switch to pink (inner kimono sleeve edge):
R7–10: sc around (9)
Stuff lightly and sew forearms together in front of belly.
🦶 Feet
Pale pink yarn:
R1: MR, 6 sc
R2: inc ×6 (12)
R3–5: sc around (12)
R6: (2 sc, dec) ×3 (9)
FO. Stuff and sew side by side at front bottom of kimono.
Lift front hem slightly so feet remain visible.
💮 Assembly
-
Sew head to body.
-
Attach hair sections, ensuring buns are symmetrical.
-
Add ornamental hairpins and tassels.
-
Attach arms and sleeves with hands folded in front.
-
Sew obi belt securely and flatten back seam.
-
Adjust kimono folds so it drapes smoothly around the seated base.
-
Use a hidden stitch at hem back to keep the doll in seated position.
💡 Finishing Touches
-
Add faint blush using pink pastel or yarn.
-
Optionally embroider small floral motifs directly on kimono for texture.
-
For display, place on a small circular wooden base for authenticity.
Your elegant Geisha doll is complete — poised, calm, and beautifully traditional. She makes a stunning handmade display piece or a meaningful gift symbolizing artistry and grace. 🎎