Creating an amigurumi Kaws doll is such an exciting journey! 🎉 As someone who loves crafting unique and delightful pieces, I find that the charm of amigurumi lies in its ability to transform simple yarn into adorable creations with character and personality. The Kaws doll, with its distinctive design and playful aesthetic, is especially captivating. Whether you’re a seasoned crocheter or a beginner eager to dive into the world of amigurumi, the process of creating a Kaws doll offers a rewarding experience marked by creativity and fun. With just a few materials, some patience, and a touch of imagination, anyone can create these lovable figures that bring joy to both the maker and the viewer.
The process of crafting an amigurumi Kaws doll involves a delightful blend of art and technique. 🧶 It all starts with choosing the perfect yarn and crochet hook, followed by selecting a pattern that captures the essence of the beloved character. I enjoy watching the doll come to life as I work through the pattern, from crafting the iconic ‘XX’ eyes to sewing on those little hands and feet. The best part? Adding your own personal touches, such as color variations or unique accessories, to make your Kaws doll truly one-of-a-kind. Along the way, there’s plenty of room for trial and error, which only adds to the charm and learning experience. So, grab your crochet hook and let’s bring some smiles to life with a delightful Kaws amigurumi doll!
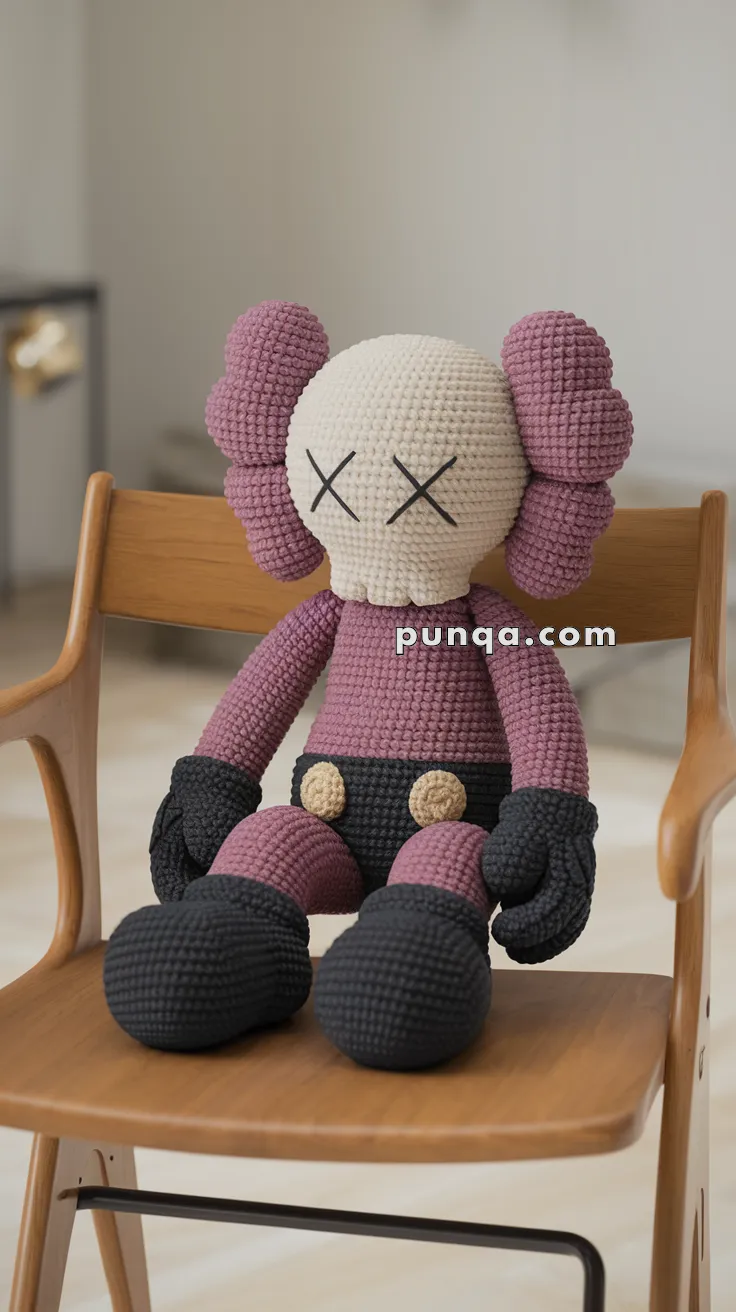
💀 Amigurumi KAWS-Inspired Doll Crochet Pattern
This unique KAWS-inspired amigurumi doll brings an iconic street-art aesthetic to your crochet collection! With X-ed out eyes, fluffy sculpted ears, and oversized gloves and boots, it’s a creative challenge for crochet lovers and collectors alike.
✨ Skill Level
Intermediate to Advanced
Includes shaping, proportion control, and multi-part assembly.
📏 Finished Size
Approx. 36–40 cm (14–16 inches) tall
(using cotton or chenille yarn and a 3.5–4.0 mm hook)
🧶 Materials (Approximate Yarn Amounts)
Worsted / cotton yarn:
- Cream / Off-white (head): 90–110 g
- Dusty Mauve (torso, arms, legs, ears): 150–170 g
- Black (gloves, boots, shorts): 110–130 g
- Beige (buttons): 10–15 g
- Black embroidery thread (eyes): small amount
Supplies:
- 3.5–4.0 mm crochet hook
- Polyester fiberfill
- Tapestry needle
- Stitch markers
🧵 Abbreviations (US Terms)
MR – Magic Ring
sc – Single Crochet
inc – Increase
dec – Invisible decrease
sl st – Slip stitch
FO – Fasten Off
🧠 Head (Large, smooth sphere – slightly oversized)
With cream yarn:
Rnd 1: MR 6 (6)
Rnd 2: inc ×6 (12)
Rnd 3: (sc, inc) ×6 (18)
Rnd 4: (2 sc, inc) ×6 (24)
Rnd 5: (3 sc, inc) ×6 (30)
Rnd 6: (4 sc, inc) ×6 (36)
Rnd 7: (5 sc, inc) ×6 (42)
Rnd 8: (6 sc, inc) ×6 (48)
Rnd 9: (7 sc, inc) ×6 (54)
Rnd 10–22: sc 54
➡️ Keep tension tight for a very smooth, rounded surface
Rnd 23: (7 sc, dec) ×6 (48)
Rnd 24: (6 sc, dec) ×6 (42)
Rnd 25: (5 sc, dec) ×6 (36)
Rnd 26: (4 sc, dec) ×6 (30)
Rnd 27: (3 sc, dec) ×6 (24)
Stuff very firmly to maintain perfect shape.
Rnd 28: (2 sc, dec) ×6 (18)
Rnd 29: (sc, dec) ×6 (12)
Rnd 30: dec ×6 (6)
FO
✖️ Eyes (Signature detail)
- Embroider two large X shapes using black yarn
- Place centered and evenly spaced
- Each X spans approx. 7–8 stitches for bold visibility
🌀 Ears (Make 2 – three rounded lobes stacked vertically)
With mauve yarn:
Make 3 small ovals per ear:
Each lobe:
Rnd 1: MR 6
Rnd 2: inc ×6 (12)
Rnd 3–6: sc 12
FO (make 3)
Assembly:
- Stack lobes vertically (top–middle–bottom)
- Sew together edge-to-edge
- Lightly stuff while shaping
➡️ Result: soft triple-bulge ear structure
🧥 Body (Slim torso with defined black shorts)
Start with black:
Rnd 1: MR 6
Rnd 2: inc ×6 (12)
Rnd 3: (sc, inc) ×6 (18)
Rnd 4: (2 sc, inc) ×6 (24)
Rnd 5–8: sc 24
➡️ Forms the shorts section
Switch to mauve:
Rnd 9–20: sc 24
Rnd 21: (2 sc, dec) ×6 (18)
Rnd 22: (sc, dec) ×6 (12)
Stuff firmly but keep torso slightly flexible.
FO
🧤 Arms (Long, straight with oversized gloves)
Start with black:
Rnd 1: MR 6
Rnd 2: inc ×6 (12)
Rnd 3: (sc, inc) ×6 (18)
Rnd 4–8: sc 18
➡️ Creates bulky rounded glove
Switch to mauve:
Rnd 9–24: sc 18
- Light stuffing
- Keep arms long and slightly curved
👣 Legs (Shorter thighs with large rounded boots)
Start with black:
Rnd 1: MR 6
Rnd 2: inc ×6 (12)
Rnd 3: (sc, inc) ×6 (18)
Rnd 4: (2 sc, inc) ×6 (24)
Rnd 5: (3 sc, inc) ×6 (30)
Rnd 6–10: sc 30
➡️ Forms wide, rounded boot
Switch to mauve:
Rnd 11–20: sc 30
- Stuff firmly
- Keep legs slightly shorter than arms
🍪 Buttons (Make 2)
With beige:
Rnd 1: MR 6
Rnd 2: inc ×6 (12)
sl st around
FO
🧩 Assembly
- Sew head securely to body (slightly forward tilt)
- Attach ears vertically along sides of head
- Sew arms low on torso so they hang naturally
- Attach legs forward for seated pose
- Sew buttons centered on black shorts
✨ Finishing Touches
- Smooth and shape the head for a perfect sphere 💀
- Keep ears softly rounded and evenly aligned
- Ensure boots are wide enough for stable sitting
- Adjust arm curve for a relaxed, natural look
💛 Final Thoughts
This striking crochet doll combines minimal facial detail with bold proportions, creating a modern, collectible-style piece. The oversized head, sculpted ears, and chunky boots give it a distinctive silhouette that stands out beautifully in any handmade collection.
A fun and rewarding project for those who enjoy clean structure and contemporary crochet design. 🧶🎨