Celebrate the heart of every classroom with this charming Amigurumi Teacher Doll crochet pattern! 🍎🧶 With her warm smile, stylish outfit, and ready-to-inspire attitude, this handmade educator is a sweet tribute to the mentors who shape our minds and hearts. Whether you’re crafting a thoughtful gift for a favorite teacher, decorating a school-themed display, or simply love dolls with personality and purpose, this pattern is full of scholastic charm and stitchable love.
Designed with expressive details and playful accessories, this project invites you to crochet tiny glasses, a book or clipboard, and even a cozy cardigan to complete her look. Customize her hair, outfit, and classroom tools to reflect your favorite teacher or your own creative flair. Whether perched on a desk, tucked into a gift basket, or starring in a handmade back-to-school scene, this Teacher Doll Amigurumi is a joyful and satisfying project—perfect for stitching up a little appreciation, one loop at a time! ✏️📚💖
🍎 Amigurumi Teacher Crochet Pattern
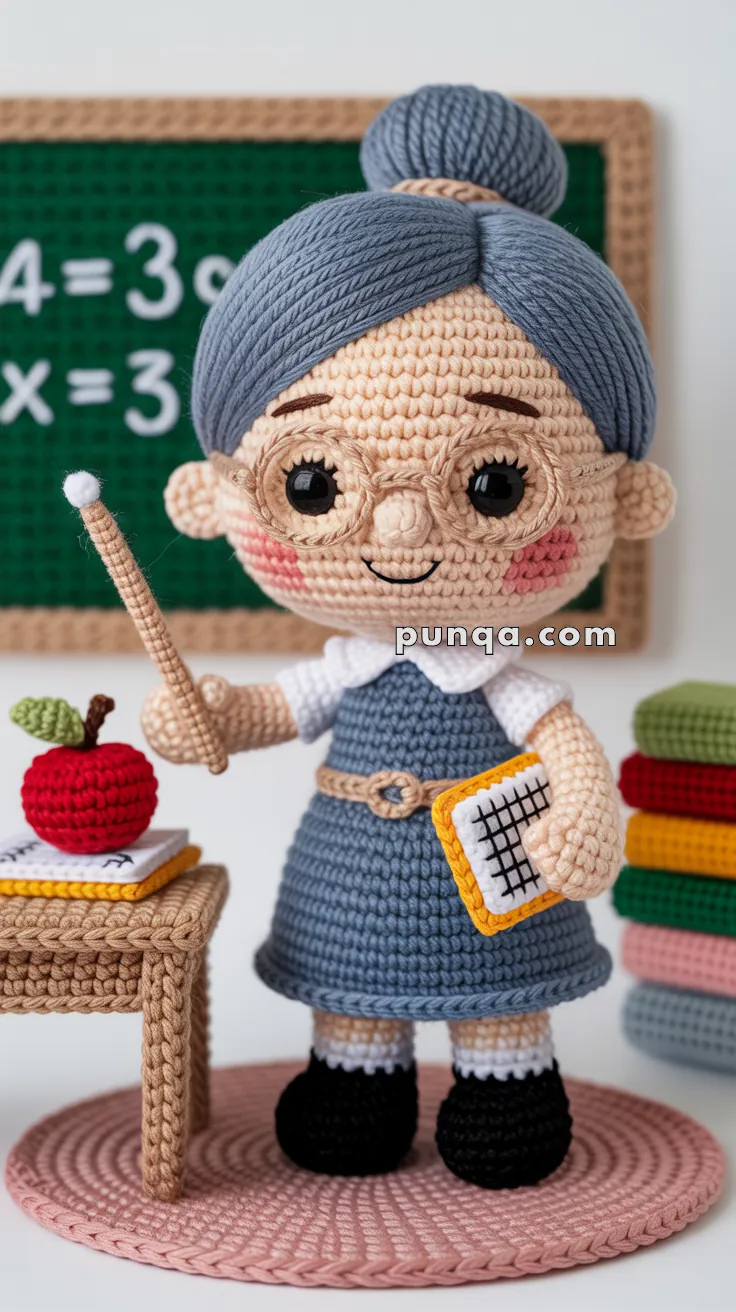
Here’s a sweet and scholarly addition to your amigurumi collection: the Amigurumi Teacher Doll! 👩🏫✨
With her neat bun hairstyle, glasses, chalkboard, and teaching accessories, this doll makes a charming classroom companion or a thoughtful handmade gift for teachers.
This pattern is photo-accurate and includes all details — nose, ears, hands with fingers, glasses, bun, and accessories.
✨ Skill Level
Intermediate – shaping, accessories, and sewing parts.
📏 Finished Size
Approx. 23 cm (9 inches) tall using DK cotton yarn and 2.5 mm hook.
🧶 Materials
- DK cotton yarn:
- Skin: Beige/peach
- Hair: Grey-blue
- Dress: Denim blue
- Shirt & Socks: White
- Shoes: Black
- Accessories: Red (apple), green (apple leaf), mustard (book frame), tan (pointer stick, table), green (blackboard), assorted yarn for details
- 2.5 mm crochet hook
- 8 mm safety eyes (black)
- Embroidery thread: dark brown (eyebrows, mouth), pink (blush)
- Wire for glasses (optional)
- Stuffing (polyester fiberfill)
- Tapestry needle, scissors
🔤 Abbreviations (US Terms)
- MR = magic ring
- sc = single crochet
- inc = increase (2 sc in same st)
- dec = decrease (sc2tog)
- ch = chain
- sl st = slip stitch
- FLO = front loop only
- BLO = back loop only
👩🏫 Amigurumi Teacher Pattern
Head (Beige)
- MR, 6 sc (6)
- inc x6 (12)
- (sc, inc) x6 (18)
- (2 sc, inc) x6 (24)
- (3 sc, inc) x6 (30)
- (4 sc, inc) x6 (36)
7–12. sc around (36)
➡️ Insert eyes between R9–R10, 7 sts apart.
➡️ Nose: small oval embroidered at R11.
➡️ Blush: pink embroidery under eyes.
➡️ Ears (x2): MR, 4 sc, sl st, FO. Sew at R10 sides.
➡️ Eyebrows: dark brown thread 2 rows above eyes. - (4 sc, dec) x6 (30)
- (3 sc, dec) x6 (24)
- (2 sc, dec) x6 (18)
Stuff firmly. - (sc, dec) x6 (12)
- dec x6 (6). FO.
Hair + Bun (Grey-Blue)
- Crochet a wig cap same as head up to 30 sts.
- Attach long strands and sweep back smoothly.
- Bun: MR, 6 sc, inc x6 (12), (sc, inc) x6 (18), 2 rounds sc. Stuff and sew on top of head.
Body & Dress
White (shirt):
- MR 6 sc
- (sc, inc) x3 (9)
- (2 sc, inc) x3 (12)
- (3 sc, inc) x3 (15)
5–6. sc around (15)
Switch to blue (dress):
7–14. sc around (15)
15. (2 sc, inc) x5 (20)
16–18. sc around (20)
19. (3 sc, dec) x4 (16)
Stuff firmly.
Collar: with white yarn, surface crochet tiny triangles around neckline.
Belt: mustard, ch 28, sl st, sew around waist. Add embroidered buckle.
Arms with Fingers (x2)
Beige (hands):
- MR, 5 sc (5)
- sc around (5)
➡️ Fingers: ch 3, sl st back into same st, repeat for 3 fingers + thumb.
3–4. sc around (5)
Switch to white (sleeves): 3 rounds sc.
FO, sew to body.
Legs & Shoes (x2)
Black shoes:
- MR 6 sc (6)
- inc x6 (12)
- (sc, inc) x6 (18)
4–5. sc around (18)
Switch to beige → 4 rounds (legs).
Add white socks trim with FLO sl st.
Glasses (Wire + Beige Yarn)
- Form 2 small loops (1 cm each) from thin craft wire.
- Join with a bridge, wrap in beige yarn.
- Attach around head.
Accessories
Pointer Stick:
- Tan yarn, ch 16, sc back.
- White mini pom-pom at tip.
Mini Book:
- ch 10 x 8 rows in white.
- Border in mustard.
- Embroider grid lines with black.
Apple:
- Red yarn: MR, inc until 18 sts, 3 rows sc, dec until closed.
- Add green leaf and brown stem.
Table (optional):
- Base circle 18 sts.
- Legs: ch 8, sc back x4. Attach to base.
Blackboard:
- MR 6 sc, increase until rectangle base ~20 x 12 sts.
- Surface crochet tan border.
- Embroider math formula in white.
🧵 Assembly
- Sew head to body.
- Attach arms at shoulder level.
- Sew legs at base evenly.
- Place hair bun, tack securely.
- Position glasses across eyes.
- Place book in one hand, pointer in the other.
- Display with apple, blackboard, and table.
🌟 Finishing Touch
Your Amigurumi Teacher Doll is ready to brighten the classroom! 🍎👩🏫 With her bun, glasses, and accessories, she’s the perfect gift for a teacher or a sweet school-themed decoration.
