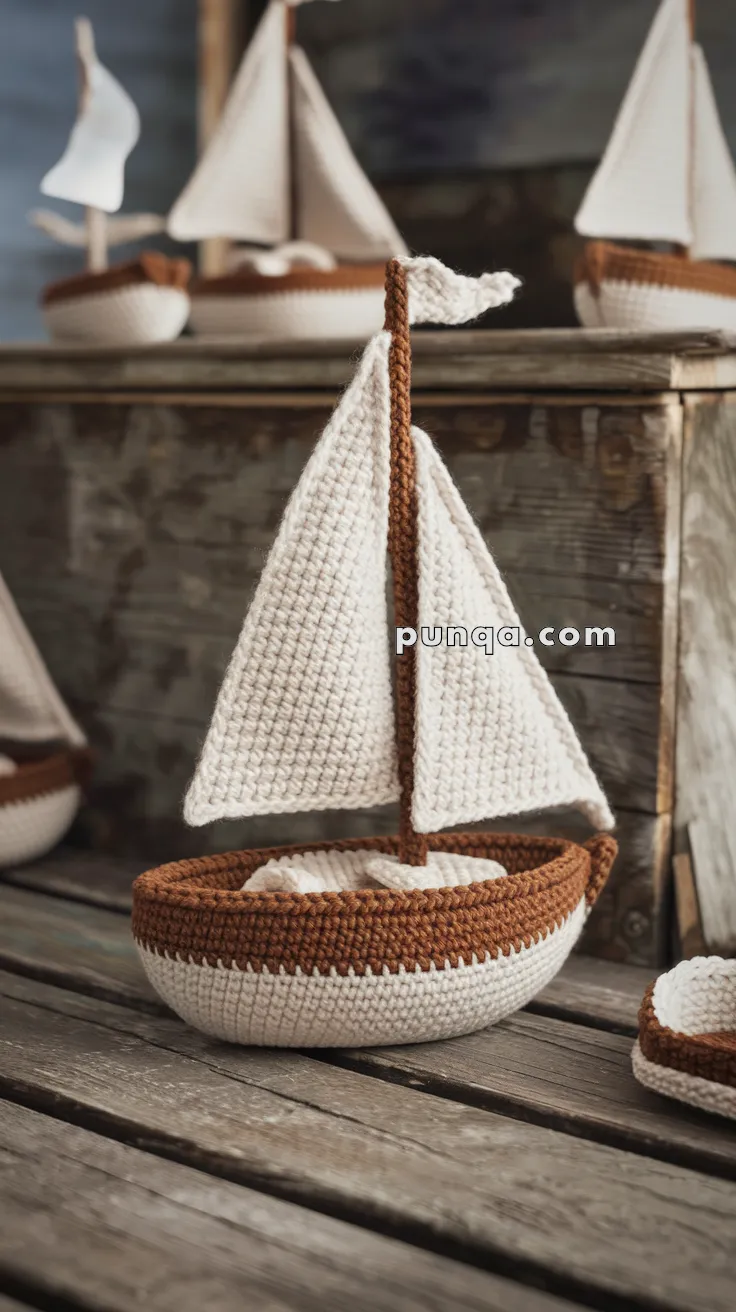
Set sail on a whimsical crochet adventure with the Amigurumi Sailboat, a project that’s as charming as it is creative! ⛵🧶 This delightful design features a rounded boat base, tall mast, and soft sails that capture the spirit of the sea in miniature form. With its cozy handmade texture and playful details, this sailboat makes a wonderful addition to nautical décor, toy collections, or handmade gifts for ocean lovers.
Perfect for display on a shelf, in a nursery, or as part of a themed set, the Amigurumi Sailboat brings a splash of seaside magic wherever it goes. Fun to stitch and delightful to showcase, it’s a joyful way to crochet adventure, imagination, and a sprinkle of handmade charm—one loop at a time! ✨🌊🧵
This minimalist crocheted sailboat captures the calm beauty of seaside décor with its rounded hull, simple mast, and two soft triangular sails. Designed as a decorative amigurumi (not a toy), this project focuses on clean lines, natural textures, and a balanced silhouette—perfect for shelves, nurseries, or nautical displays.
🧶 Skill Level
Easy → Confident Beginner (basic amigurumi and flat crochet)
📏 Finished Size
Approx. 15 cm (6 in) tall Approx. 12–13 cm (5 in) long (using DK cotton yarn and a 2.5 mm hook)
🧵 Materials
Yarn (DK cotton recommended):
White / Off-white – hull base, cushion, sails, flag
Medium Brown – hull rim and mast
Tools & Supplies:
2.5 mm crochet hook
Tapestry needle
Stitch marker
Polyester fiberfill
Scissors
Support disk (essential): thin cardboard, plastic canvas, EVA foam, or stiff felt cut into a circle the size of the hull base
🧩 Abbreviations (US Terms)
MR – Magic Ring sc – Single Crochet inc – Increase dec – Decrease BLO – Back Loop Only ch – Chain sl st – Slip Stitch FO – Fasten Off
Work in continuous rounds unless stated otherwise.
Continue increasing every other row until the base measures 20 sc. FO and block lightly.
Small Sail (Front Sail)
Work the same as the large sail, stopping when the base measures 14–15 sc. FO and block lightly.
🚩 Flag (Top of Mast)
With White:
Ch 6 Row 1: sc in 2nd ch from hook, sc 3, sl st
FO.
Sew loosely so it curves backward naturally.
🧵 Assembly
Step 1 – Deck & Mast
Place support disk inside hull
Sew cushion on top of disk
Insert mast through:
cushion
support disk
hull base
Sew securely from underneath
Step 2 – Sails
Sew the large sail to one side of the mast
Sew the small sail to the opposite side, slightly forward
Keep sails flat and gently angled
Step 3 – Flag
Attach the flag to the top of the mast so it trails backward
🪵 Final Shaping Tips
Hull must sit flat and stable
Brown rim clearly visible
Cushion centered and raised
Mast straight and vertical
Sails soft, not stiff
No borders. No embroidery. No windows or extra details.
✨ Photo-Accurate Features
✔ Rounded shallow hull ✔ Thick brown rim ✔ Raised white cushion ✔ Flat mast (not tubular) ✔ Two triangular sails ✔ Small trailing flag ✔ Clean minimalist coastal look
🌊 Finished Look
Your sailboat should now match the photo precisely: a calm, coastal crochet ornament with soft texture, simple geometry, and timeless charm.
Perfect for shelves, nurseries, and nautical décor displays. Crochet several in matching tones to create a peaceful little harbor scene ⛵🧶