Twirl into your next crochet adventure with this graceful Amigurumi Ballerina Doll—a delightful project full of elegance, charm, and handmade flair! 🩰🧶 With her sweet bun, dainty tutu, and poised expression, she’s ready to pirouette her way into your heart and your yarn stash. Whether you’re crafting a gift for a little dancer, decorating a ballet-themed display, or simply love stitching up dolls with personality, this ballerina brings a touch of stage magic to every loop.
Designed with soft textures and customizable details, this pattern invites you to play with pastel palettes, sparkly accents, and accessories like ballet slippers or a tiny ribbon. You can personalize her look to match your favorite dance style—from classical to contemporary—and even create a whole troupe of twirling friends. Whether perched on a shelf, tucked into a recital gift, or starring in a handmade performance scene, this Ballerina Doll Amigurumi is a joyful and satisfying project—perfect for stitching up a little grace and glitter, one loop at a time! 💖🎀✨
🩰 Amigurumi Ballerina Doll Crochet Pattern
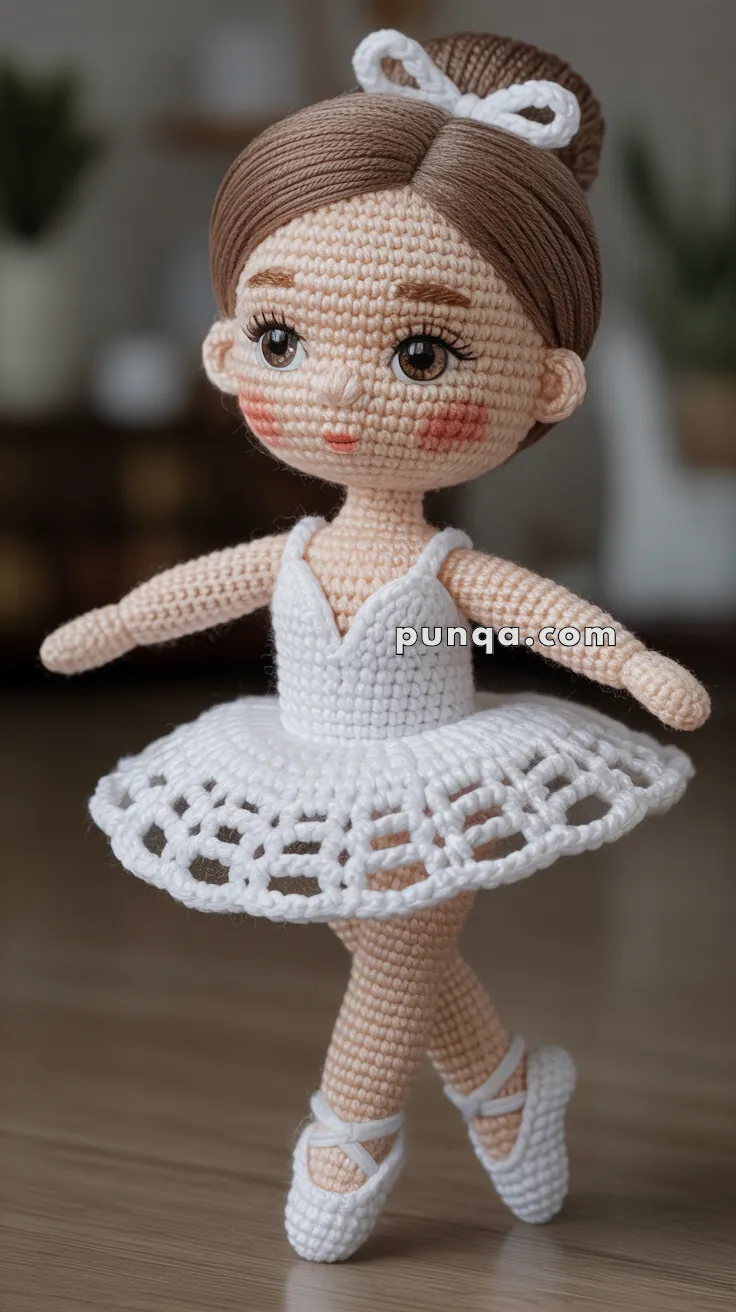
This elegant ballerina doll is inspired by classical ballet dancers and handcrafted to replicate the exact proportions and detailing seen in the reference photo. With her delicate lace tutu, wrapped side-part hairstyle, sculpted facial features, and pointe ballet slippers, she captures the graceful charm of a real stage dancer.
✨ Skill Level
Intermediate to Advanced – Includes shaping, facial sculpting, wrapped hair technique, fitted bodice construction, lace tutu structure, and detailed embroidery.
📏 Finished Size
Approximately 27–29 cm (10.5–11.5 inches) tall using sport/DK yarn and a 2.5 mm hook.
🧶 Yarn & Materials
Sport or DK weight yarn:
• Skin tone – 65 g
• White (leotard, tutu, shoes, bow) – 55 g
• Medium brown (hair) – 35 g
• Small amounts: black (lashes), brown (brows), coral (mouth), soft pink (blush)
Polyester fiberfill – approx. 200 g
12–14 mm brown safety eyes
2.25–2.5 mm hook (for tight stitches)
Yarn needle
Stitch marker
🧵 Abbreviations (US Terms)
MR – magic ring
sc – single crochet
inc – increase
dec – invisible decrease
sl st – slip stitch
ch – chain
dc – double crochet
hdc – half double crochet
BLO – back loop only
FO – fasten off
👩 Head (Smooth, Rounded with Soft Cheeks)
With skin tone:
R1: MR 6
R2: inc ×6 (12)
R3: (1 sc, inc) ×6 (18)
R4: (2 sc, inc) ×6 (24)
R5: (3 sc, inc) ×6 (30)
R6: (4 sc, inc) ×6 (36)
R7: (5 sc, inc) ×6 (42)
R8: (6 sc, inc) ×6 (48)
R9–17: sc around (48)
Insert eyes between R12–13, spaced 9 stitches apart.
R18: (6 sc, dec) ×6 (42)
R19: (5 sc, dec) ×6 (36)
R20: (4 sc, dec) ×6 (30)
Stuff firmly, shaping cheeks full and rounded.
R21: (3 sc, dec) ×6 (24)
R22: (2 sc, dec) ×6 (18)
R23: (1 sc, dec) ×6 (12)
R24: dec ×6 (6)
FO and close tightly.
Sculpted Nose
With skin tone:
R1: MR 4
R2: (sc, inc) ×2 (6)
R3: sc around (6)
Lightly stuff and sew centered slightly below eye line for a gentle projection.
Facial Embroidery
• Slightly arched brows with 6–7 short stitches
• 4 fine upward lashes on outer corners
• Small delicate curved mouth
• Blush placed slightly below outer eye edges
👂 Ears (Small & Subtle – Make 2)
R1: MR 6
R2: (1 sc, inc) ×3 (9)
R3: sc around (9)
Flatten gently and sew aligned with lower eye line.
👗 Slim Torso & Fitted Bodice
Start with skin tone:
R1: MR 6
R2: inc ×6 (12)
R3: (1 sc, inc) ×6 (18)
R4: (2 sc, inc) ×6 (24)
R5: (3 sc, inc) ×6 (30)
R6–7: sc around (30)
Switch to white.
R8–17: sc around (30)
Slight waist shaping:
R18: (3 sc, dec) ×6 (24)
R19: sc around (24)
R20: (2 sc, dec) ×6 (18)
Stuff firmly.
FO leaving long tail for sewing.
Embroider a clean V-neck shape at the front to create the leotard neckline.
💪 Long Slender Arms (Make 2)
R1: MR 5
R2: (sc, inc) ×2, sc (7)
R3–5: sc around (7)
R6: (sc, dec) ×2, sc (5)
R7–20: sc around (5)
Stuff lightly at hands only.
Leave upper portion unstuffed for natural drape.
Sew high on shoulders and angle outward for ballet pose.
🦵 Long Legs with Pointe Shoes (Make 2)
Pointe Shoes (White)
R1: MR 6
R2: inc ×6 (12)
R3: (1 sc, inc) ×6 (18)
R4: BLO sc around (18)
R5–6: sc around (18)
Toe shaping:
R7: 6 sc, 3 dec, 6 sc (15)
R8: 5 sc, 2 dec, 5 sc (13)
R9: 4 sc, dec, 4 sc (12)
Stuff toe box firmly.
Leg (Skin Tone)
R10–36: sc around (12)
Stuff lower leg firmly, upper leg lightly.
Keep legs straight and attach very close together to achieve en pointe alignment.
Embroider thin crossed ribbons around ankle and tie a small side bow.
💇 Smooth Side-Part Hair Cap
With brown:
R1: MR 6
R2: inc ×6 (12)
R3: (1 sc, inc) ×6 (18)
R4: (2 sc, inc) ×6 (24)
R5: (3 sc, inc) ×6 (30)
R6: (4 sc, inc) ×6 (36)
R7: (5 sc, inc) ×6 (42)
R8: (6 sc, inc) ×6 (48)
R9–16: sc around (48)
FO leaving long tail.
Sew firmly to head, aligning front hairline low above brows.
🎀 Wrapped Hair & Bun
Using long brown strands:
• Create defined side part slightly off center
• Wrap strands tightly and smoothly across scalp
• Right side shorter sweep
• Left side deeper coverage over ear
• Secure with tiny stitches every few wraps
Low Bun
R1: MR 6
R2: inc ×6 (12)
R3: (1 sc, inc) ×6 (18)
R4: (2 sc, inc) ×6 (24)
R5–6: sc around (24)
R7: (2 sc, dec) ×6 (18)
R8: (1 sc, dec) ×6 (12)
R9: dec ×6 (6)
Lightly stuff and sew low at back of head.
White Bow
Ch 16
Row 1–3: sc across
Wrap center tightly and sew to bun.
🩰 Structured Openwork Tutu
Attach white yarn to waist (24 sts).
Round 1 – Base
sc around evenly, sl st to join.
Round 2 – Mesh Panels
Ch 5, skip 2 sts, dc in next st, ch 2.
Repeat around to create evenly spaced panels.
Round 3 – Vertical Extension
Sl st into space.
Ch 5, dc in same space, ch 2, dc in next space.
Repeat around.
Round 4 – Square Frame
Ch 4, sc in next space.
Repeat around.
Round 5 – Defined Edge
In each ch-4 space work:
sc, hdc, 3 dc, hdc, sc
FO.
Gently steam or lightly stiffen so tutu holds a flat circular shape with visible open lattice.
🪡 Assembly & Shaping
• Sew head securely to torso
• Attach arms angled slightly downward in ballet second position
• Attach legs straight and close together
• Crochet tutu at waist
• Refine hair wrapping and bun
• Adjust stance for balanced en pointe posture
🌸 Final Touch
With elongated proportions, a refined face, sleek wrapped hair, and a structured lace tutu, this ballerina captures the elegance and discipline of classical dance. Her slim silhouette and delicate finishing details create a timeless keepsake that beautifully reflects grace, strength, and artistry in every stitch. 🩰✨