✨ Skill Level
Intermediate
Skills needed:
📏 Finished Size
Approx. 13–15 cm (5–6 inches) tall
(using DK / worsted yarn and a 3.0 mm hook)
Perfect size for a fridge magnet.
🧶 Materials
Yarn (DK or worsted):
-
Dark Red – main body, fins, tail
-
White – belly, jaw, teeth, gills
-
Small amount of Black – eye embroidery (or 8–10 mm safety eyes)
Tools & Supplies:
-
3.0 mm crochet hook
-
Polyester fiberfill (light amount)
-
Yarn needle
-
Stitch marker
-
Scissors
-
Flat round magnet (3–4 cm diameter)
-
Fabric glue (optional, to secure magnet)
🧵 Abbreviations (US Terms)
MR – magic ring
sc – single crochet
inc – increase
dec – decrease
sl st – slip stitch
ch – chain
FO – fasten off
Work in continuous rounds unless stated.
🧩 Pattern Instructions
🦈 Body (Red & White – one piece)
Start with White (belly and mouth area).
R1: MR 6 sc (6)
R2: inc x6 (12)
R3: (sc, inc) x6 (18)
R4: (2 sc, inc) x6 (24)
R5: (3 sc, inc) x6 (30)
R6: (4 sc, inc) x6 (36)
R7–9: sc around (36)
Change to Dark Red.
R10–17: sc around (36)
Place safety eyes between R8–9, about 7 stitches apart.
Lightly stuff the body and shape it into a gentle curve.
Insert flat magnet against the back (red side).
R18: (4 sc, dec) x6 (30)
R19: (3 sc, dec) x6 (24)
R20: (2 sc, dec) x6 (18)
R21: (sc, dec) x6 (12)
R22: dec x6 (6)
FO and close.
Do not overstuff – the body should stay slightly flattened at the back.
👄 Mouth & Teeth Panel (White)
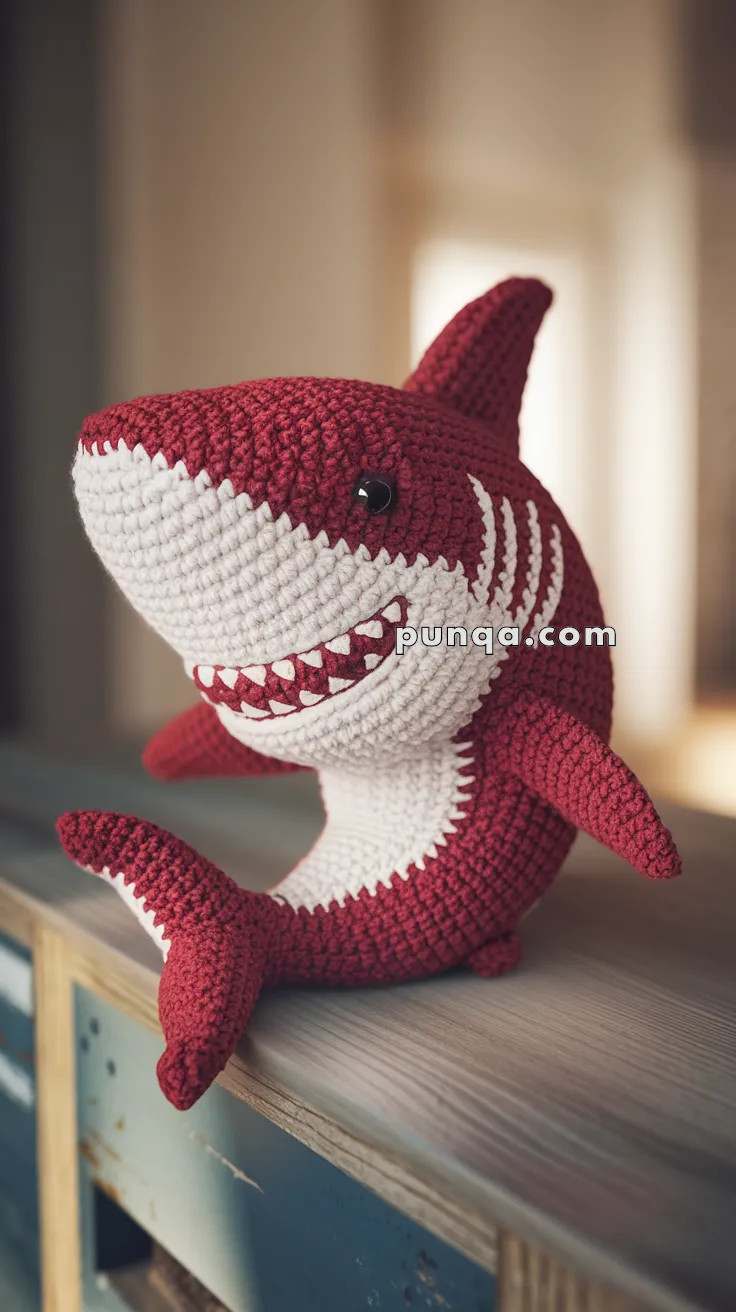
This creates the wide smiling jaw seen in the photo.
Ch 15
Row 1: sc in 2nd ch from hook and across (14)
Rows 2–3: sc across (14)
FO, leave long tail.
Teeth (White)
Cut 12–14 small triangular pieces of white yarn felt OR crochet tiny teeth:
Tiny Tooth (make 12):
MR 3 sc, FO.
Sew teeth evenly along the top edge of the mouth panel to form a zigzag grin.
Sew mouth panel onto front of body, centered on the white belly area, curving slightly upward.
🦈 Dorsal Fin (Red)
Tall triangular fin.
R1: MR 4 sc (4)
R2: (sc, inc) x2 (6)
R3: (2 sc, inc) x2 (8)
R4–6: sc around (8)
FO (no stuffing).
Flatten and sew to the top of the shark’s back.
🦈 Side Fins (Make 2 – Red)
Short rounded fins.
R1: MR 5 sc (5)
R2: (sc, inc) x2, sc (7)
R3–5: sc around (7)
FO.
Flatten slightly and sew one on each side, angled downward.
🦈 Tail Fin (Make 2 – Red)
Forked tail shape.
R1: MR 6 sc (6)
R2: (sc, inc) x3 (9)
R3–5: sc around (9)
FO.
Make two identical pieces.
Sew them together around the edge, lightly stuff, and pinch the center to form a forked shape.
Attach to the back of the body.
🪡 Gill Details (White Embroidery)
With white yarn, embroider three curved vertical gill slashes on each side of the body behind the eyes, matching the photo placement.
🧲 Magnet Placement
Before fully closing the body:
-
Insert flat magnet inside the back.
-
Secure with a few stitches or fabric glue so it stays flat.
-
Ensure the back surface is slightly flattened.
🪄 Assembly Order
-
Sew mouth & teeth panel onto the belly area.
-
Attach dorsal fin on top.
-
Sew side fins to sides.
-
Attach tail fin to back.
-
Embroider gills.
-
Insert magnet and close body.
-
Shape shark into a gentle curved sitting pose.
✨ Key Photo Details Matched
✔ Rounded curved body
✔ Deep red top color
✔ Large white belly and jaw
✔ Wide smiling mouth with visible teeth
✔ Small black eyes
✔ Three white gill slashes
✔ Tall dorsal fin
✔ Short side fins
✔ Forked tail fin
✔ Compact size for fridge magnet
🌊 Finishing Touches
-
Lightly steam shape (no iron contact).
-
Make sure magnet is secure and flat.
-
Keep stuffing minimal so magnet holds well.
🎉 Final Thoughts
This Amigurumi Shark Fridge Magnet captures the playful personality and toothy grin seen in the photo, making it a perfect ocean-themed decoration for your kitchen or workspace. Its compact curved shape and bold color contrast make it instantly recognizable and irresistibly cute.
Create a whole school of sharks in different colors and let them “swim” across your fridge! 🦈🧶