Celebrate springtime sweetness with the Amigurumi Easter Lamb, a cuddly crochet creation that’s as soft and charming as a fresh spring breeze! 🐑🌸 With its fluffy texture, gentle smile, and dainty little bow, this lamb is the perfect companion for Easter baskets, seasonal décor, or heartfelt handmade gifts. Whether nestled among pastel eggs or perched on a sunny windowsill, this woolly friend brings warmth and whimsy to any space.
This pattern is a joyful treat for crocheters who love soft textures and adorable details. You can customize your lamb with different bow colors, add tiny flowers, or even stitch up a whole flock for extra festive flair. Whether you’re crafting for a little one, decorating for the season, or simply indulging in some cozy creativity, the Easter Lamb With A Bow is a delightful way to welcome spring—one snuggly stitch at a time! 🧶💐
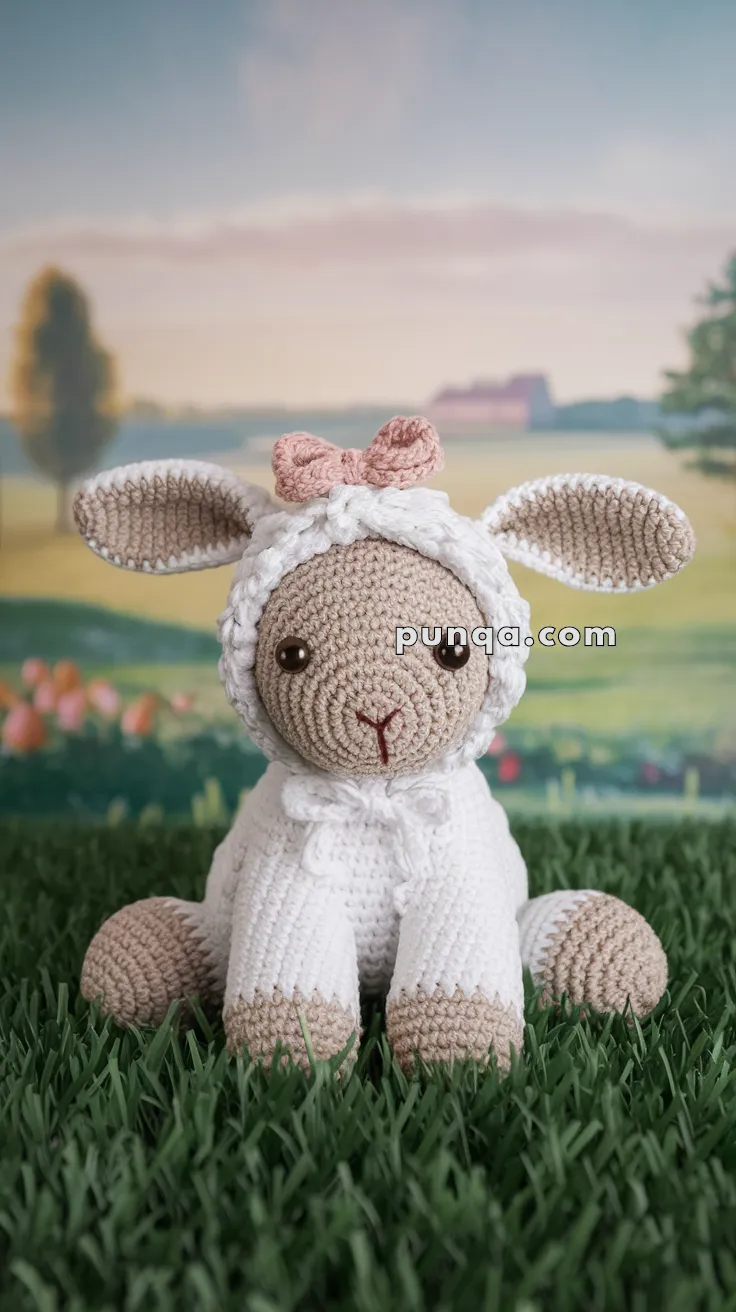
🐑 Amigurumi Easter Lamb with a Bow – Free Crochet Pattern
This sweet amigurumi lamb is dressed in fluffy white “wool,” has floppy beige ears, and wears a pastel pink bow. With her big eyes and gentle smile, she’s the perfect springtime decoration, gift, or Easter basket surprise.
✨ Skill Level
Intermediate – You’ll need basic amigurumi skills, color changes, shaping, and sewing.
📏 Finished Size
Approx. 25 cm (10 inches) tall using worsted weight yarn and a 3.5 mm hook.
🧶 Materials
- Worsted weight yarn in:
- White (body, fleece hood, arms & legs)
- Beige/tan (head, inner ears, hooves)
- Pastel pink (bow)
- Crochet hook: 3.5 mm
- Safety eyes (10–12 mm)
- Brown embroidery thread (nose & mouth)
- Toy stuffing
- Yarn needle & scissors
- Stitch markers
🔤 Abbreviations (US Terms)
MR = Magic Ring
sc = single crochet
inc = increase (2 sc in same st)
dec = decrease (sc2tog)
sl st = slip stitch
ch = chain
st(s) = stitch(es)
FO = fasten off
🧵 Pattern Instructions
🐑 Head (Beige)
- R1: 6 sc in MR (6)
- R2: inc in each st (12)
- R3: (sc, inc) x 6 (18)
- R4: (2 sc, inc) x 6 (24)
- R5: (3 sc, inc) x 6 (30)
- R6: (4 sc, inc) x 6 (36)
- R7–15: sc around (36)
- R16: (4 sc, dec) x 6 (30)
- R17: (3 sc, dec) x 6 (24)
👉 Place safety eyes between R13–14, spaced 9–10 sts apart.
👉 Embroider nose as a small “V” with a line down, between the eyes on R15–16. - R18: (2 sc, dec) x 6 (18)
- R19: (sc, dec) x 6 (12)
- Stuff firmly.
- R20: dec around (6). FO and close.
🐑 Body (White)
- R1: 6 sc in MR (6)
- R2: inc in each st (12)
- R3: (sc, inc) x 6 (18)
- R4: (2 sc, inc) x 6 (24)
- R5: (3 sc, inc) x 6 (30)
- R6: (4 sc, inc) x 6 (36)
- R7–15: sc around (36)
- R16: (4 sc, dec) x 6 (30)
- R17–22: sc around (30)
- R23: (3 sc, dec) x 6 (24)
- Stuff firmly. FO, leaving long tail for sewing.
🐑 Legs (Make 4 – Beige hooves, then White)
Start with Beige:
- R1: 6 sc in MR (6)
- R2: inc in each st (12)
- R3: (sc, inc) x 6 (18)
- R4–5: sc around (18)
Switch to White: - R6–10: sc around (18) – shorter legs for photo accuracy
- Stuff lightly. FO, leaving tail for sewing.
🐑 Ears (Make 2 – Beige inside, White border)
With Beige:
- R1: 6 sc in MR (6)
- R2: (sc, inc) x 3 (9)
- R3: sc around (9)
- R4: (2 sc, inc) x 3 (12)
- R5–12: sc around (12) for long floppy ears
Switch to White: - R13: sc around (12)
- FO, flatten ear, do not stuff.
🐑 Fleece Hood Trim (White)
- Ch 40 (long enough to fit around head).
- R1: 2 sc in each st across.
- FO.
- Sew around head like a bonnet edge to frame the face.
🎀 Bow (Pastel Pink)
- Ch 20.
- Row 1–4: sc across (19). FO.
- Pinch center, wrap yarn tightly around several times, and secure.
- Sew to top of head between ears.
🪡 Assembly
- Sew head to body securely.
- Attach front legs angled slightly forward.
- Attach back legs to sides so lamb sits upright.
- Sew ears to sides of head, pointing slightly outward.
- Sew fleece trim around face.
- Attach bow at top center, slightly forward.
- Weave in all ends neatly.
🎉 Final Look
Your Easter Lamb with a Bow is complete! 🐑💖
- She has floppy beige ears, embroidered nose and mouth, a fluffy fleece hood, and a pastel bow.
- Perfect for Easter baskets, springtime décor, or gifting to little ones.
🧵 Face Placement Guide
👉 Always pin parts in place before sewing to check proportions.
👀 Eyes
- Place between R13–14 of the head.
- Space them 9–10 stitches apart for the wide, gentle look.
- Insert safety eyes before stuffing the head.
👃 Nose & Mouth (Embroidered)
- Nose tip sits on R15–16, centered between the eyes.
- Shape: small “V” with a short vertical line down from the center.
- Use dark brown embroidery thread for contrast.
👂 Ears
- Sew to the sides of the head at about R16–17, just slightly behind the eyes.
- Angle them outward and slightly downward to match the floppy look in the photo.
🧣 Fleece Trim
- Attach around the face edge, starting just below one ear → across the forehead → around chin → up to the other ear.
- This frames the face neatly like a lamb’s hood.
🎀 Bow
- Position on top of head, centered between ears, slightly forward.
- Secure well so it sits upright and doesn’t flop backward.