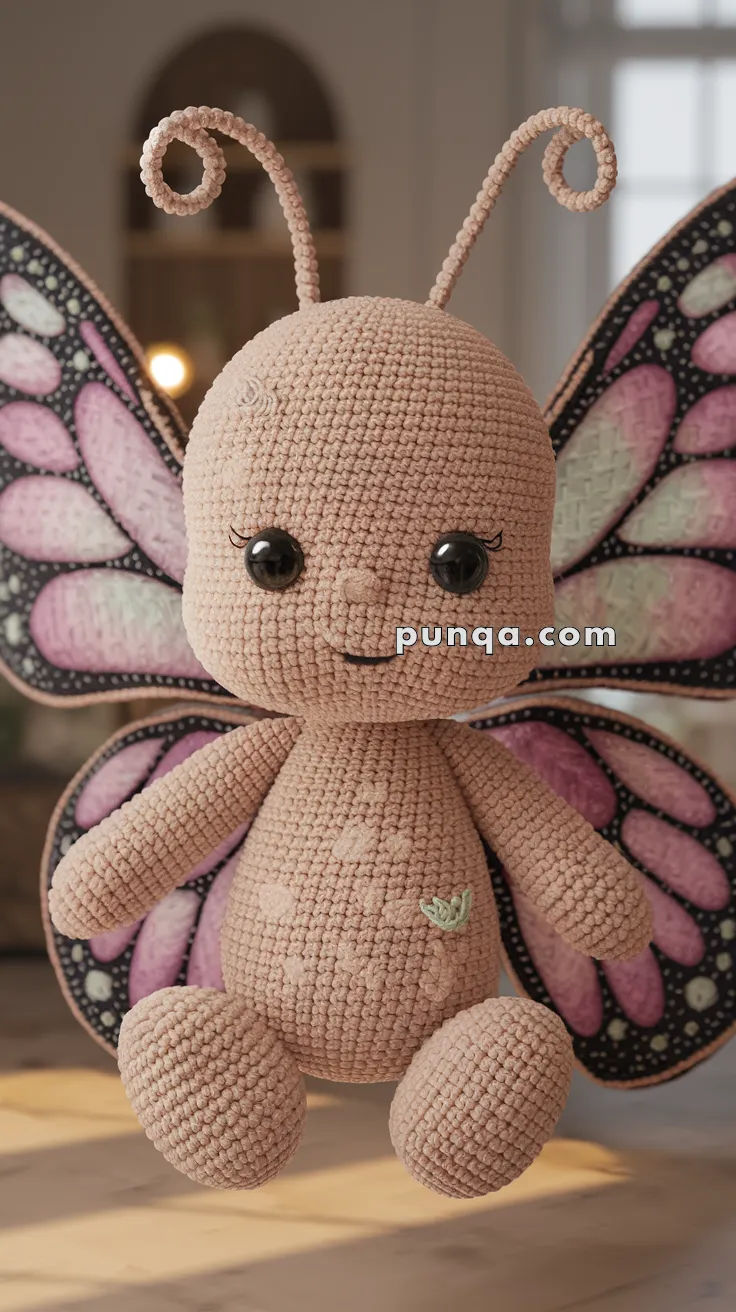
Flutter into sweetness with the Amigurumi Butterfly Baby, a whimsical crochet project that’s full of charm and gentle magic! 🦋🧶 With its soft wings, rounded body, and sleepy little face, this tiny butterfly is perfect for springtime décor, baby gifts, or anyone who loves cuddly critters with a touch of fantasy. Whether perched on a shelf or nestled in a nursery, this baby brings a flutter of joy to every handmade moment.
Perfect for crocheters who adore delicate details and playful shapes, this pattern invites you to explore pastel colors, textured stitches, and imaginative accents. Add a flower crown, stitch on tiny antennae, or pair it with other insect friends for a full garden of amigurumi delight. The Amigurumi Butterfly Baby is a heartwarming way to stitch up serenity, sweetness, and a sprinkle of handmade wonder—one loop at a time! 🧵🌸
🦋 Amigurumi Butterfly Baby Crochet Pattern
Bring a little magic into your handmade world with this sweet Butterfly Baby! With its soft body, curly antennae, big eyes, and beautiful pastel wings, this doll is perfect for gifting, decorating, or adding to your fantasy amigurumi collection.
✨ Skill Level
Beginner–Intermediate – works mostly with simple shapes, but requires sewing parts and attaching felt/fabric wings.
📏 Finished Size
Approximately 25 cm (10 inches) tall when made with velvet or chenille yarn using a 3.5 mm hook.
🧶 Materials
-
Velvet/chenille yarn:
-
Light beige/peach – 100 g (head, body, arms, legs, antennae)
-
Black – for wing outline or embroidery (if crocheted wings)
-
Green – small leaf accent on belly (optional)
-
-
Felt/fabric for wings – pink, lilac, cream, and black shades
-
12 mm black safety eyes
-
Black embroidery thread – for smile and lashes
-
Pink pastel or yarn – for cheek blush
-
Crochet hook – 3.5 mm
-
Polyfill stuffing
-
Yarn needle, scissors, stitch marker
-
Fabric glue (if attaching felt wings)
🧵 Abbreviations (US Terms)
MR – magic ring
sc – single crochet
inc – increase (2 sc in one st)
dec – decrease (sc 2 tog)
sl st – slip stitch
ch – chain
FO – fasten off
👶 Head
With beige yarn:
Rnd 1 – MR 6 sc (6)
Rnd 2 – inc × 6 (12)
Rnd 3 – (1 sc, inc) × 6 (18)
Rnd 4 – (2 sc, inc) × 6 (24)
Rnd 5 – (3 sc, inc) × 6 (30)
Rnd 6 – (4 sc, inc) × 6 (36)
Rnd 7 – (5 sc, inc) × 6 (42)
Rnd 8–16 – sc around (42)
Rnd 17 – (5 sc, dec) × 6 (36)
Rnd 18 – (4 sc, dec) × 6 (30)
Rnd 19 – (3 sc, dec) × 6 (24)
Rnd 20 – (2 sc, dec) × 6 (18)
Begin stuffing firmly.
Rnd 21 – (1 sc, dec) × 6 (12)
Rnd 22 – dec × 6 (6), FO, close.
Insert eyes between Rnds 10 – 11, 7 sts apart.
Add embroidered lashes and gentle curved smile.
🐽 Nose
MR 6 sc (6) → FO leaving tail.
Sew centered between eyes for a raised nose bump.
🌀 Antennae (×2)
Ch 25.
Starting in 2nd ch from hook, sc across (24).
FO. Coil the tips tightly into spirals and sew securely to top of head, angled forward.
🧸 Body
Rnd 1 – MR 6 sc (6)
Rnd 2 – inc × 6 (12)
Rnd 3 – (1 sc, inc) × 6 (18)
Rnd 4 – (2 sc, inc) × 6 (24)
Rnd 5 – (3 sc, inc) × 6 (30)
Rnd 6–14 – sc around (30)
Rnd 15 – (3 sc, dec) × 6 (24)
Rnd 16 – (2 sc, dec) × 6 (18)
Rnd 17 – (1 sc, dec) × 6 (12)
Rnd 18 – dec × 6 (6), FO.
Stuff firmly toward top for a rounded upper body, leaving lower part slightly softer.
Optional – embroider a small leaf motif or pale spots on belly for detail.
💪 Arms (×2)
MR 6 sc (6)
Rnd 2 – inc × 6 (12)
Rnd 3–5 – sc around (12)
Rnd 6 – (2 sc, dec) × 3 (9)
Rnd 7–11 – sc around (9)
FO, stuff lightly, and sew just below head on each side.
🦵 Legs (×2)
MR 6 sc (6)
Rnd 2 – inc × 6 (12)
Rnd 3–6 – sc around (12)
Rnd 7 – (2 sc, dec) × 3 (9)
Rnd 8–10 – sc around (9)
FO and stuff firmly.
Sew to bottom of body so the doll can sit upright.
🦋 Felt Wings (Photo-Accurate Version)
Cut 2 large upper and 2 smaller lower wings from black felt.
Layer pastel pink, lavender, and cream pieces onto each wing and secure with fabric glue or stitches.
Outline each section with fine black embroidery or fabric paint for definition.
Sew or glue smaller lower wing to base of larger wing.
Attach completed wings to the back of body, centered between arms.
Wings should extend slightly above the head and reach to the legs, as seen in the photo.
🪡 Assembly
1️⃣ Sew head firmly to body.
2️⃣ Attach arms and legs symmetrically.
3️⃣ Secure antennae with tight stitches.
4️⃣ Stitch or glue wings on back.
5️⃣ Embroider smile and blush under eyes.
6️⃣ Shape antennae into soft curls.
🌸 Finishing Touches
-
Apply light pink pastel to cheeks.
-
Add small embroidered leaf or heart on belly if desired.
-
Optional: brush light shimmer paint over wing edges for magical effect.
🦋 Your Butterfly Baby is complete!
Soft, serene, and full of pastel grace — this gentle creature makes a perfect gift or whimsical display piece for any home.