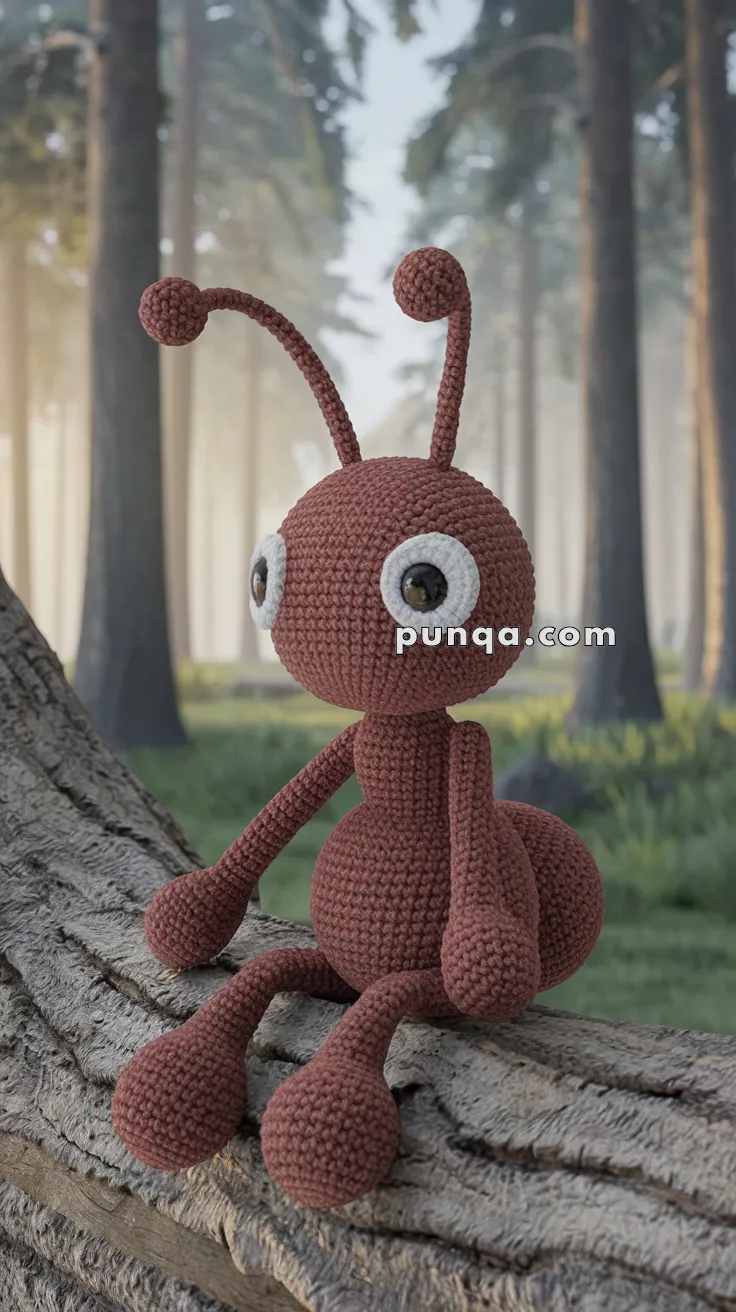
March into cuteness with the Amigurumi Ant, a delightful crochet creation that’s full of charm and character! 🐜🧶 With its rich brown body, big expressive eyes, bobbly limbs, and a rounded, detailed back, this tiny insect is anything but ordinary. Whether you’re crafting a fun addition to your bug-themed collection or looking for a quirky handmade gift, this ant is sure to bring a smile to anyone who sees it.
Perfect for crocheters who love playful shapes and imaginative designs, this pattern invites you to explore texture and personality in every stitch. Add a tiny leaf, pair it with other garden critters, or create a whole colony for a whimsical display. The Amigurumi Ant is a joyful way to stitch up curiosity, creativity, and a sprinkle of handmade magic—one loop at a time! 🧵✨🌿
🐜 Amigurumi Ant Crochet Pattern
Meet your forest friend — a charming crocheted ant with big eyes, bobbly limbs, and a rounded, detailed back. Whether you want to make a woodland creature for storytelling, decoration, or playtime, this little ant is sure to march right into your heart!
✨ Skill Level
🧶 Intermediate
Includes shaping, proportion control, limb positioning, and assembly.
📏 Finished Size
Approx. 23–25 cm (9–10 inches) tall (seated)
🧶 Materials & Yarn Amount
DK or light worsted yarn:
Brown (entire body, limbs, antennae): 75 g (~225 m)
White (eye whites): 10–12 g (~30–35 m)
Black/dark brown (pupils): small amount (~3 g)
Other:
3.0 mm crochet hook
10–12 mm safety eyes
Polyfill stuffing (220–260 g)
Tapestry needle
Stitch markers
Optional: thin wire for antennae shaping
🧵 Abbreviations (US Terms)
MR – magic ring
sc – single crochet
inc – increase
dec – invisible decrease
FO – fasten off
🪶 Design Proportions (Important)
✨ Head = large sphere
✨ Thorax = very narrow and short (neck-like)
✨ Abdomen = largest rounded part after head
✨ Eyes = flat discs, sewn on sides
✨ Limbs = long, soft, slightly bent
✨ Antennae = tall, curved, thin with small balls
🧠 Head (Large, smooth sphere)
With brown:
Rnd 1: MR 6
Rnd 2: inc ×6 (12)
Rnd 3: (1 sc, inc) ×6 (18)
Rnd 4: (2 sc, inc) ×6 (24)
Rnd 5: (3 sc, inc) ×6 (30)
Rnd 6: (4 sc, inc) ×6 (36)
Rnd 7–14: sc around (36)
Shape and close
Rnd 15: (4 sc, dec) ×6 (30)
Rnd 16: (3 sc, dec) ×6 (24)
Rnd 17: (2 sc, dec) ×6 (18)
Stuff firmly
Rnd 18: (1 sc, dec) ×6 (12)
Rnd 19: dec ×6 (6)
FO.
👉 Keep head very round and full
👀 Eye Discs (Large and flat)
Make 2 (white):
Rnd 1: MR 6
Rnd 2: inc ×6 (12)
Rnd 3: (1 sc, inc) ×6 (18)
FO.
Insert safety eye in center.
👉 Sew to sides of head so they protrude clearly outward
🪶 Antennae (Tall and expressive)
Make 2:
Tip Ball
Rnd 1: MR 6
Rnd 2: (1 sc, inc) ×3 (9)
Rnd 3: sc around (9)
Rnd 4: (1 sc, dec) ×3 (6)
Lightly stuff
Thin Stem
Rnd 5–22: sc around (6)
FO.
👉 Keep long and thin
👉 Curve outward and slightly forward
🪶 Thorax (Very slim connector)
With brown:
Rnd 1: MR 6
Rnd 2: inc ×6 (12)
Rnd 3: (1 sc, inc) ×6 (18)
Rnd 4–5: sc around (18)
Narrow down strongly
Rnd 6: (1 sc, dec) ×6 (12)
Rnd 7–10: sc around (12)
Stuff lightly
FO.
👉 This part must look like a thin neck, not a ball
🪶 Abdomen (Large rounded back)
With brown:
Rnd 1: MR 6
Rnd 2: inc ×6 (12)
Rnd 3: (1 sc, inc) ×6 (18)
Rnd 4: (2 sc, inc) ×6 (24)
Rnd 5: (3 sc, inc) ×6 (30)
Rnd 6: (4 sc, inc) ×6 (36)
Rnd 7–12: sc around (36)
Shape and close
Rnd 13: (4 sc, dec) ×6 (30)
Rnd 14: (3 sc, dec) ×6 (24)
Rnd 15: (2 sc, dec) ×6 (18)
Stuff very firmly
Rnd 16: (1 sc, dec) ×6 (12)
Rnd 17: dec ×6 (6)
FO.
👉 Keep perfectly round and full
🦵 Limbs (4 pieces total)
With brown:
Rnd 1: MR 6
Rnd 2: inc ×6 (12)
Rnd 3–5: sc around (12)
👉 forms rounded hand/foot
Long thin section
Rnd 6: (2 sc, dec) ×3 (9)
Rnd 7–18: sc around (9)
Rnd 19: (1 sc, dec) ×3 (6)
FO.
👉 Stuff only the rounded ends
👉 Keep limbs soft and bendable
🧩 Assembly
🪡 Attach thorax centered under head (upright)
🪡 Attach abdomen to back of thorax
🪡 Sew eyes wide apart on sides of head
🪡 Attach antennae high on head
Limb placement (very important)
🪡 Arms: attach high on thorax, hanging down
🪡 Legs: attach lower, angled forward
👉 Let legs extend forward naturally
👉 Arms rest slightly outward
🧶 Shaping Tips
✨ Head must be largest front element
✨ Thorax should be noticeably narrow
✨ Abdomen sits behind like a round cushion
✨ Eyes positioned wide, slightly outward
✨ Limbs relaxed (not stiff or straight)
✨ Antennae tall with soft curves
✂️ Finishing Touches
✨ Adjust limb angles for seated balance
✨ Slightly tilt head for personality
✨ Smooth stuffing for clean silhouette
✨ Optional tiny embroidered mouth
🐜 Final Result
A whimsical ant with bold proportions, oversized curious eyes, and relaxed limbs that naturally drape into a seated pose. The contrast between the tiny middle section and rounded shapes gives it a playful, storybook charm perfect for display or gifting. 🌿🐜
Happy crocheting! 🧶✨