Float into cuteness with the Amigurumi Otter, a lovable crochet project that’s full of charm and cozy vibes! 🦦🧶 With its round little face, sweet stitched smile, and tiny paws perfect for holding a seashell or heart, this otter is ready to snuggle its way into your handmade collection. Whether you’re crafting a gift, decorating a nursery, or simply indulging your love of adorable animals, this fuzzy friend brings a splash of joy to every stitch.
Perfect for crocheters who enjoy soft shapes and expressive details, this pattern invites playful customization. Try earthy browns for a natural look, pastel tones for a dreamy twist, or add accessories like a scarf, flower crown, or mini fish buddy. Whether lounging on a shelf or floating into someone’s heart, the Amigurumi Otter is a delightful way to stitch up sweetness—one cuddly loop at a time! 🌊💙
🦦 Amigurumi River Otter Crochet Pattern
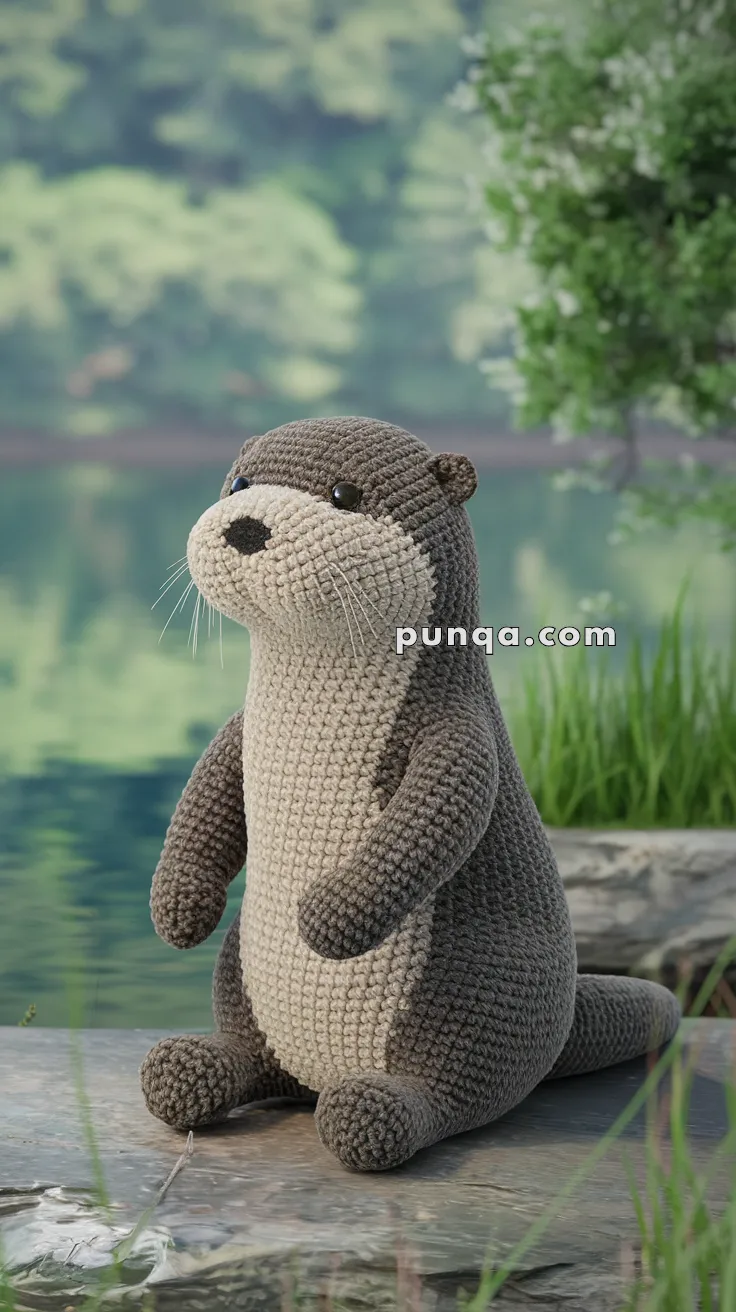
This sweet little river otter sits upright with a gentle posture, soft rounded head, narrow muzzle, creamy belly, and a long sturdy tail for balance. Inspired directly from the reference photo, this pattern creates a lifelike woodland companion that feels calm, cozy, and full of personality.
Perfect for animal lovers, woodland decor, nursery toys, or handmade gifts.
✨ Skill Level
Intermediate – includes shaping, color changes, and assembling multiple parts.
📏 Finished Size
Approximately 25–28 cm (10–11 in) tall using worsted weight yarn and a 3.5 mm hook.
🧶 Materials
Worsted weight yarn
- Dark brown (main body, head, arms, legs, tail, ears)
- Beige / light tan (belly panel and muzzle)
- Black (nose embroidery)
Other supplies
- 3.5 mm crochet hook
- 8–10 mm safety eyes
- Polyester fiberfill
- Tapestry needle
- Stitch marker
- Fishing line or thin black thread for whiskers
🧵 Abbreviations (US Terms)
MR – Magic ring
sc – Single crochet
inc – Increase (2 sc in same stitch)
dec – Decrease (sc 2 together)
sl st – Slip stitch
FO – Fasten off
🦦 Head (dark brown)
The head is an oval shape with a gentle taper toward the chin — not a round ball.
MR, 6 sc (6)
inc in each st (12)
(sc, inc) ×6 (18)
(2 sc, inc) ×6 (24)
(3 sc, inc) ×6 (30)
(4 sc, inc) ×6 (36)
(5 sc, inc) ×6 (42)
7–13. sc around (42)
Insert safety eyes between rounds 9–10, about 7 stitches apart.
(5 sc, dec) ×6 (36)
(4 sc, dec) ×6 (30)
(3 sc, dec) ×6 (24)
(2 sc, dec) ×6 (18)
(sc, dec) ×6 (12)
Stuff firmly, shaping into a tall oval.
dec ×6 (6)
FO and close.
🐽 Muzzle (beige)
The muzzle is a long oval that protrudes slightly forward.
Ch 9
Starting in 2nd ch: 7 sc, 3 sc in last ch
Working opposite side: 6 sc, 2 sc in last st (18)
- inc, 6 sc, inc ×3, 6 sc, inc ×2 (24)
3–5. sc around (24) - (2 sc, dec) ×6 (18)
- sc around (18)
Stuff lightly and flatten slightly.
FO with long tail. Sew centered low on the face.
Embroider a small vertical oval nose at the top of the muzzle with black yarn.
Add 3 whiskers on each side using fishing line or thin thread.
Embroider a tiny straight mouth line under the nose.
👂 Ears (make 2, dark brown)
MR, 6 sc (6)
sc around (6)
FO, flatten slightly.
Sew far back on the head, slightly behind the eyes.
🧸 Body (beige belly + dark brown sides)
The body is tall and oval with a long vertical cream belly panel.
Start with beige:
MR, 6 sc (6)
inc in each st (12)
(sc, inc) ×6 (18)
(2 sc, inc) ×6 (24)
(3 sc, inc) ×6 (30)
(4 sc, inc) ×6 (36)
(5 sc, inc) ×6 (42)
7–18. sc around (42)
(keep beige for the entire front belly panel)
Switch to dark brown and continue working in joined color blocks so the beige stays centered on the front.
19–28. sc around (42)
(5 sc, dec) ×6 (36)
(4 sc, dec) ×6 (30)
(3 sc, dec) ×6 (24)
(2 sc, dec) ×6 (18)
Stuff firmly.
(sc, dec) ×6 (12)
dec ×6 (6)
FO and close.
🐾 Arms (make 2, dark brown)
Long relaxed arms that hang naturally.
MR, 6 sc (6)
inc in each st (12)
3–10. sc around (12)
(2 sc, dec) ×3 (9)
11–13. sc around (9)
Stuff lightly.
FO, leave tail for sewing.
Sew to body sides just below the head, angled slightly forward.
🦶 Legs (make 2, dark brown)
Short thick legs used for sitting.
MR, 6 sc (6)
inc in each st (12)
(sc, inc) ×6 (18)
4–6. sc around (18)
(4 sc, dec) ×3 (15)
(3 sc, dec) ×3 (12)
7–10. sc around (12)
Stuff firmly and flatten slightly at base.
FO, leave tail.
Sew to front-bottom of body so the otter sits upright.
🐊 Tail (dark brown)
The tail is thick and long and acts as a balance prop.
MR, 6 sc (6)
(sc, inc) ×3 (9)
(2 sc, inc) ×3 (12)
4–22. sc around (12)
(2 sc, dec) ×3 (9)
23–26. sc around (9)
Stuff lightly so it stays flexible.
FO and sew centered at the back base of the body, angled slightly downward.
🪡 Assembly
- Attach muzzle and embroider nose, mouth, and whiskers
- Sew ears far back on head
- Attach head to body with a slight forward tilt
- Sew arms so they hang naturally
- Attach legs forward for seated pose
- Sew tail so it touches the ground for balance
✨ Finishing Details
- Shape the muzzle so it slopes gently into the face
- Keep mouth subtle and minimal
- Adjust whiskers evenly
- Position tail and legs so otter stands upright naturally
🏁 Final Result
Your finished otter will match the photo with:
✔ Upright sitting posture
✔ Tall oval body
✔ Long cream belly panel
✔ Narrow oval muzzle
✔ Small rounded ears set far back
✔ Long relaxed arms
✔ Short sturdy legs
✔ Thick balancing tail
✔ Calm natural expression
This woodland otter is perfect as a collectible plush, gift, or display piece. Soft, gentle, and beautifully proportioned — just like the one in the photo. 🦦💚