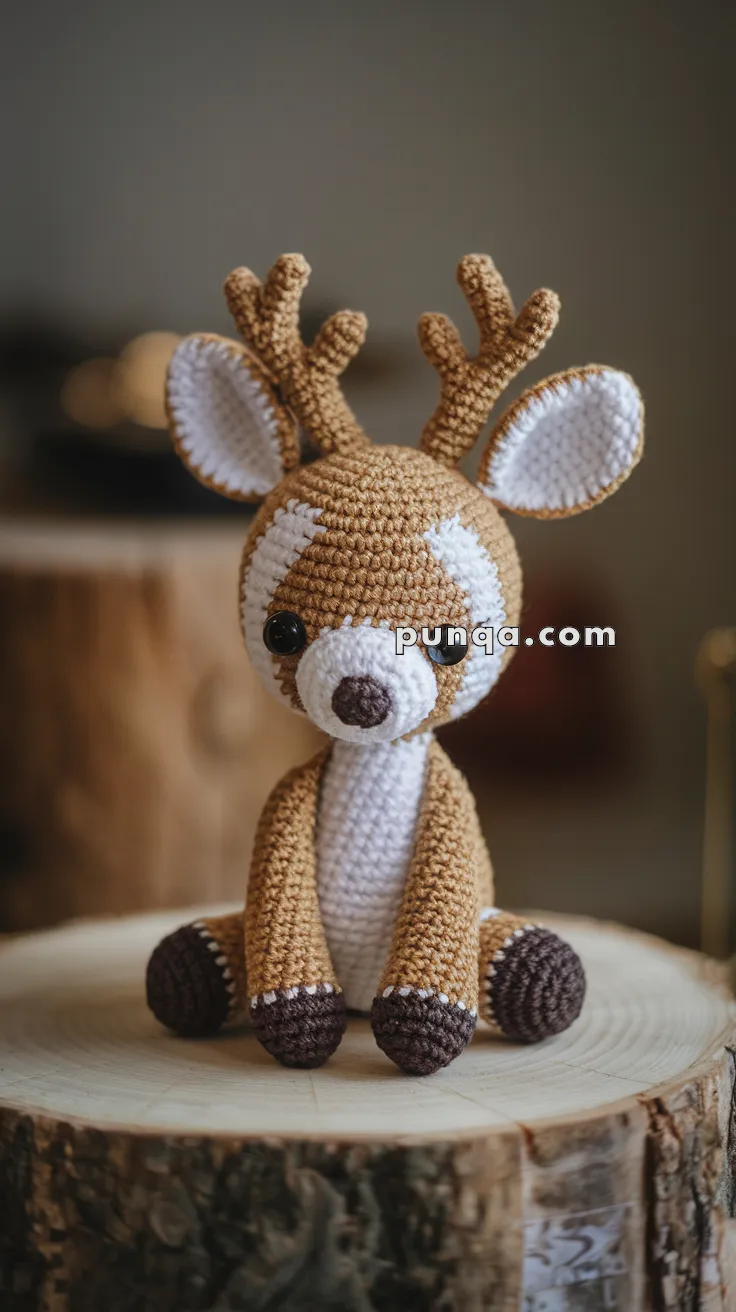
Bring the gentle charm of a Deer to life with this Amigurumi Deer crochet pattern! 🦌✨ With its delicate features, soft fur, and graceful stance, this design captures the essence of this beloved woodland creature in yarn form. Whether you’re crafting for a nature-inspired décor piece, a heartfelt gift, or simply love deer-themed amigurumi, this FREE pattern is a fantastic addition to your collection.
Designed for crocheters of all skill levels, this pattern allows for customization in antler shapes, fur textures, and even tiny accessories like embroidered markings or a miniature forest setting to enhance its personality. Choose classic warm browns and creams for a realistic look or experiment with pastel hues for a whimsical twist! Whether displayed as part of a woodland setup or gifted to a fellow crochet enthusiast, this amigurumi deer is sure to impress.
Grab your hook, select your favorite yarn, and let’s bring this graceful forest dweller to life—one stitch at a time! 🧶✨
🦌 Amigurumi Deer Free Crochet Pattern
Bring the charm of the forest into your home with this adorable Woodland Deer! With gentle eyes, long slender legs, oversized ears, and playful antlers, this little friend is perfect as nursery décor, a woodland toy, or a seasonal handmade keepsake.
✨ Skill Level
Intermediate – You’ll work with shaping, color changes, and assembling smaller parts like antlers and ears.
📏 Finished Size
Approx. 8–10 in (20–25 cm) tall when using worsted weight yarn and a 2.5–3.5 mm crochet hook.
🧶 Materials
-
Worsted weight yarn:
-
Light brown – main body & antlers
-
White – belly, face patch, inner ears, muzzle
-
Dark brown – hooves & nose
-
-
Crochet hook: 2.5–3.5 mm
-
10–12 mm black safety eyes
-
Stitch marker
-
Fiberfill stuffing
-
Tapestry needle
-
Black embroidery thread (for optional eyelashes)
🔤 Abbreviations (US Terms)
-
MR = Magic Ring
-
sc = single crochet
-
inc = increase (2 sc in same st)
-
dec = decrease (sc2tog)
-
sl st = slip stitch
-
ch = chain
-
FO = fasten off
🪡 Pattern Instructions
Head (Light Brown + White Patch)
-
MR, 6 sc (6)
-
inc x6 (12)
-
(1 sc, inc) x6 (18)
-
(2 sc, inc) x6 (24)
-
(3 sc, inc) x6 (30)
6–13. sc around (30)
👉 Insert safety eyes between Rounds 7–8, about 9 sts apart.
-
(3 sc, dec) x6 (24)
-
(2 sc, dec) x6 (18)
-
Stuff firmly.
-
(1 sc, dec) x6 (12)
-
dec x6 (6), FO.
Face Patch (White)
-
MR, 6 sc (6)
-
inc x6 (12)
-
(1 sc, inc) x6 (18)
-
sc around (18)
-
(2 sc, inc) x6 (24)
-
sc around (24), FO.
📍 Shape the patch slightly elongated (do not increase too wide).
📍 Sew starting between the eyes and taper down toward the muzzle.
Nose (Dark Brown)
-
MR, 6 sc (6)
-
inc x6 (12)
-
sc around (12), FO.
📍 Sew at the tip of snout over the face patch.
Body (White Belly + Light Brown Back)
-
With white yarn: MR, 6 sc (6)
-
inc x6 (12)
-
(1 sc, inc) x6 (18)
-
(2 sc, inc) x6 (24)
-
(3 sc, inc) x6 (30)
6–9. sc around (30)
Switch to light brown:
10–16. sc around (30)
17. (3 sc, dec) x6 (24)
18. (2 sc, dec) x6 (18)
19. Stuff firmly.
20. (1 sc, dec) x6 (12)
21. dec x6 (6), FO.
Legs (Make 2 – Dark Brown → Light Brown)
-
With dark brown: MR, 6 sc (6)
-
inc x6 (12)
-
(1 sc, inc) x6 (18)
4–5. sc around (18) -
Switch to light brown, sc around (18)
7–18. sc around (18) → creates long slender legs
Stuff firmly. FO.
📍 Sew slightly forward so the deer sits upright.
Arms (Make 2 – Dark Brown → Light Brown)
-
With dark brown: MR, 6 sc (6)
-
inc x6 (12)
3–4. sc around (12) -
Switch to light brown, sc around (12)
6–14. sc around (12) → slim arms
Stuff lightly. FO.
📍 Sew to sides of body.
Ears (Make 2 – Inner White, Outer Brown)
-
Inner Ear (White): MR, 6 sc → (1 sc, inc) x3 (9), sc around, FO.
-
Outer Ear (Brown): Repeat inner ear, do not FO. Place inner ear behind, crochet together.
📍 Flatten and sew to head sides.
Antlers (Make 2 – Light Brown)
-
Main Shaft: MR, 5 sc, work 9 rounds, FO.
-
Branches (2–3 each): MR, 4 sc, work 5–6 rounds, FO.
📍 Sew branches onto shaft at staggered heights.
📍 Attach antlers securely to top of head.
Tail (Light Brown)
-
MR, 5 sc (5)
-
inc x5 (10)
-
sc around (10), FO.
📍 Stuff lightly, sew to back.
✨ Finishing Touches
-
Embroider optional eyelashes with black thread.
-
Add subtle white stitches on back for a fawn-like look.
-
Sew legs angled forward so the deer sits naturally.
-
Adjust antlers so they stand tall and symmetrical.
🌟 Your Woodland Deer is Ready!
Once complete, your little deer will sit gracefully with its gentle eyes, long legs, and playful antlers. Perfect for woodland nurseries, forest-themed décor, or as a seasonal handmade gift, this project is full of warmth and charm.
🦌💕 Every stitch brings your woodland friend to life!