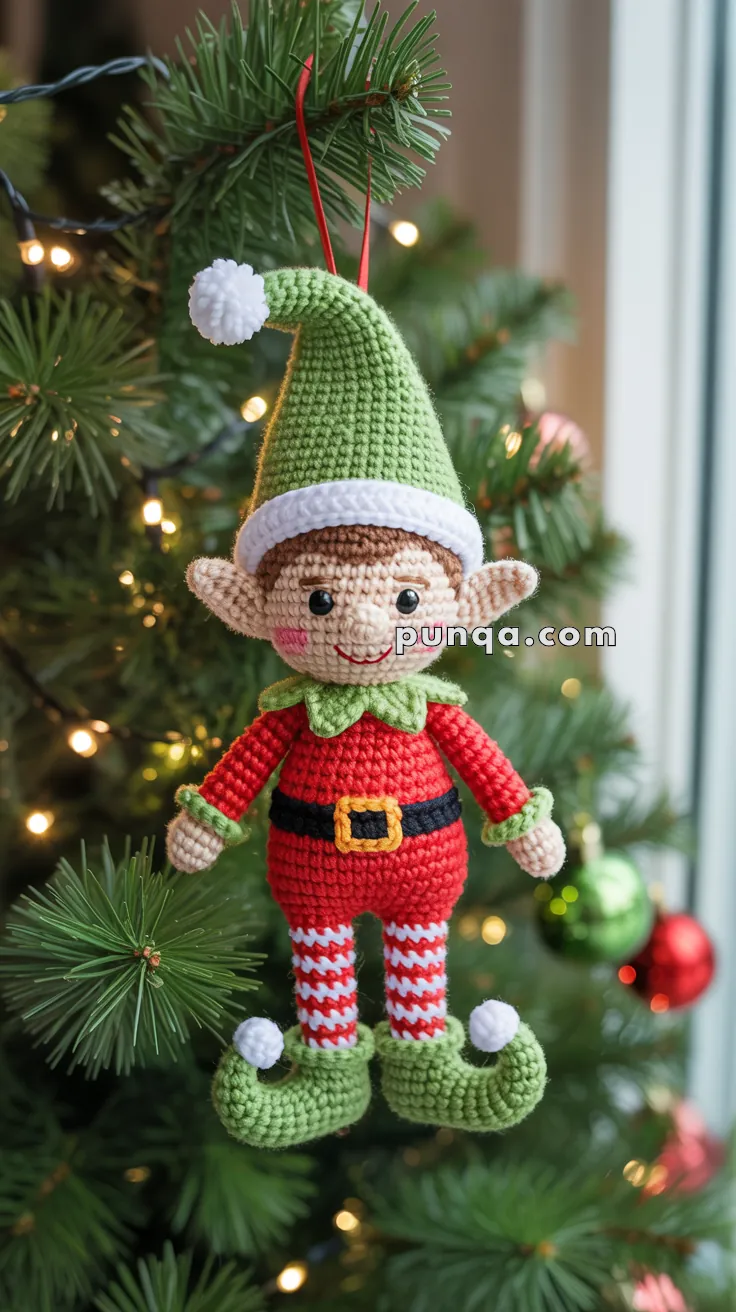
Deck the halls with handmade cheer using the Amigurumi Christmas Elf Ornament, a festive crochet project that’s brimming with holiday spirit! 🎄🧝♂️ With his rosy cheeks, pointy hat, and jolly little outfit, this tiny elf is ready to spread joy from the branches of your tree. Whether you’re crafting for a winter market, gifting a touch of whimsy, or simply adding to your seasonal décor, this ornament is a merry way to celebrate the magic of the season.
This pattern is perfect for crocheters who love quick, charming projects with plenty of personality. You can customize your elf with different hat colors, add a tiny gift or candy cane, or even stitch up a whole team of helpers for Santa’s sleigh. Whether you’re creating a keepsake or building a handmade holiday tradition, the Christmas Elf Ornament is a delightful way to stitch up joy—one festive loop at a time! 🧶✨
🎅✨ Amigurumi Christmas Elf Ornament – Crochet Pattern
Bring festive cheer to your home with this sweet Amigurumi Christmas Elf Ornament! With a tall green hat, rosy cheeks, candy-striped legs, curly elf shoes, and a bright smile, this handmade ornament adds warmth and joy to any Christmas tree. The perfect weekend project and a lovely gift idea.
🧶 Skill Level
Intermediate – includes shaping, color changes, and small sculpted details.
📏 Finished Size
Approx. 18 cm tall (including hat).
🧵 Yarn & Materials
DK / Light Worsted (100–115 m / 50 g):
- Beige (skin) – 12 g
- Brown (hair) – 3 g
- Red (body, sleeves, leg stripes) – 22 g
- White (hat brim, leg stripes, pom-poms) – 12 g
- Green (hat, collar, cuffs, shoes) – 28 g
- Black (belt) – 2 g
- Yellow (buckle) – 1–2 g
- Pink embroidery floss – small amount
Other supplies
- 2.5–3.0 mm hook
- 6–7 mm safety eyes
- Fiberfill
- Tapestry needle
- Ribbon or yarn for hanging loop
🔁 Abbreviations (US Terms)
MR – Magic ring
sc – Single crochet
inc – Increase
dec – Decrease
sl st – Slip stitch
ch – Chain
FLO – Front loop only
Work in continuous rounds unless stated.
😊 Head (Beige)
- MR, 6
- inc ×6 → 12
- (sc, inc) ×6 → 18
- (2 sc, inc) ×6 → 24
- (3 sc, inc) ×6 → 30
6–12) sc (30) - (3 sc, dec) ×6 → 24
- (2 sc, dec) ×6 → 18
- sc (18)
Insert eyes between R9–10, spaced 5 sts apart.
- (sc, dec) ×6 → 12
Stuff firmly. - dec ×6 → 6
FO.
😊 Nose (Beige)
MR, 5 sc, sl st, FO.
Sew centered below eyes.
Add soft blush and a small smile with pink embroidery thread.
💇 Hair Front (Brown)
- MR, 6
- inc ×6 → 12
- (sc, inc) ×6 → 18
Sew only across the front hairline.
👂 Ears ×2 (Beige)
- Ch 5
- Work down the chain:
• 2nd ch from hook: sc
• Next ch: dc
• Next ch: 2 dc
• Next ch: dc
Turn and work along the opposite side of the chain:
• Next st: 2 dc
• Next st: dc
• Final st: sc
Sl st to the first stitch, FO with a long tail.
Flatten slightly and sew level with the hairline, angled upward.
🎩 Tall Hat (Green)
- MR, 4
- sc (4)
- (sc, inc) ×2 → 6
4–5) sc (6) - (2 sc, inc) ×2 → 8
7–8) sc (8) - (3 sc, inc) ×2 → 10
10–11) sc (10) - (4 sc, inc) ×2 → 12
13–15) sc (12) - (5 sc, inc) ×2 → 14
17–19) sc (14) - (6 sc, inc) ×2 → 16
21–23) sc (16) - (7 sc, inc) ×2 → 18
25–27) sc (18) - (8 sc, inc) ×2 → 20
29–31) sc (20) - (9 sc, inc) ×2 → 22
33–35) sc (22) - (10 sc, inc) ×2 → 24
37–39) sc (24) - (11 sc, inc) ×2 → 26
41–43) sc (26) - (12 sc, inc) ×2 → 28
45–47) sc (28) - (13 sc, inc) ×2 → 30
49–55) sc (30)
Lightly stuff only the upper tip.
❄️ Rolled White Brim
Attach white yarn to the last round of the hat.
- sc around (30)
2–4) sc (30)
Fold outward to form a smooth rolled brim.
Sew the inner fold down inside the hat.
❄️ Pom-Pom (White)
MR, 6 sc, sl st, FO.
Sew to hat tip.
🎀 Body (Red)
- MR, 6
- inc ×6 → 12
- (sc, inc) ×6 → 18
- (2 sc, inc) ×6 → 24
5–8) sc (24) - (3 sc, dec) ×4 → 20
- Change to Black: sc 20 (belt)
11–14) Change to Red: sc 20
Stuff firmly. FO.
🟨 Belt Buckle (Yellow)
Ch 7.
Sl st evenly around all four edges.
Sew centered on the belt.
🌿 Collar (Green – 6 Points)
Work evenly spaced around neckline:
Repeat 6 times:
(sc in next st, ch 4, sl st in 2nd ch from hook, sc next ch, sc next ch, sl st into same base stitch)
Fold points downward.
🤲 Arms ×2
Hands (Beige)
- MR, 6
2–3) sc (6)
Sleeves (Red)
4–10) sc (6)
Cuffs (Green)
(ch 3, sl st next st) around
Light stuffing only in the beige part.
Sew below the collar.
🧦 Legs – Candy Stripes
Start with Red.
- MR, 6
- inc ×6 → 12
3–5) sc (12)
Then alternate:
2 rounds red, 2 rounds white
Continue until leg measures 8 cm.
Stuff lightly. FO.
👞 Shoes (Green)
- MR, 6
- inc ×6 → 12
- (sc, inc) ×6 → 18
4–6) sc (18) - (dec, sc) ×6 → 12
- sc (12)
Curled Toe
Ch 9, sl st back along chain to shoe tip.
Curl upward.
Cuff
Attach yarn at shoe opening:
(ch 3, sl st next st) repeat around.
Pom
MR, 5 sc.
Sew to shoe tip.
Sew legs into shoes and close securely.
🧍 Assembly
• Sew head onto body.
• Attach arms beneath collar with shoulder frills visible.
• Sew legs centered under the body.
• Attach shoes with curls facing up.
• Position ears level with the hairline.
• Place hat slightly tilted and sew securely.
• Attach ribbon loop at the back of the hat.
Face
• Eyes between R9–10
• Nose centered
• Blush under each eye
• Small embroidered smile
🎄 Finished Elf
Your Christmas Elf Ornament is complete with a tall bent hat, rolled brim, pointed collar, striped legs, curly shoes, and a warm smiling face. Perfect for displaying on the tree or gifting during the holidays.


I have just recently gotten back to crocheting. Amigurumi has grab my attention. I wanted to make an Elf and this is the cutest one I have found. I am very excited to make him, once I finish my other project. I try not to get more than one project going at a time. Thank you so much for making this adorable Elf pattern accessible.