Add a touch of feline flair to your winter wardrobe with the Cat Fingerless Gloves, a cozy crochet accessory that’s as cute as it is practical! 🐾🧶 Featuring adorable cat faces, pointy ears, and just the right amount of whiskered charm, these gloves keep your hands warm while letting your fingers roam free. Whether you’re texting, crafting, or sipping a warm drink, they’re the purr-fect blend of comfort and personality.
This pattern is ideal for cat lovers and style seekers alike. You can customize the colors to match your favorite kitty, add embroidered details for extra expression, or even stitch up a matching pair for a friend. Whether worn as a playful statement or a cozy everyday essential, the Cat Fingerless Gloves are sure to bring smiles, warmth, and a little meow-gic to your handmade collection! 🧵😺
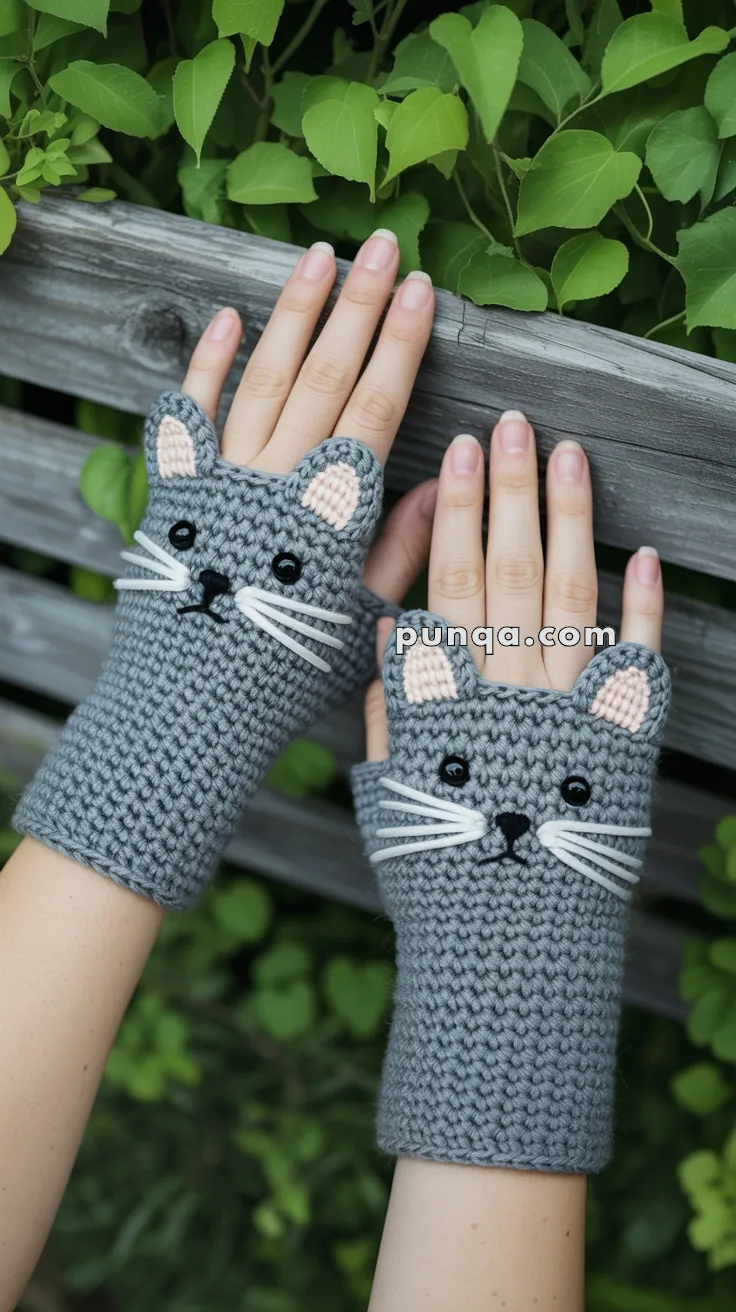
🐱 Adorable Cat Fingerless Gloves Crochet Pattern
Keep your hands cozy while staying functional with these charming cat-themed fingerless gloves! Featuring 3D ears, embroidered details, and an adorable face, these gloves are perfect for cat lovers who want to stay warm while texting, crafting, or working.
✨ Skill Level
Beginner to Intermediate – Requires knowledge of working in rows, basic shaping, and simple embroidery.
📏 Finished Measurements
- Length: 16-17 cm (6.3-6.7 in) from wrist to fingertips
- Width (around hand): 18-20 cm (7-8 in) circumference
- Fits: Adult women’s small/medium hands
🧶 Materials Needed
Yarn
- Worsted weight (medium #4) acrylic or cotton-blend yarn:
- Gray: 45g (90m) for both gloves
- Light pink: 5g (10m) for inner ears
- White: 2g (4m) for whiskers
- Black: 2g (4m) for nose
Total yarn needed: Approximately 55g
Other Supplies
- Crochet hook: 4.0 mm (G)
- Black safety eyes or beads: 6 mm diameter (4 total – 2 per glove)
- Tapestry needle
- Scissors
- Pins (for positioning features)
- Small amount of fiberfill (for nose)
- Black embroidery thread or thin black yarn (for mouth/details)
⏱️ Time to Complete
3-4 hours for both gloves
📖 Abbreviations (US Terms)
- ch = Chain
- sc = Single Crochet
- hdc = Half Double Crochet
- sl st = Slip Stitch
- st(s) = Stitch(es)
- inc = Increase (2 hdc in same st)
- dec = Decrease (hdc2tog)
- MR = Magic Ring
- BLO = Back Loop Only
- FO = Fasten Off
🧤 Pattern Instructions
GLOVE BASE (Make 2 – Gray)
Foundation:
Ch 30
Row 1: Hdc in 3rd ch from hook and across. (28 hdc)
Rows 2-22: Ch 2 (counts as first hdc), turn, hdc across. (28 hdc)
After Row 22, do NOT fasten off.
THUMB OPENING
Row 23: Ch 2, turn, hdc in next 18 sts, ch 5, skip 5 sts, hdc in last 5 sts. (18 hdc + 5 ch + 5 hdc)
Rows 24-26: Ch 2, turn, hdc across (working hdc into the chain stitches on Row 24). (28 hdc)
FO, leaving a long tail (approximately 60 cm) for seaming.
THUMB TUBE (Gray)
With the glove laid flat, locate the thumb opening (the ch-5 space and skipped stitches from Row 23).
Round 1: Join gray yarn at the thumb opening. Work sc evenly around the entire opening (working into the chains, skipped stitches, and row edges). You should have approximately 12-14 sc total. Join with sl st to first sc.
Rounds 2-4: Ch 1, sc in each st around. Join with sl st. (12-14 sc)
FO and weave in end.
SEAMING THE GLOVE
- Fold the glove piece in half lengthwise with right sides together
- Using the long tail and tapestry needle, whipstitch or mattress stitch along the long edge from wrist to finger opening
- Leave the top edge (finger opening) and bottom edge (wrist) open
- Turn right side out
- Weave in the seaming tail
Important: For the second glove, make sure the thumb opening is on the opposite side to create a left and right glove.
WRIST EDGE FINISHING (Gray)
For a neat edge at the wrist:
Round 1: Join gray yarn at the bottom wrist edge seam. Sc evenly around the opening (approximately 28-30 sc). Join with sl st.
FO and weave in end.
FINGER EDGE FINISHING (Gray)
For a neat edge at the finger opening:
Round 1: Join gray yarn at the finger opening seam. Sc evenly around the opening (approximately 28-30 sc). Join with sl st.
FO and weave in end.
EARS – OUTER (Make 4 – Gray)
Round 1: MR, 6 sc in ring. (6)
Round 2: [sc, inc] x3 (9)
Round 3: [sc 2, inc] x3 (12)
Round 4: [sc 3, inc] x3 (15)
Round 5: [sc 4, inc] x3 (18)
Round 6: sc around (18)
FO, leaving a long tail for sewing.
Do NOT stuff the ears – they should be flat cone shapes. Pinch the bottom opening flat.
EARS – INNER PINK OVAL (Make 4 – Pink)
Row 1: Ch 5
Row 2: Starting in 2nd ch from hook: sc, hdc, hdc, sc. (4 sts)
Row 3: Ch 1, turn. 2 sc in first st, hdc, hdc, 2 sc in last st. (6 sts)
Row 4: Ch 1, turn. Sc in each st across. (6 sts)
Row 5: Ch 1, turn. Sc2tog, sc 2, sc2tog. (4 sts)
FO, leaving a long tail.
This creates a small oval shape for the inner ear.
ASSEMBLING EARS
- Position one pink oval on the front center of each gray ear
- The pink oval should be centered vertically and horizontally
- Sew the pink oval onto the gray ear using the long tail with whipstitch around the edges
- The ears remain flat – do not stuff
NOSE (Make 2 – Black)
Round 1: MR, 6 sc in ring. (6)
Round 2: sc around (6)
Round 3: sc around (6)
FO, leaving a long tail.
Stuff very lightly with a tiny amount of fiberfill to create a small rounded shape.
ASSEMBLING THE FACE
Positioning Guide (on back of hand):
The face should be positioned on the back/top of the glove, centered horizontally and vertically between wrist and finger opening.
Step 1: Mark Center
- With glove laid flat, find the center point on the back
- The face center should be approximately 8-9 cm from the wrist edge
- Use a pin to mark this spot
Step 2: Attach Ears
- Position both ears at the top of the face area
- Ears should be approximately 3.5-4 cm above the center mark
- Space ears approximately 3.5-4 cm apart (measuring from inner edges)
- Pinch the bottom of each ear flat
- Sew the flat bottom edge of each ear securely to the glove
- Make several stitches back and forth through all layers
- Ears should stand upright and angle slightly outward
- The pink ovals should face forward/outward
Step 3: Attach Eyes
- Position safety eyes approximately 2 cm below the ear base
- Space eyes approximately 2.5 cm apart (center to center)
- Eyes should be horizontally aligned
- If using safety eyes, push posts through the fabric and secure with backs from the inside
- If using beads, sew securely with black thread, going through the glove from inside to outside
Step 4: Attach Nose
- Position the small black nose centered between and below the eyes
- The nose should be approximately 1.5 cm below the eye level
- Sew the nose securely using the long tail
- Sew around the base in a small triangle or rounded shape
- Make sure the nose protrudes slightly for 3D effect
Step 5: Embroider Mouth (Optional)
Using black embroidery thread or thin black yarn:
- Make a small vertical line down from the center bottom of the nose (approximately 0.3 cm)
- From the bottom of this line, make two small curved lines going outward and slightly upward (like a Y shape)
- This creates a subtle cat mouth
Step 6: Add Whiskers
Using white yarn:
Method 1 – Inserted Strands (3D effect):
- Cut 6 strands of white yarn, each approximately 10-12 cm long
- Thread one strand onto tapestry needle
- Insert needle from inside of glove through to the front, coming out just beside the nose (approximately 0.8-1 cm to the side and slightly below eye level)
- Pull through until the strand is centered (equal lengths on both sides of the insertion point)
- Make a tiny stitch to secure the center of the strand to the glove
- Repeat for 3 whiskers on each side (total 6 strands = 12 whisker ends)
- Arrange so there are 3 insertion points on each side of the nose
- Trim whiskers so they extend approximately 3-4 cm on each side
- Gently brush out the yarn strands to make them look more wispy
Method 2 – Embroidered Whiskers (flatter):
- Using white yarn and tapestry needle
- Make 3 long straight stitches on each side of the nose
- Each stitch should be approximately 3-4 cm long
- Angle them slightly – top whisker more upward, bottom more downward, middle straight out
- Secure ends on the inside of the glove
🎨 Color Variations
Classic Combinations:
Orange Tabby Cat:
- Orange/ginger yarn for base
- Light pink inner ears
- White whiskers
- Black or dark brown nose and eyes
Tuxedo Cat:
- Black yarn for base
- Light pink inner ears
- White whiskers
- Black nose
Calico Cat:
- White base with orange and gray patches
- Pink inner ears
- White whiskers
- Pink or black nose
Siamese Cat:
- Cream/beige base
- Dark brown/chocolate ears
- White whiskers
- Dark brown nose
Russian Blue:
- Blue-gray base
- Light pink inner ears
- White whiskers
- Dark gray or black nose
💡 Tips for Success
✨ Gauge: Your fabric should be dense with no gaps between stitches. If you can see through the fabric, go down a hook size.
✨ Seaming: Use mattress stitch for the neatest, most invisible seam along the side of the glove.
✨ Thumb Position: Try on the glove before seaming to ensure the thumb opening is positioned correctly. It should align with your natural thumb position.
✨ Ear Shape: The ears are flat, not stuffed. Pinch the bottom flat before sewing to create the proper ear shape.
✨ Pink Inner Ears: These oval shapes should be smaller than the outer ear and centered on the front.
✨ Eye Placement: Use pins to position eyes before inserting permanently. Make sure they’re level and evenly spaced.
✨ Nose Dimension: Just a tiny amount of stuffing creates subtle 3D effect – don’t overstuff.
✨ Whisker Security: If using inserted strands, make a small securing stitch at the insertion point. You can also add a tiny dot of clear fabric glue.
✨ Symmetry: Work on both gloves at the same time, completing each step on both before moving to the next. This ensures they match.
✨ Comfort: Make sure all knots and yarn ends are on the palm side are smooth and won’t irritate your skin.
📐 Sizing Adjustments
For Smaller Hands (Children ages 8-12):
- Start with ch 26 instead of ch 30
- Work Rows 1-18 instead of 1-22
- Make thumb opening on Row 19 with ch 4, skip 4
For Larger Hands:
- Start with ch 32-34
- Work Rows 1-24
- Make thumb opening on Row 25 with ch 6, skip 6
For Teen/Young Adult:
- Use the pattern as written or start with ch 28
- Work Rows 1-20
- Make thumb opening on Row 21
For Longer Coverage:
- Add 2-4 additional rows before starting the thumb opening
- This extends the wrist coverage
For Shorter/Hand Warmers Only:
- Reduce to Rows 1-16
- Make thumb opening on Row 17
🎁 Gifting & Display Ideas
These adorable cat gloves are perfect for:
- 🐱 Cat lovers and enthusiasts
- 🎁 Birthday or Christmas gifts
- 💝 Valentine’s Day gifts for cat lovers
- 🎨 Craft fair bestsellers
- 👩🎓 Teen and tween gifts
- ☕ Coffee shop or outdoor activities
- 📱 Perfect for texting in cold weather
- 🧶 Yarn shop samples
- 🏫 Teacher gifts
- 🎭 Costume accessories
Gift Presentation Ideas:
- Roll and tie with ribbon
- Package in a small box with tissue paper
- Add a cat-themed gift tag
- Pair with a cat-themed mug or book
- Include care instructions card
🧵 Care Instructions
- Hand wash in cool water with mild detergent
- Gently squeeze out excess water (do not wring)
- Lay flat to dry on a towel
- Reshape while damp if needed
- Do not machine wash or tumble dry
- Do not iron
- Store flat or gently rolled
🎯 Troubleshooting
Problem: Gloves are too tight around hand
- Solution: Go up one hook size (4.5mm) or add 2 more foundation chains
Problem: Gloves are too loose
- Solution: Go down to 3.5mm hook or reduce foundation chains by 2
Problem: Ears flop forward or sideways
- Solution: Sew the entire flat base of the ear to the glove with multiple stitches. You can also add a small stitch at the tip of each ear to tack it slightly backward.
Problem: Thumb hole is too small
- Solution: Increase the chain count in the thumb opening row (ch 6-7 instead of ch 5)
Problem: Thumb hole is too large
- Solution: Reduce to ch 4, skip 4 stitches
Problem: Fabric curls at edges
- Solution: Block lightly with steam, or add additional edging rounds in sc
Problem: Whiskers keep falling out
- Solution: Secure with a tiny knot on the inside, or add a small dot of clear-drying fabric glue at each insertion point
Problem: Seam is visible or bulky
- Solution: Use mattress stitch instead of whipstitch, and work with matching yarn color
Problem: Face features look crooked
- Solution: Use pins to position all features before sewing. Step back and look at both gloves together to check symmetry.
📏 Gauge
Gauge (not critical but helpful):
- 14 hdc x 10 rows = 10 cm (4 in) square with 4.0mm hook
- Adjust hook size if your gauge is significantly different
❤️ Final Thoughts
These Cat Fingerless Gloves are the perfect combination of adorable and practical! The half double crochet fabric creates a thick, warm texture while the flat construction with a side seam makes them quick and easy to work up.
The charm is in the details – those perky ears, the tiny pink inner ear ovals, the dimensional nose, and wispy whiskers all come together to create an irresistibly cute cat face on each glove.
Take your time with the face assembly. Using pins to position everything before sewing makes a huge difference in achieving a sweet, balanced expression. Don’t rush this part – it’s what brings your cat gloves to life!
These make wonderful gifts for cat enthusiasts of all ages and are perfect for anyone who needs warm hands but functional fingers for phones, tablets, or crafting.
Happy crocheting, and enjoy your purr-fectly cozy new gloves! 🐱🧤✨


Terima kasih pola gratisnya,semakin memperdalam kemampuan untuk berkarya di rajutan.