Double the mischief, double the magic—meet the Amigurumi Elf Twins, a festive duo full of holiday cheer and handmade charm! 🎄🧶 With their pointy hats, rosy cheeks, and matching outfits, these playful little helpers are ready to spread joy from your craft shelf to the North Pole. Whether you’re crocheting for Christmas décor, gifting to loved ones, or building a whimsical winter scene, these twins bring a sprinkle of enchantment to every stitch.
Designed with cozy textures and cheerful details, this pattern invites you to personalize each elf with different colors, hairstyles, or accessories like tiny candy canes or gift sacks. You can pose them side by side, tuck them into stockings, or let them peek out from a snowy display. Whether you’re crafting for tradition or just love a touch of holiday whimsy, the Elf Twins Amigurumi are a joyful and satisfying project—perfect for stitching up a little seasonal magic, one loop at a time! ❄️❤️🧝♂️🧝♀️
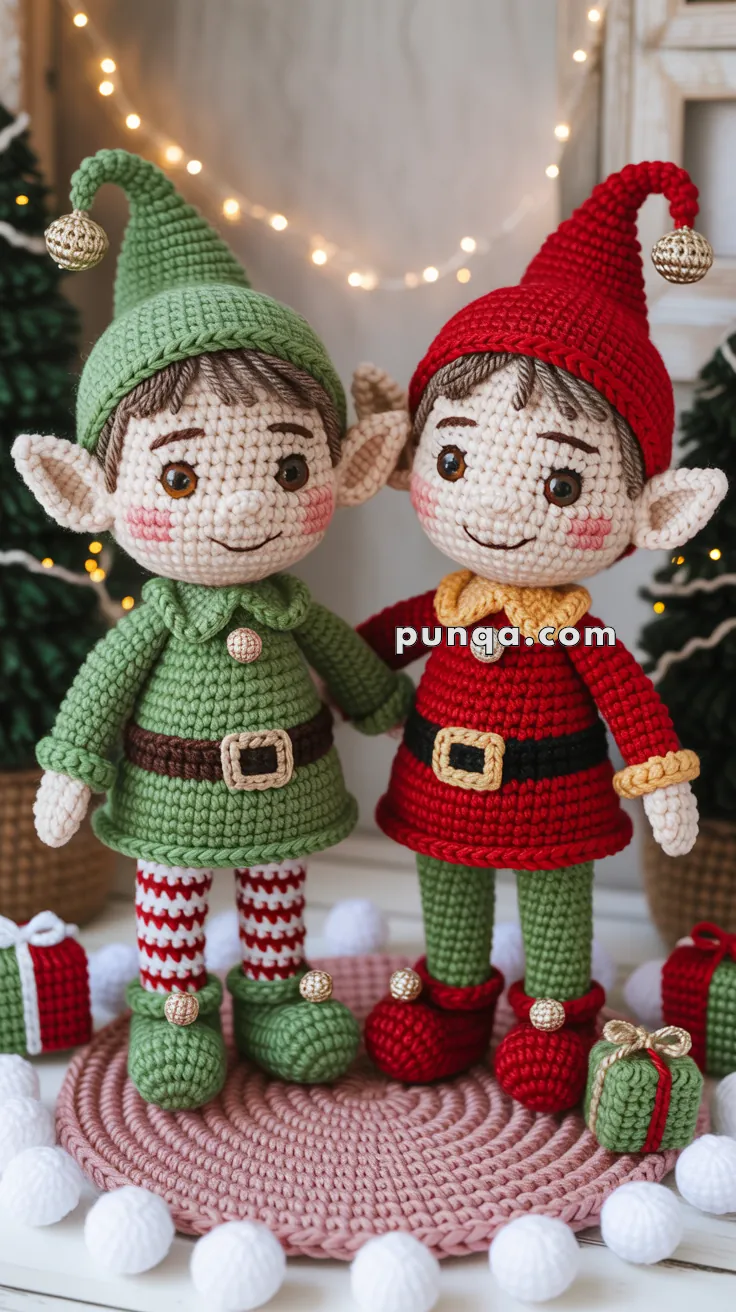
🧝♂️🧝 Amigurumi Christmas Elf Twins Crochet Pattern
Bring Christmas cheer into your home with these adorable amigurumi elf twins! One dressed in festive red and gold, the other in green and white, these little helpers feature cheerful faces, striped stockings, curly hats, and shiny gold pom-poms. Perfect as holiday decorations or handmade gifts, they’re sure to fill your space with cozy, handmade magic.
✨ Skill Level
Intermediate – Requires shaping, color changes, assembling small pieces, and working in continuous rounds.
📏 Finished Size
Approximately 22 cm (8.5 in) tall when made with DK yarn and a 2.5 mm hook.
🧶 Materials
Yarn (DK / light worsted):
- Beige / light peach – skin
- Brown – hair
- Green – green elf outfit, shoes, legs
- Red – red elf outfit, shoes, striped stockings
- White – striped stockings only
- Mustard yellow – red elf collar & belt buckles
- Dark brown or black – belts
- Metallic gold yarn or small bells – pom-poms
Notions:
- 8 mm safety eyes
- Polyester fiberfill
- Black embroidery thread (mouth)
- Pink embroidery thread or blush
- Tapestry needle
- Stitch marker
- Scissors
Hook:
2.5 mm crochet hook
🪡 Abbreviations (US Terms)
MR – magic ring
sc – single crochet
inc – increase (2 sc in one stitch)
dec – decrease (sc2tog)
sl st – slip stitch
st(s) – stitch(es)
FO – fasten off
🧒 HEAD (Both Elves)
Using beige
R1: 6 sc in MR (6)
R2: inc ×6 (12)
R3: (sc, inc) ×6 (18)
R4: (2 sc, inc) ×6 (24)
R5: (3 sc, inc) ×6 (30)
R6: (4 sc, inc) ×6 (36)
R7–R12: sc around (36)
Insert safety eyes between R9–R10, about 7 sts apart.
R13: (4 sc, dec) ×6 (30)
R14: sc around (30)
R15: (3 sc, dec) ×6 (24)
R16: (2 sc, dec) ×6 (18)
Stuff firmly
R17: (sc, dec) ×6 (12)
R18: dec ×6 (6)
FO and close.
😊 FACE DETAILS
- Embroider a small curved smile between R12–R13
- Add soft blush beneath eyes
- Optional tiny horizontal stitch for nose
👂 EARS (Make 2)
Using beige
R1: 5 sc in MR (5)
R2: (sc, inc) ×2, sc (7)
R3: (2 sc, inc) ×2, sc (9)
R4: (3 sc, inc) ×2, sc (11)
R5: sc around (11)
R6: (dec, 2 sc) ×2, sc 3 (9)
Flatten slightly and pinch top into a soft point.
Sew to sides of head just above eye level.
💇 HAIR
Using brown
Cut 40–50 strands (6–7 cm).
Latch along the front half of the head (approx. R6–R8).
Trim diagonally for natural bangs; keep crown lightly filled.
🧍 BODY (TUNIC SHAPE)
Worked from bottom up.
🟢 GREEN ELF BODY
Using green
R1: 6 sc in MR (6)
R2: inc ×6 (12)
R3: (sc, inc) ×6 (18)
R4: (2 sc, inc) ×6 (24)
R5–R10: sc around (24)
Belt
R11: switch to dark brown, sc around (24)
R12: switch to green, sc around (24)
Tunic flare
R13: (3 sc, inc) ×6 (30)
R14: (4 sc, inc) ×6 (36)
R15–R16: sc around (36)
Close body
R17: (4 sc, dec) ×6 (30)
R18: (3 sc, dec) ×6 (24)
R19: (2 sc, dec) ×6 (18)
Stuff firmly
R20: (sc, dec) ×6 (12)
R21: dec ×6 (6)
FO and close.
🔴 RED ELF BODY
Same construction as green elf, with:
- Body color: red
- Belt color: black
🔲 BELT BUCKLE (Make 1 per elf)
Using mustard yellow
Ch 12, join with sl st
R1: sc around (12)
FO, flatten slightly, sew centered on belt.
🧣 COLLARS (PHOTO-ACCURATE)
🟢 GREEN ELF COLLAR (Petal Collar)
Attach green yarn to neckline.
R1: sc evenly around neckline (≈ 36 sts)
R2: (sl st, 2 sc in next st, sl st in next st) repeat around
FO. Gently press petals downward.
🔴 RED ELF COLLAR (Mustard Scalloped)
Attach mustard yellow yarn to neckline.
R1: sc evenly around neckline (≈ 36 sts)
R2: (sl st, 3 sc in next st, sl st in next st) repeat around
FO.
💪 ARMS (Make 2 per elf)
Start with beige
R1: 6 sc in MR (6)
R2–R5: sc around (6)
Switch to outfit color:
- Green elf: green
- Red elf: red
R6–R13: sc around (6)
Do not stuff.
Flatten top, sew closed, attach just below collar so hands reach mid-thigh.
🦵 LEGS
🟢 GREEN ELF LEGS (Candy-Cane Stockings)
Make 2
Using white
R1: 6 sc in MR (6)
R2: inc ×6 (12)
R3–R4: sc around (12)
Striped stockings — 1 round per color
R5: red
R6: white
R7: red
R8: white
R9: red
R10: white
R11: red
R12: white
Switch to green
R13–R18: sc around (12)
Lightly stuff lower half only.
Flatten top and sew to body base.
🔴 RED ELF LEGS (Solid)
Using green
R1: 6 sc in MR (6)
R2: inc ×6 (12)
R3–R18: sc around (12)
Lightly stuff, flatten, and attach.
👞 SHOES (Make 2 per elf)
Using outfit color (green or red)
R1: 6 sc in MR (6)
R2: inc ×6 (12)
R3: (sc, inc) ×6 (18)
R4: BLO sc around (18)
R5–R8: sc around (18)
R9: (2 sc, dec) ×3 (9)
R10: sc around (9)
Lightly stuff.
Fold toe upward slightly and sew closed.
Attach a gold pom-pom or bell at the tip.
🎩 HAT (Make 1 per elf)
Using outfit color
R1: 4 sc in MR (4)
R2: (sc, inc) ×2 (6)
R3: sc around
R4: (2 sc, inc) ×2 (8)
Continue increasing evenly until:
R14: 28 sts
R15–R16: sc around (28)
FO.
Gently curl tip (short, soft curl).
Attach gold pom-pom near tip.
🧵 ASSEMBLY
- Sew head to body
- Attach arms just under collar
- Attach legs evenly to body base
- Sew shoes onto legs
- Position hat slightly tilted and tack in place
- Trim and style hair
- Add blush and final shaping
🎀 FINISHING NOTES
- Keep hat and shoe curls soft, not stiff
- Collars should sit compact and rounded
- Avoid over-stuffing legs to preserve photo proportions
💫 Final Thoughts
Your Christmas Elf Twins are now complete — fully photo-accurate, proportioned, and ready for display. These elves make beautiful holiday décor, collectible keepsakes, or standout handmade gifts that capture classic Christmas charm.
Happy crocheting and joyful stitching! 🎄🧶✨