Drift into dreamland with the Amigurumi Sleepy Pajama Siblings—a snuggly duo dressed in cozy sleepwear and ready for bedtime cuddles! 💤🧶 With their soft pajamas, sleepy eyes, and matching nightcaps, these adorable siblings bring a gentle, heartwarming vibe to your crochet collection. Whether you’re crafting a gift for a little one, decorating a nursery, or simply love stitching up sweet scenes, this pair is perfect for adding a touch of nighttime magic to your handmade world.
Designed with comfort and charm in mind, this pattern invites you to play with pastel colors, soft textures, and whimsical details like pom-pom hats, bunny slippers, or tiny bedtime books. You can personalize each sibling with different hair styles, pajama prints, or even a crocheted teddy bear to complete the sleepytime scene. Whether perched on a shelf, tucked into a gift basket, or starring in a handmade bedtime story, these Sleepy Pajama Siblings are a joyful and satisfying project—perfect for stitching up a little handmade hush, one loop at a time! 🌙💖📚
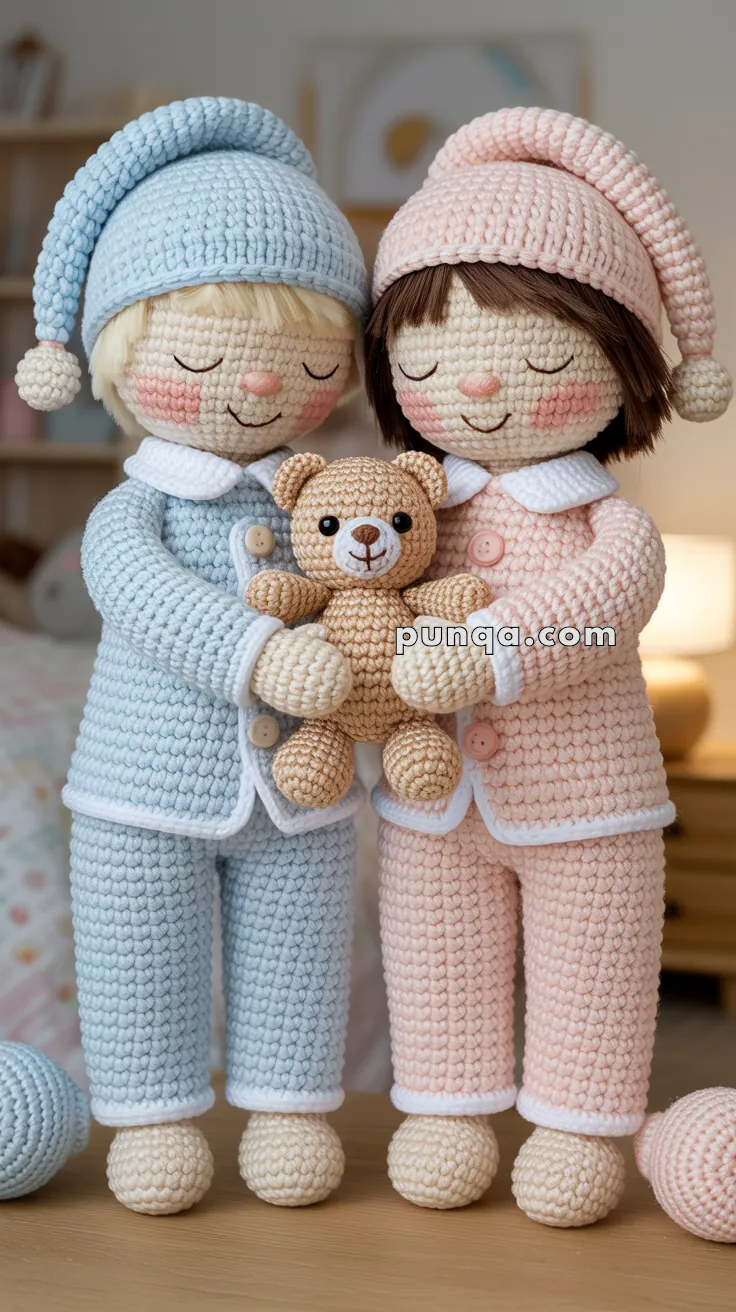
🧵 Sleepy Pajama Siblings with Teddy Bear Amigurumi Pattern
Create this heartwarming duo of sleepy siblings in their cozy matching pajamas, complete with floppy nightcaps and an adorable teddy bear companion. Perfect for nursery décor, gifts, or your handmade collection! 🌙✨
✨ Skill Level
Intermediate — Requires shaping techniques, color changes, embroidery, and multi-piece assembly.
📏 Finished Size
- Each Doll: Approximately 11 inches (28 cm) tall
- Teddy Bear: Approximately 4.5 inches (12 cm) tall
🧶 Materials & Yarn Requirements
Yarn (Sport/DK Weight – Soft Cotton or Velvet Recommended):
- Beige/Cream (skin tone): 140g (310 yards)
- Baby Blue (boy’s pajamas & nightcap): 150g (330 yards)
- Soft Pink (girl’s pajamas & nightcap): 150g (330 yards)
- White (collars, cuffs, pom-poms): 70g (155 yards)
- Light Blonde (boy’s hair): 15g (33 yards)
- Chocolate Brown (girl’s hair): 20g (44 yards)
- Light Brown/Tan (teddy bear): 60g (132 yards)
- Dark Brown (embroidery details): 10g (22 yards)
Total Yarn Needed: Approximately 615g (1,356 yards)
Additional Supplies:
- Crochet Hook: 2.5mm or 3.0mm
- Polyester Fiberfill: 200g for stuffing
- Safety Eyes:
- 6mm for teddy bear (1 pair)
- Dolls have embroidered eyes
- Embroidery Needle/Tapestry Needle
- Stitch Markers
- Buttons:
- 2 small pink buttons (10-12mm)
- 2 small blue buttons (10-12mm)
- Scissors
- Pins for assembly
🔤 Abbreviations (US Crochet Terms)
- MR = Magic Ring
- ch = Chain
- sc = Single Crochet
- inc = Increase (2 sc in one stitch)
- dec = Invisible Decrease (sc2tog)
- sl st = Slip Stitch
- BLO = Back Loop Only
- FLO = Front Loop Only
- FO = Fasten Off
- ( ) x # = Repeat sequence # times
- (#) = Total stitch count
👶 Doll Pattern – Make 2 (One in Blue, One in Pink)
🎯 Head (Beige)
Rounds:
- MR, 6 sc (6)
- inc x6 (12)
- (1 sc, inc) x6 (18)
- (2 sc, inc) x6 (24)
- (3 sc, inc) x6 (30)
- (4 sc, inc) x6 (36)
- (5 sc, inc) x6 (42) 8-17. sc around (42) — 10 rounds
- (5 sc, dec) x6 (36)
- (4 sc, dec) x6 (30)
- (3 sc, dec) x6 (24)
- (2 sc, dec) x6 (18)
Stuff head firmly. Leave opening for attaching to body.
😴 Facial Features Embroidery
Closed Eyes:
- Position: Between Rounds 11-12, about 7-8 stitches apart
- Using dark brown yarn, embroider curved lines (gentle downward arcs) for closed, peaceful eyes
- Each eye should be approximately 4-5 stitches wide
- Add 2-3 tiny eyelash stitches at outer corners pointing upward
Small Nose:
- Position: Round 13-14, centered between eyes
- Embroider a tiny pink vertical stitch (2-3 stitches long) or use beige for subtle look
Gentle Smile:
- Position: Round 15
- Small curved line in dark brown (subtle upward curve, about 3-4 stitches wide)
Rosy Cheeks:
- Position: Below each eye (Round 13)
- Use pink chalk/pastel or light pink embroidery stitches in circular pattern
- Make them prominent and visible for that sweet sleepy look
🎩 Floppy Nightcap (Blue for Boy / Pink for Girl)
Rounds:
- MR, 6 sc (6)
- inc x6 (12)
- (1 sc, inc) x6 (18)
- (2 sc, inc) x6 (24)
- (3 sc, inc) x6 (30)
- (4 sc, inc) x6 (36)
- (5 sc, inc) x6 (42) 8-20. sc around (42) — 13 rounds
FO, leaving long tail for sewing.
To create the floppy effect: Only lightly stuff the base (first 4-5 rounds where it sits on the head), leave the rest completely unstuffed so it drapes naturally to the side. The cap should be long enough to droop significantly.
☁️ Pom-Pom for Nightcap (White)
- MR, 6 sc (6)
- inc x6 (12) 3-4. sc around (12) — 2 rounds
- dec x6 (6)
FO, stuff firmly to create a round ball shape, close opening. Sew to tip of nightcap.
👕 Body with Integrated Pajama Top & Pajama Pants
Using Blue (Boy) or Pink (Girl):
Neck/Shoulder Area:
- MR, 6 sc (6)
- inc x6 (12)
- (1 sc, inc) x6 (18)
- (2 sc, inc) x6 (24)
- BLO: (3 sc, inc) x6 (30) — FLO will be used for white collar
Upper Torso:
6-8. sc around (30) — 3 rounds
Mid Torso (expansion):
- (4 sc, inc) x6 (36) 10-18. sc around (36) — 9 rounds
Lower Torso/Hip:
- (4 sc, dec) x6 (30) 20-21. sc around (30) — 2 rounds
Begin stuffing body firmly as you work.
Divide for Legs:
- sc 15, ch 2, skip next 15 sc, sl st to first sc of round
🦵 First Leg (Continuing from Body)
- sc 15 around leg opening, sc 2 over ch-2 space (17)
- sc around (17)
- (5 sc, dec) x2, 3 sc (15) 26-39. sc around (15) — 14 rounds
- BLO: sc around (15) — this creates edge for white cuff
FO. Stuff leg firmly.
🦵 Second Leg
- Attach yarn to opposite side where you left the 15 skipped stitches
- Pick up 2 sc from the ch-2 space on the inside
- Repeat Rounds 23-40
- FO. Stuff leg firmly.
👟 Feet (Beige) – Make 2
- MR, 6 sc (6)
- inc x6 (12)
- (1 sc, inc) x6 (18) 4-7. sc around (18) — 4 rounds
- (1 sc, dec) x6 (12)
- sc around (12)
FO with long tail. Stuff firmly and sew to bottom of each leg, positioned forward slightly so dolls stand properly.
💪 Arms (Beige Hand + Pajama Sleeve) – Make 2 per Doll
Using Beige (for hand):
- MR, 6 sc (6)
- inc x6 (12) 3-4. sc around (12) — 2 rounds
Switch to Blue (Boy) or Pink (Girl):
- BLO: sc around (12) — creates wrist edge for white cuff 6-16. sc around (12) — 11 rounds
FO with long tail. Stuff hand area moderately, leave arm lightly stuffed for posability. Sew to body at shoulder area (around Rounds 5-6 of body), positioned at slight forward angle.
⚪ White Collar Trim
Using White:
- Attach to FLO of Round 5 on body (neck area)
- Round 1: Ch 1, sc evenly around entire neck opening (30)
- Round 2: Ch 1, sc around (30) — creates thicker, more visible collar
- Round 3: Ch 1, sc around (30) — optional third round for even more prominent collar
- FO and weave in ends.
The collar should stand out visibly against the pajama color.
⚪ White Sleeve Cuffs (Make 2 per Doll)
Using White:
- Attach to FLO of Round 5 on each arm (wrist area)
- Round 1: sc around (12)
- Round 2: sc around (12) — creates thicker, more visible cuff
- FO and weave in ends.
⚪ White Leg Cuffs (Make 2 per Doll)
Using White:
- Attach to FLO of Round 40 on each leg (ankle area)
- Round 1: sc around (15)
- Round 2: sc around (15) — creates thicker, more visible cuff
- FO and weave in ends.
🔘 Pajama Front Buttons
- Sew 2 matching buttons (pink for girl, blue for boy) vertically down center front of pajama top
- Position around Rounds 11 and 16 of body
- Space evenly for balanced appearance
- Buttons should be clearly visible in the center
💇♂️ Boy’s Hair (Light Blonde)
Method: Latch-hook or loop technique
- Cut yarn into 5-7 cm strands
- Attach around front and top of head (Rounds 4-9)
- Create short, straight bangs across forehead (approximately 10-12 loops across)
- Keep hair short and textured on top and sides
- Trim bangs straight across at eyebrow level
- Trim to desired shape, keeping it neat and boyish
💇♀️ Girl’s Hair (Chocolate Brown)
Method: Latch-hook or loop technique
- Cut yarn into 8-10 cm strands
- Attach evenly around head (Rounds 4-9)
- Create straight-cut bangs across forehead (approximately 10-12 loops across)
- Allow sides and back to hang to shoulder length
- Trim bangs straight across at eyebrow level
- Trim sides evenly for a neat bob hairstyle with clean lines
- Hair should frame the face nicely
🧸 Teddy Bear Pattern
🐻 Head (Light Brown)
- MR, 6 sc (6)
- inc x6 (12)
- (1 sc, inc) x6 (18)
- (2 sc, inc) x6 (24) 5-8. sc around (24) — 4 rounds
- (2 sc, dec) x6 (18)
- (1 sc, dec) x6 (12)
- dec x6 (6)
FO with long tail. Stuff head very firmly.
👁️ Teddy Eyes & Nose
Eyes:
- Insert 6mm safety eyes between Rounds 5-6, approximately 6-7 stitches apart
- Position them slightly closer together for a cute expression
- Secure backs before finishing stuffing
Nose & Mouth:
- Using dark brown yarn, embroider inverted triangle nose on Round 7 (centered between eyes)
- The triangle should be about 2-3 stitches wide
- Add vertical line from nose down to Round 8 (about 2 stitches long)
- Add curved smile lines from bottom of vertical line, curving outward and upward on each side
- The smile should create a friendly, happy bear expression
🐻 Ears (Light Brown) – Make 2
- MR, 6 sc (6)
- inc x6 (12)
- sc around (12)
FO leaving long tail. Do NOT stuff. Flatten and sew to sides of head (Rounds 3-5), positioned slightly to the sides and back for natural ear placement.
🧸 Body (Light Brown)
- MR, 6 sc (6)
- inc x6 (12)
- (1 sc, inc) x6 (18)
- (2 sc, inc) x6 (24) 5-10. sc around (24) — 6 rounds
- (2 sc, dec) x6 (18)
- (1 sc, dec) x6 (12)
- dec x6 (6)
FO with long tail. Stuff body firmly. Sew head to body securely.
🐾 Teddy Arms (Light Brown) – Make 2
- MR, 6 sc (6)
- inc x6 (12) 3-6. sc around (12) — 4 rounds
- dec x2, 8 sc (10)
- sc around (10)
FO with long tail. Stuff bottom half (paw area) moderately, leave upper half lightly stuffed for movement. Sew to upper sides of body (Rounds 2-4), angled slightly forward.
🐾 Teddy Legs (Light Brown) – Make 2
- MR, 6 sc (6)
- inc x6 (12) 3-6. sc around (12) — 4 rounds
- dec x2, 8 sc (10)
- sc around (10)
FO with long tail. Stuff bottom half (paw area) moderately, leave upper half lightly stuffed. Sew to bottom of body, positioned so teddy can sit or be held.
🔧 Assembly Instructions
Step-by-Step Assembly:
- Prepare all pieces – Ensure all doll parts (heads, bodies with legs, arms, feet) are complete and the teddy bear is fully assembled
- Attach doll heads to bodies – Sew heads securely to neck openings (Round 1-4 area), ensuring faces are centered and oriented forward. The head should sit firmly on the body.
- Attach feet – Sew feet to bottom of legs, angled slightly forward so dolls can stand upright
- Attach arms – Sew arms to shoulders (body Rounds 5-6) symmetrically on both sides, positioned at a slight forward and downward angle for natural hugging position
- Add all white trims – Attach white collar (neck), sleeve cuffs (wrists), and leg cuffs (ankles) to create crisp, visible pajama details
- Sew buttons – Add 2 buttons down center front of each pajama top, evenly spaced and aligned
- Add hair – Use latch-hook technique to attach hair in rows from forehead back. Trim bangs straight across at eyebrow level. Style boy’s hair short, girl’s hair to bob length
- Attach nightcaps – Sew nightcaps to heads tilted to one side (boy’s cap can tilt left, girl’s can tilt right for variety). Base of cap should cover top portion of head. The floppy portion should drape naturally over the side of the head
- Final teddy check – Ensure teddy bear is complete with all limbs, ears, eyes, and facial features
- Position dolls with teddy – Place both dolls side by side, standing. Position teddy bear between them, centered at chest height
- Create hugging pose – Carefully bend each doll’s arms at the “elbow” (around mid-arm). Position arms so they wrap around the teddy:
- Inner arms (closest to each other) should cross in front of teddy
- Outer arms can wrap around teddy’s sides
- Hands should meet or overlap slightly in front
- Secure hugging position – Using matching thread:
- Stitch each hand to teddy’s body (2-3 stitches per hand)
- Optionally stitch the dolls’ hands to each other where they meet
- Ensure stitches are invisible but secure
- The pose should look natural and the teddy should appear to be gently hugged
🌟 Finishing Details
✨ Blush Cheeks: Apply prominent pink chalk pastel in gentle circular motions or embroider pink stitches in a circular pattern. The blush should be clearly visible and add to the sweet sleepy expression.
✨ Nightcap Draping: The nightcaps are a key feature – ensure they drape naturally to the side with the pom-pom hanging down. Only the base should be stuffed; the long part must be completely unstuffed.
✨ Arm Positioning: Take time to position the arms naturally. The dolls should appear to be lovingly holding the teddy together, not awkwardly posed.
✨ White Trim Contrast: All white collar and cuffs should be clearly visible and provide nice contrast against the pajama colors. Work them firmly but not too tight.
✨ Standing Stability: When properly stuffed and assembled, dolls should be able to stand on their own (though they may lean on each other slightly when holding the teddy).
✨ Personalization Ideas:
- Embroider initials on pajama chest area
- Add tiny embroidered heart to teddy’s chest
- Customize pajama colors to match nursery themes
- Add small embroidered stars or moons to nightcaps
💡 Helpful Tips
🔹 Yarn Choice: Velvet or chenille yarn (such as Himalaya Dolphin Baby or Bernat Velvet) creates the plush, soft appearance seen in the photo and gives that professional amigurumi look
🔹 Stuffing Strategy:
- Heads: VERY firm (they support the nightcaps)
- Bodies: Very firm (they need to stand)
- Upper legs: Firm
- Lower legs: Moderately firm
- Arms: Light to moderate (need flexibility for posing)
- Feet: Firm (for stability)
🔹 Nightcap Success: This is the signature feature! Make it long enough (13+ rounds at 42 stitches) and DO NOT stuff the draping portion. It should fold over naturally when sewn to the head at an angle.
🔹 Color Consistency: Use the exact same shade of blue for boy’s pajamas and nightcap, same pink for girl’s pieces. Consistency matters for the cohesive look.
🔹 Hair Application: Work systematically in rows from front to back. Keep loops consistent length. Trim carefully for even bangs – they should be perfectly straight across.
🔹 Button Alignment: Mark button positions with pins first. They should be centered and evenly spaced vertically.
🔹 Hugging Assembly: This is the trickiest part. Use pins to test arm positions before final stitching. Step back and look from different angles. The pose should look natural and sweet, not forced.
🔹 Teddy Proportion: The teddy should be noticeably smaller than the dolls – about 40% of their height. This size difference makes the scene more endearing.
🔹 Work Surface: Work on a flat surface when assembling the final hugging scene. This helps ensure dolls will stand properly.
🎁 Perfect For
💝 Baby shower gifts
💝 Nursery decoration
💝 New sibling gifts (“big brother” and “big sister” theme)
💝 Twin baby gifts
💝 Bedtime companions
💝 Christening or baptism gifts
💝 Photo props for newborn/sibling photography
💝 Handmade shop items
💝 Children’s room décor
💝 Hospital welcome gifts
💝 First birthday presents
📸 Display Suggestions
🌙 Bedtime Scene: Place on a shelf with small pillows or blanket props
🌙 Nursery Shelf: Display as a set on floating shelves above crib
🌙 Photo Backdrop: Use as props for sibling announcement photos
🌙 Seasonal Variation: Create holiday versions with red/green or themed colors
🌙 Gift Presentation: Place in a clear gift box with tissue paper for stunning presentation
Sweet dreams and happy crocheting! These precious sleepy siblings will bring warmth, charm, and a touch of handmade love to any home. 🌙💕✨