Rock your way into holiday cheer with this Amigurumi Christmas Baby in Rocking Chair crochet pattern! Featuring a snuggly little baby dressed in festive attire and nestled into a cozy rocking chair, this heartwarming project captures the magic of Christmas in every stitch. With rosy cheeks, a sweet smile, and a tiny blanket to keep warm, this adorable scene is perfect for seasonal decor, heartfelt gifting, or simply adding a touch of handmade joy to your winter crafting. 🎄🧶👶
Designed for charm and storytelling, this pattern invites you to play with soft yarns, gentle shaping, and delightful extras like a miniature teddy bear, holiday hat, or even a tiny stocking tucked beside the chair. Customize the baby’s outfit with classic reds and greens or go whimsical with pastel hues and sparkly accents. Whether perched on a mantel, nestled under the tree, or gifted with love, this Christmas Baby in Rocking Chair Amigurumi is a joyful and satisfying project—perfect for stitching up a little handmade holiday hug! 💖✨🪑
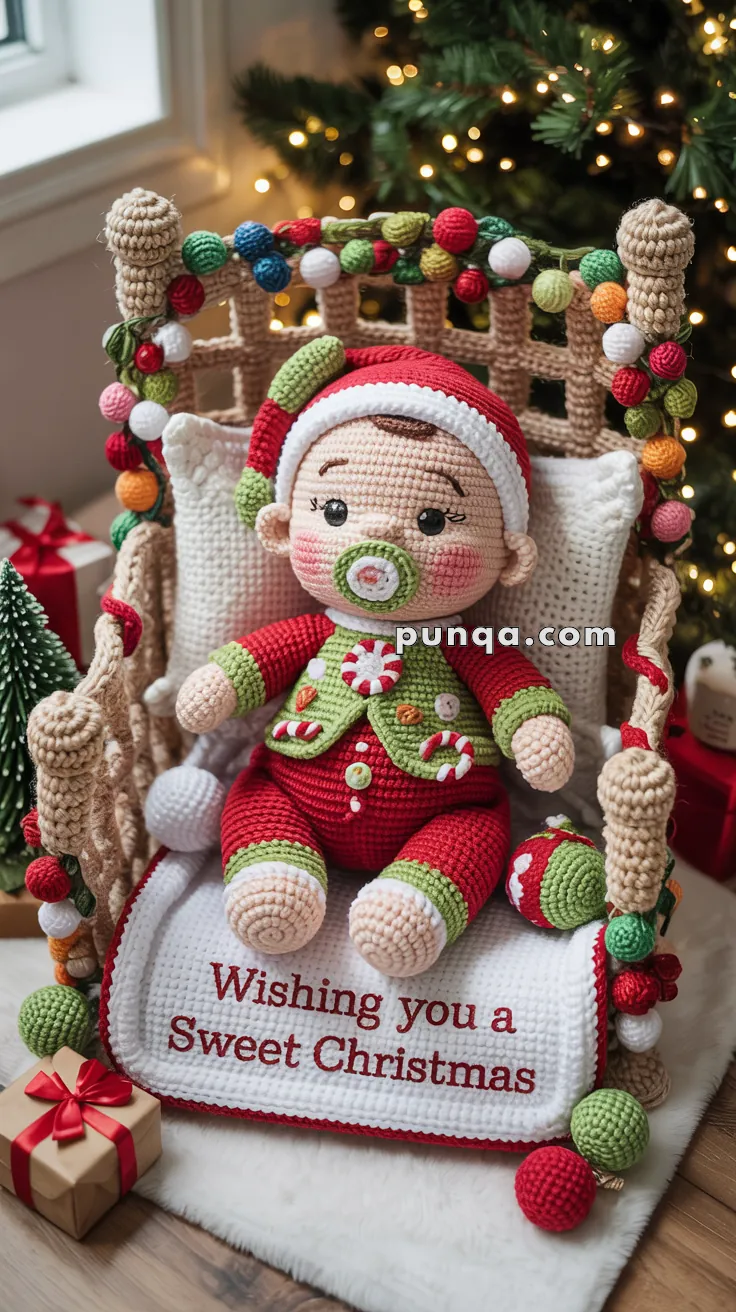
🎄 Amigurumi Christmas Baby in Rocking Chair Crochet Pattern
Celebrate the magic of the holidays with this heart-melting Christmas baby nestled in a handcrafted rocking chair. With chubby sitting legs, a striped red-and-green outfit, peppermint appliqués, a bright Santa hat, and a cozy embroidered blanket, this charming scene becomes an instant Christmas keepsake. The woven-back rocking chair with colorful pom-pom garland adds the perfect festive touch, making this project a beautiful display piece for your home or a memorable handmade gift.
Let’s start stitching this sweet Christmas treasure! 🎅🧶✨
✨ Skill Level
Intermediate – Includes shaping, colorwork, appliqués, embroidery, and structural assembly.
📏 Finished Size
- Baby: ~10–12 in (25–30 cm) seated
- Rocking Chair: ~12–14 in (30–35 cm) tall
- Blanket: ~6 × 7 in (15 × 18 cm)
🧶 Materials Needed
(All yarn amounts approximate)
Yarn – DK or Light Worsted Weight
- Skin (light peach/beige): 40 g
- Red: 70 g
- Green: 50 g
- White: 60 g
- Brown (hair): 15 g
- Beige/Tan (chair): 100 g
- Multicolor for pom-poms: 35 g total (red, green, white, yellow, orange, pink)
Notions
- 2.5 mm & 3.0 mm crochet hooks
- 8 mm safety eyes
- Fiberfill stuffing (150 g)
- Stitch markers, scissors
- Tapestry & embroidery needles
- Pink blush
- Optional: fabric glue, wire/cardboard for chair support
📝 Abbreviations
MR – Magic Ring
sc – Single crochet
inc – Increase
dec – Invisible decrease
sl st – Slip stitch
ch – Chain
hdc – Half double crochet
dc – Double crochet
FLO/BLO – Front/Back loop only
FO – Fasten off
(All rounds worked in continuous spirals unless stated.)
🧸 BABY DOLL PATTERN
👶 Head
Skin color, 2.5 mm hook
R1: MR, 6 sc
R2: inc ×6 → 12
R3: (sc, inc) ×6 → 18
R4: (2 sc, inc) ×6 → 24
R5: (3 sc, inc) ×6 → 30
R6: (4 sc, inc) ×6 → 36
R7–13: 36 sc
Insert 8 mm eyes between R9–10, 6–7 sts apart.
Embroider 3–4 long eyelashes angling upward.
R14: (4 sc, dec) ×6 → 30
R15: (3 sc, dec) ×6 → 24
R16: (2 sc, dec) ×6 → 18
Stuff firmly.
R17: (sc, dec) ×6 → 12
R18: dec ×6 → 6
FO and close.
👂 Ears ×2
R1: MR, 5 sc
R2: inc ×5 → 10
R3: 10 sc
Flatten, sc across to close.
Sew between R9–10, slightly toward the back.
👃 Nose
R1: MR, 4 sc
R2: 4 sc
FO, sew between eyes slightly lower.
💇 Hair Cap
Brown yarn.
Repeat head increase rounds until R6 (36 sts).
R7–8: 36 sc
FO and sew to top/back of head.
Forehead curl:
Ch 8, sc across (7). Coil lightly, sew to center forehead.
😊 Facial Details
- Blush cheeks heavily for rosy baby look.
- Tiny brown eyebrows optional.
🦵 LEGS – Seated Shape (Make 2)
These legs do NOT join into a standing body. They form round bent thighs for a sitting baby.
Start skin color:
R1: MR, 6
R2: inc ×6 → 12
R3: (sc, inc) ×6 → 18
R4–5: 18 sc (foot shape)
Change to white (thick cuff area):
R6–7: 18 sc
Change to green (stripe band):
R8–9: 18 sc
Change to red (pants):
R10–15: 18 sc (6 rounds)
Firmly stuff feet and shins; avoid overstuffing thighs so they curve naturally.
FO first leg.
Do not FO second leg — continue to body.
🧍 BODY – SEATED BABY SHAPE
This construction creates the rounded belly sitting BEHIND the legs.
From second leg:
Ch 3, join to first leg with sc into any stitch.
R1 (Body Join):
18 sc on leg 1, 3 sc across chain, 18 sc on leg 2, 3 sc across chain → 42
R2–4: 42 sc (red pants)
Change to green (vest):
R5–8: 42 sc
Stuff firmly, shaping a round belly behind the legs.
R9: (4 sc, dec) ×7 → 35
R10: (3 sc, dec) ×7 → 28
R11: (2 sc, dec) ×7 → 21
R12: (sc, dec) ×7 → 14
R13: dec ×7 → 7
FO and close.
💪 ARMS ×2
Skin color:
R1: MR, 6
R2: inc ×6 → 12
R3–5: 12 sc
Change to white cuff:
R6–7: 12 sc
Change to green:
R8–9: 12 sc
Change to red:
R10–12: 12 sc
Lightly stuff only lower half.
FO, sew to sides of body aligned with vest top.
🍬 VEST DETAILS
Candy Caves ×2
White yarn:
Ch 18
Rows 1–3: sc across (17)
FO.
Embroider 5–6 red diagonal stripes.
Curve top third into hook shape.
Sew crossed on vest center.
Peppermint Disc
White yarn:
R1: MR, 6
R2: inc ×6 → 12
R3: (sc, inc) ×6 → 18
R4: 18 sc
FO, keep flat.
Embroider red swirl from center outward.
Sew over crossed candy canes.
👶 PACIFIER
Green Shield:
R1: MR, 6
R2: inc ×6 → 12
R3: (sc, inc) ×6 → 18
R4: 18 sc
Change to white:
R5 (FLO): 18 sl st (rim)
White Ring:
Ch 14, join.
R1: sc around.
Sew ring to shield.
Sew entire pacifier to lower face.
🎅 SANTA HAT
Red yarn, 2.5 mm:
R1: MR, 6
R2: (sc, inc) ×3 → 9
R3: (2 sc, inc) ×3 → 12
R4: (3 sc, inc) ×3 → 15
R5: (4 sc, inc) ×3 → 18
R6: (5 sc, inc) ×3 → 21
R7: (6 sc, inc) ×3 → 24
R8: (7 sc, inc) ×3 → 27
R9–10: 27 sc
Switch to white trim:
R11–13: 27 sc
Pom-pom:
R1: MR, 6
R2: inc ×6 → 12
R3: (sc, inc) ×6 → 18
R4–5: 18 sc
R6: (sc, dec) ×6 → 12
R7: dec ×6 → 6
Stuff, close, sew to hat tip.
Sew hat slightly tilted.
🛏️ PILLOW
White yarn:
Ch 20
Rows 1–16: sc across (19)
Fold, stuff, close 3 edges.
🧵 BLANKET – “Wishing you a Sweet Christmas”
Base
White yarn:
Ch 42
Rows 1–32: sc across (41)
Red Scalloped Border
Join red at any corner:
Round 1: sc around (3 sc in corners)
Round 2: skip 1, 5 dc in next, skip 1, sc in next repeat around
Embroidery:
Using red yarn:
Line 1: Wishing you a
Line 2: Sweet Christmas
Use backstitch or chain stitch.
🪑 ROCKING CHAIR – REAL WOVEN BACK
POSTS ×2 (Side Uprights with Finials)
Beige yarn, 3.0 mm:
R1: MR, 6
R2: inc ×6 → 12
R3–30: 12 sc (long post)
Finial Top:
R31: (sc, inc) ×6 → 18
R32–33: 18 sc
R34: (sc, dec) ×6 → 12
R35: dec ×6 → 6
Stuff very firmly.
WOVEN STRIPS (Make 12–14)
These replicate the exact rectangle weave in the photo.
Each strip:
Ch 22
Rows 1–3: sc across (21)
Keep flat — do not stuff.
Make 12–14 depending on how dense you want the weave.
TOP RAIL
Ch 32
Rows 1–3: sc across (31)
ARMRESTS ×2
R1: MR, 6
R2: inc ×6 → 12
R3–20: 12 sc
Stuff firmly.
SEAT PANEL
Ch 26
Rows 1–10: sc across (25)
Make 2, sew together, stuff lightly.
ROCKING RUNNERS ×2
Ch 40
Rows 1–5: sc across (39)
Insert cardboard or wire strip.
Fold lengthwise and sc edges together.
Curve into gentle rocker arc.
POM-POM BALLS (20–24 total)
R1: MR, 6
R2: inc ×6 → 12
R3–4: 12 sc
R5: dec ×6 → 6
Use red, green, white, yellow, orange, pink.
Sew densely to chair back and sides.
🧩 CHAIR ASSEMBLY
1) Build the back
- Place two tall POSTS upright.
- Lay woven strips horizontally, weaving over–under between the posts.
- Sew sides of each strip to posts.
- Attach TOP RAIL across the top.
2) Add armrests
Sew each armrest to front sides of posts.
3) Install the seat
Sew padded SEAT panel between armrests and lower back strips.
4) Attach rocking runners
Sew one curved runner to each side, aligned with bottom posts and front armrest base.
5) Decorate with pom-pom garland
Sew pom-poms densely along:
- top rail
- upper half of posts
- outer armrests
🎄 FINAL ASSEMBLY
- Sew head to top of body.
- Position baby seated deeply, thighs forward, belly behind.
- Sew arms so hands rest naturally on lap or armrests.
- Add pillow behind baby for support.
- Sit baby in chair and secure with a few stitches if preferred.
- Drape embroidered blanket over lap.
- Adjust hat tilt and pacifier placement.
- Add finishing touches (extra blush, shaping, pom-poms).
💛 Finishing Touches
- Brush white hat trim for fluffiness
- Keep chair joints very firm for stability
- Embroider baby’s cheeks generously for cuteness
- Pose baby slightly leaning back into the pillow like in the photo
🎁 Final Words
Your Christmas Baby in Rocking Chair is complete — a heartwarming handmade treasure that captures the joy, sweetness, and magic of the holiday season. Whether displayed on a mantel, gifted to someone special, or added to your yearly Christmas décor, this adorable little scene is sure to bring smiles for many years to come.
Happy crocheting, and may your holidays be merry and bright! 🎄🧶✨