Bring a dose of classic cartoon mischief to your bookshelf with this Amigurumi Tom & Jerry Bookends crochet pattern! Featuring the iconic cat-and-mouse duo in playful poses, these charming bookends are a nostalgic nod to the timeless antics of Tom and Jerry. Whether you’re crafting for a fan of vintage animation, decorating a kid’s room, or just love turning your favorite characters into yarny creations, this pattern lets you stitch up a pair of scene-stealing companions that are as functional as they are fun. 🐱📚🐭
Designed for creativity and character, this pattern invites you to play with expressive features, bold colors, and clever shaping to bring Tom’s grumpy charm and Jerry’s cheeky grin to life. Add tiny props like cheese, a mallet, or even a little trap for extra storytelling flair. Whether perched on your shelf or gifted to a fellow cartoon lover, these Amigurumi Tom & Jerry Bookends are a joyful and satisfying project—perfect for bringing a touch of handmade humor to every stitch! 🧶💖🎬
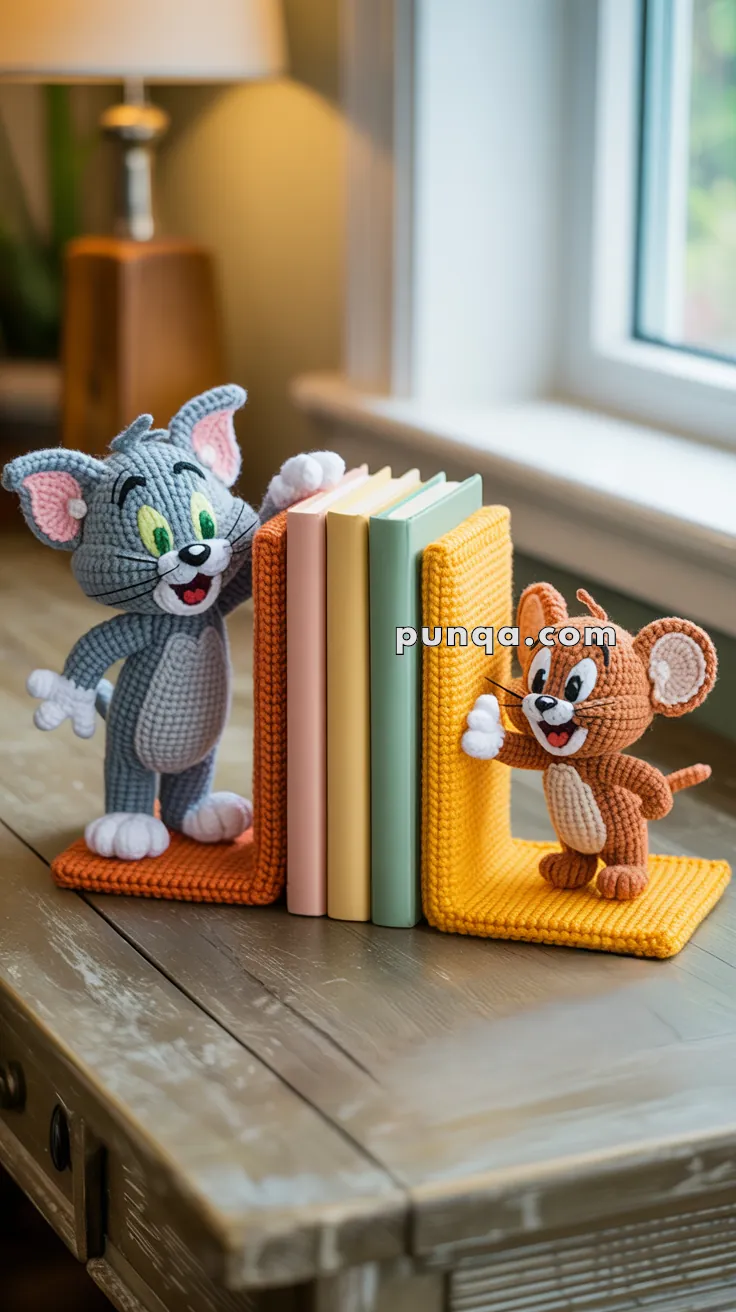
📚 Tom & Jerry Bookends Crochet Pattern
Bring the legendary cartoon duo to your bookshelf with these sturdy, expressive Tom & Jerry crochet bookends. Each character is permanently attached to a weighted, ribbed L-shaped base, designed to hold real books securely while adding playful charm to your space.
These bookends are decorative, functional, and built to last.
✨ Skill Level
Advanced Intermediate
Includes:
- Precise shaping
- Felt + safety eye placement
- Structured bases with internal reinforcement
- Facial embroidery
- Weighted construction
(No wire is used anywhere in this pattern.)
📏 Finished Size
Tom
- Height: ~8 in / 20 cm
- Base footprint: 4 × 4 in
- Vertical back: 6 in
Jerry
- Height: ~5 in / 13 cm
- Base footprint: 4 × 4 in
- Vertical back: 6 in
🧶 Materials
Yarn (DK weight)
Tom
- Grey – 40 g (head, body, arms, legs, tail)
- White – 25 g (muzzle, belly, paws)
- Pink – small amount (inner ears, nose)
- Green – small amount (eyes)
- Black – small amount (pupils, embroidery)
Jerry
- Light brown / tan – 30 g (head, body, arms, legs, tail)
- Cream / off-white – 20 g (belly, muzzle, inner ears)
- Pink – small amount (nose, inner ears)
- Black – small amount (eyes, embroidery)
Bases
- Rust / orange – 50 g (Tom’s base)
- Mustard / yellow – 50 g (Jerry’s base)
Other Supplies
- Crochet hook: 2.0–2.5 mm (use smaller size for bases)
- Safety eyes:
- Tom: 12–14 mm
- Jerry: 9–10 mm
- White felt (eye backing)
- Red felt or red yarn (tongues)
- Nylon thread (whiskers)
- Polyfill stuffing
- Poly pellets or glass beads (~200 g per base)
- Plastic canvas or foam board (base structure)
- Tapestry needle, stitch markers, scissors
- Hot glue (optional, for felt only)
🧾 Abbreviations (US Terms)
MR – Magic Ring
sc – Single Crochet
inc – Increase (2 sc in one st)
dec – Invisible Decrease
sl st – Slip Stitch
ch – Chain
BLO – Back Loop Only
FO – Fasten Off
🐱 Tom the Cat
Head (Grey)
MR 6
inc ×6 (12)
(1 sc, inc) ×6 (18)
(2 sc, inc) ×6 (24)
(3 sc, inc) ×6 (30)
(4 sc, inc) ×6 (36)
R7–R11 sc around (36)
(4 sc, dec) ×6 (30)
(3 sc, dec) ×6 (24)
(2 sc, dec) ×6 (18)
Stuff firmly
(1 sc, dec) ×6 (12)
dec ×6 (6)
FO, close.
Eyes
- Cut white felt ovals (~2 cm)
- Insert safety eyes through felt
- Place between R8–R10, ~6 sts apart
- Add solid green embroidery around pupils
Muzzle (White)
MR 6
inc ×6 (12)
(1 sc, inc) ×6 (18)
(2 sc, inc) ×6 (24)
(3 sc, inc) ×6 (30)
R6–R8 sc around (30)
FO.
Stuff lightly and sew below eyes.
Embroider pink nose and wide smiling mouth.
Add small red tongue.
Ears (Make 2)
Outer (Grey):
Ch 10, sc rows increasing to 15 sts, then decrease back to 7 sts.
Inner (Pink):
Same shape, stop at 11 sts.
Sew inner to outer.
Attach slightly angled outward.
Body (Grey with White Belly)
MR 6
inc ×6 (12)
(1 sc, inc) ×6 (18)
(2 sc, inc) ×6 (24)
(3 sc, inc) ×6 (30)
R6–R12 sc around (30)
Belly panel (front only):
R13–R15: 12 sc white, 18 sc grey
(3 sc, dec) ×6 (24)
(2 sc, dec) ×6 (18)
Stuff firmly
(1 sc, dec) ×6 (12)
dec ×6 (6)
FO.
Arms (Make 2 – Grey with White Paws)
Upper arm:
MR 6, sc 6 rounds
Switch to white:
sc 4 rounds
Lightly stuff.
Finish as rounded mitten-style paws (no fingers).
Attach:
- Right arm: angled forward toward books
- Left arm: relaxed downward
Legs (Make 2)
Foot (White):
MR 6 → inc to 18
sc 2 rounds
Switch to grey:
dec to 12
sc 6–7 rounds
Flatten slightly and sew under body.
Tail (Grey)
MR 6
sc 16–18 rounds
Light stuffing only
FO.
(No wire.)
Whiskers
- Nylon thread, 3 strands per side
- Insert through muzzle
🐭 Jerry the Mouse
Head & Body (One Piece)
MR 6
inc ×6 (12)
(1 sc, inc) ×6 (18)
(2 sc, inc) ×6 (24)
(3 sc, inc) ×6 (30)
R6–R9 sc around (30)
Insert black safety eyes between R7–R8.
(3 sc, dec) ×6 (24)
(2 sc, dec) ×6 (18)
Stuff head
Belly shaping:
(2 sc, inc) ×6 (24)
R13–R14 sc around
Cream belly (front only):
R15–R16: 8–10 sc cream, rest brown
(2 sc, dec) ×6 (18)
(1 sc, dec) ×6 (12)
Stuff
dec ×6 (6)
FO.
Muzzle (Cream)
MR 6
inc to 18
sc 2 rounds
FO.
Sew higher on face than Tom’s.
Add pink nose, smile, tiny tongue.
Ears (Make 2)
Outer (Brown):
MR 6 → inc to 30
Inner (Cream):
MR 6 → inc to 24
Sew together, fold base slightly, attach high on head.
Arms (Make 2)
MR 5
sc 4 rounds
Switch to cream, sc 3 rounds
Light stuffing only
Finish as simple rounded paws.
Attach:
- Right arm angled forward to touch books
- Left arm slightly outward
Legs (Make 2)
Foot (Cream):
MR 6 → inc to 12
sc 2 rounds
Switch to brown:
dec to 9
sc 5 rounds
Attach spread slightly for stability.
Tail (Brown)
MR 4
sc 18–20 rounds
Light stuffing only
FO.
(No wire.)
Whiskers
- Nylon thread, 3 short strands per side
📚 L-Shaped Ribbed Bases (Make 2)
Base Panel (Both)
Ch 22
BLO sc across (21)
Rows 2–21: BLO sc (21)
Rotate, sc evenly along side edge (~31 sts)
Rows 1–21: BLO sc
Fold into L-shape.
Assembly Inside Base
- Insert foam board:
- 4 × 4 in bottom
- 4 × 6 in vertical back
- Add 200 g weighted bead pouch
- Light stuffing around edges
- Whipstitch closed
🪡 Final Assembly
- Sew Tom securely to orange base
- Sew Jerry securely to yellow base
- Ensure arms press gently against books
- Adjust tails and whiskers naturally
- Place books between bases for tension
🧼 Care Instructions
- Spot clean only
- Do not machine wash
- Dust gently with soft brush
🎉 Your Tom & Jerry Crochet Bookends are ready!
Add nostalgic fun to your bookshelf — a playful, handmade tribute to the world’s most iconic cartoon duo. 🧀📚✨


I love this. I watched tom and Jerry cartoons with my grandson when he was little this is perfect match for his room and bring back memories