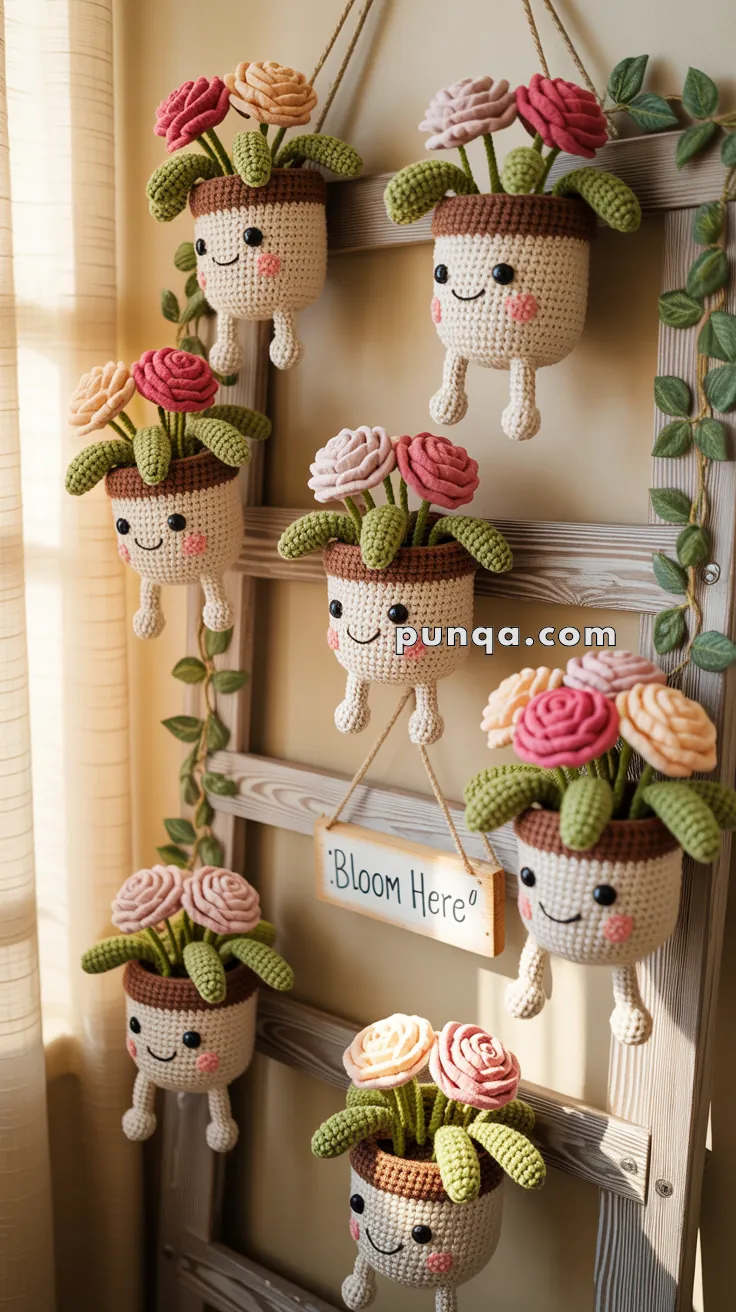
Bring a bouquet of everlasting beauty into your home with this Amigurumi Flowerpot with Blooming Roses crochet pattern! Featuring a charming pot brimming with delicate, handcrafted roses, this sweet design captures the romance and elegance of a fresh floral arrangement—without the need for watering. Whether you’re crafting a thoughtful gift, brightening up your workspace, or simply love floral-inspired amigurumi, this pattern lets you stitch up a blooming display that radiates charm and cheer. 🌹🪴✨
Designed for creativity, this pattern invites you to play with soft pastels, bold reds, or even ombré yarns to bring your roses to life. Add leafy accents, embroidered details, or a decorative ribbon around the pot for extra flair. Whether perched on a shelf, gifted for a special occasion, or made just for the joy of it, this Amigurumi Flowerpot with Blooming Roses is a delightful and satisfying project—perfect for bringing a touch of handmade garden magic to every stitch! 🧶💖🌼
🌸 Amigurumi Flowerpot with Blooming Roses Crochet Pattern
Add a little happiness to your home with this adorable flowerpot amigurumi! With its sweet smile, rosy cheeks, dangling legs with little feet, and three blooming roses standing tall among plush green leaves, this project is both decorative and fun to make. Perfect for wall hanging, shelf décor, or gifting, this crochet flowerpot will always stay in bloom.
✨ Skill Level
Intermediate – involves working in the round, color changes, shaping, stuffed leaves, and flower assembly.
📏 Finished Size
Approx. 18–20 cm (7–8 in) tall (including roses) when made with DK cotton yarn and a 2.5–3.0 mm hook.
🧶 Materials
- Yarn (cotton DK):
- Cream / Beige (pot body)
- Brown (soil rim)
- Green (leaves, stems)
- Pink, Red, Peach, Light Pink (roses)
- Black (eyes, mouth embroidery if not using safety eyes)
- Light Pink (cheeks)
- Crochet hook: 2.5–3.0 mm
- Polyester fiberfill stuffing
- 8 mm black safety eyes (or crochet black circles)
- Yarn needle, stitch markers, scissors
- Floral wire (optional, for stems)
- Hanging cord (optional)
🔤 Abbreviations (US terms)
MR – magic ring
sc – single crochet
inc – increase (2 sc in same st)
dec – invisible decrease
sl st – slip stitch
ch – chain
FO – fasten off
🧩 Pattern Instructions
1. Pot Body (Cream with Brown Rim)
R1: MR 6 (6)
R2: inc x6 (12)
R3: (sc, inc) x6 (18)
R4: (2sc, inc) x6 (24)
R5: (3sc, inc) x6 (30)
R6: (4sc, inc) x6 (36)
R7: (5sc, inc) x6 (42)
R8: blo sc around (42) → defines pot base edge
R9–12: sc around (42)
R13: (5sc, dec) x6 (36) → slight taper
R14–16: sc around (36)
R17: (4sc, dec) x6 (30)
R18–20: sc around (30)
Change to brown (soil top):
R21–24: sc around (30)
FO, weave in ends.
👉 Lightly stuff, but leave room at top for stems/leaves.
2. Legs with Feet (Make 2, Cream)
Leg Tube:
R1: MR 6 (6)
R2–12: sc around (6)
FO, stuff lightly.
Foot:
R1: MR 6 (6)
R2: inc x6 (12)
R3–4: sc around (12)
R5: (sc, dec) x4 (8)
R6: dec x4 (4) FO, close.
Sew foot to leg tube.
Attach legs to bottom of pot.
3. Face Details
- Insert safety eyes between R10–11, 6–7 sts apart.
- Embroider a curved smile with black yarn/thread between eyes.
- Crochet 2 small cheeks (Pink): MR 6, sl st around, FO. Sew under eyes.
4. Leaves (Make 6–8, Green)
R1: Ch 6
R2: sc in 2nd ch, hdc, dc, dc, hdc, sc.
Work around other side of chain: sc, hdc, dc, dc, hdc, sc. (Both sides worked for oval shape.)
R3: sc around entire oval. Stuff lightly for plump effect. FO.
Sew leaves around inside of pot rim.
5. Stems (Make 3, Green)
R1: MR 6 (6)
R2–15: sc around (6)
FO, leaving long tail.
Insert floral wire or stuff lightly with yarn scraps to keep stems upright.
6. Roses (Make 3, Pink / Peach / Red Variants)
Petal Strip:
Ch 50.
Row1: sc across (49).
Row2: (ch 2, 2dc in same st, skip 1, sl st in next) repeat across → scallop petals.
FO.
Assembly:
- Roll the strip tightly from one end to form rose.
- Sew along base to secure shape.
- Attach rose to top of stem.
7. Hanging Loop (Optional)
Ch 40, FO.
Sew both ends to opposite sides of pot rim.
🧵 Assembly
- Sew legs with feet to bottom of pot.
- Add safety eyes, cheeks, and embroidered smile.
- Attach green leaves evenly around soil rim.
- Insert 3 stems into pot center, secure with stitches or glue.
- Attach one rose to each stem.
- Add hanging loop if desired.
🌟 Finishing Touches
- Use different rose colors for variety (peach, pink, red).
- Curl leaf tips slightly by pinching after stuffing.
- Arrange stems at different heights for natural look.
- Hang several pots together to create a blooming wall display, just like in the photo.
🎉 Result
Your amigurumi flowerpot with blooming roses is complete! With its blushing smile, dangling legs with little feet, plush green leaves, and three colorful roses, this piece makes the perfect cheerful decoration for any room. Whether displayed on a shelf or hung as part of a wall garden, it’s guaranteed to bring joy year-round. 🌸✨