Set sail on a creative adventure with this Amigurumi Sailor Boy & Anchor crochet pattern! With his classic sailor outfit, cheerful expression, and sturdy anchor by his side, this charming design captures the spirit of the sea. Whether you’re crafting for nautical enthusiasts, adding a whimsical touch to your decor, or simply enjoy making character-inspired amigurumi, this pattern lets you stitch up a delightful sailor bursting with personality! Perfect for brightening up any space, this crochet creation brings a touch of handmade maritime magic to every stitch. ⚓✨
Designed for customization, this pattern allows you to experiment with different shades of blue, embroidered details, or even tiny accessories like a miniature ship or lifebuoy for extra charm. Craft a classic sailor boy with crisp navy hues, create a pastel version for a softer aesthetic, or even stitch up a full set of ocean-inspired amigurumi for a delightful display! Whether gifted as a thoughtful keepsake, displayed as a charming accent, or made simply for the joy of crafting, this Amigurumi Sailor Boy & Anchor is a fun and creative project—perfect for bringing a touch of handmade seafaring magic to every stitch! 🧶💖✨
⚓ Amigurumi Sailor Boy & Anchor Crochet Pattern
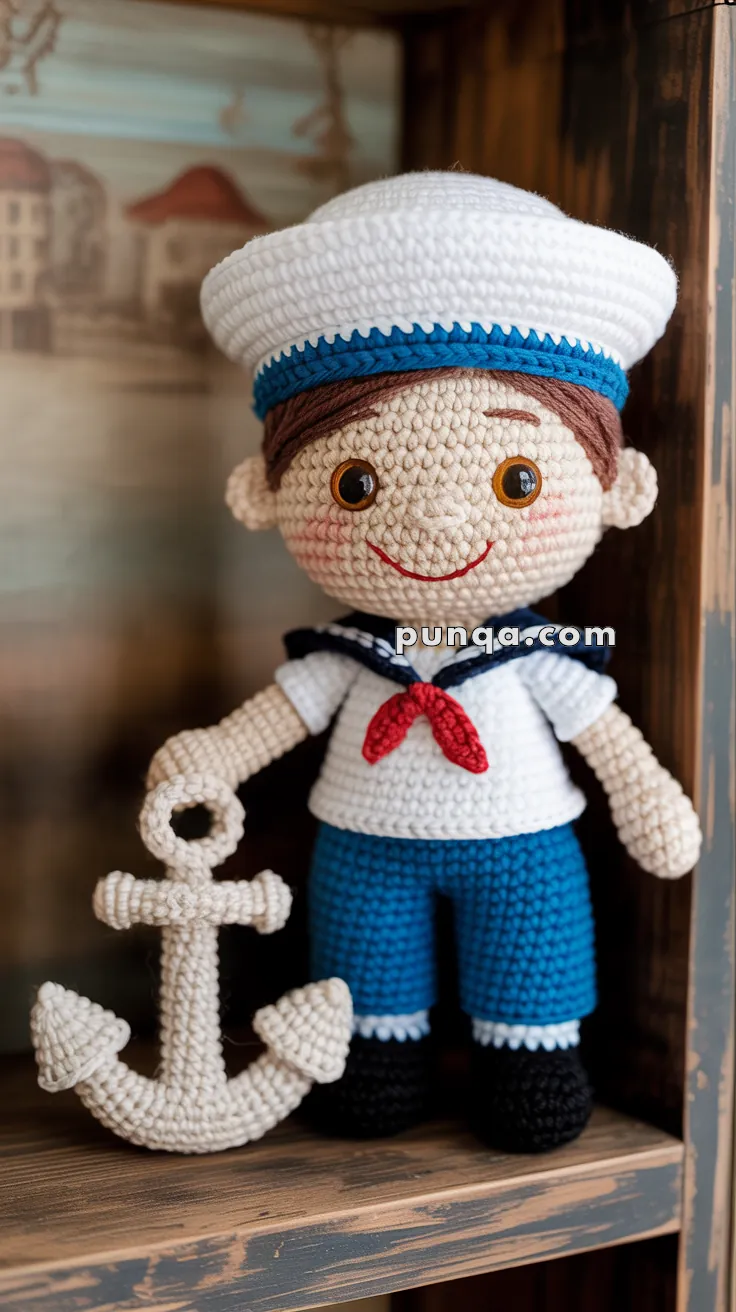
Set sail on a creative voyage with this charming Amigurumi Sailor Boy!
Dressed in a white sailor hat with a blue band, a navy collar with a red scarf, and blue shorts, this adorable doll perfectly captures nautical nostalgia. Complete with a handmade anchor accessory, he’s the perfect project for beach lovers, nursery décor, or collectors of character amigurumi.
✨ Skill Level
Intermediate – involves shaping, color changes, structured accessories, and light embroidery.
📏 Finished Size
- Approx. 10–12 inches (25–30 cm) tall
- Made with DK or light worsted weight yarn and a 2.5–3 mm crochet hook
🧶 Materials
- Skin tone – head, ears, hands
- White – shirt, hat, sleeve trim
- Navy blue – collar, shorts, shoe tops
- Black – shoes (bottoms)
- Red – scarf
- Blue – hat band
- Brown – hair
- Beige or cream – anchor
- Pink – cheeks or blush
Additional Supplies:
- Crochet hook: 2.5–3 mm
- 10–12 mm safety eyes
- Tapestry needle & stitch marker
- Polyfill stuffing
- Optional: wire or pipe cleaner for the anchor handle
- Fabric blush or pink yarn for cheeks
🪡 Abbreviations (US Terms)
MR – Magic Ring
sc – Single Crochet
inc – Increase (2 sc in same stitch)
dec – Decrease (sc2tog)
ch – Chain
sl st – Slip Stitch
BLO – Back Loop Only
FLO – Front Loop Only
FO – Fasten Off
👦 Head (Skin Tone)
- MR 6 sc [6]
- inc ×6 [12]
- (1 sc, inc) ×6 [18]
- (2 sc, inc) ×6 [24]
- (3 sc, inc) ×6 [30]
- (4 sc, inc) ×6 [36]
7–14. sc around [36] - (4 sc, dec) ×6 [30]
- (3 sc, dec) ×6 [24]
- (2 sc, dec) ×6 [18]
- (1 sc, dec) ×6 [12]
- dec ×6 [6]
FO and close. Stuff firmly.
Details:
- Attach eyes between R9–10, about 7 stitches apart.
- Embroider eyebrows and a smile.
- Add soft pink blush below the eyes.
👂 Ears (×2 – Skin Tone)
- MR 6 sc [6]
- (1 sc, inc) ×3 [9]; FO.
Flatten slightly and sew at eye level on each side.
💇 Hair Cap (Brown)
- MR 6 sc [6]
- inc ×6 [12]
- (1 sc, inc) ×6 [18]
- (2 sc, inc) ×6 [24]
- (3 sc, inc) ×6 [30]
- (4 sc, inc) ×6 [36]
7–8. sc around [36]; FO.
Sew to head, leaving a slight front fringe visible.
Use long brown stitches to create side bangs.
👕 Shirt (White)
- MR 6 sc [6]
- inc ×6 [12]
- (1 sc, inc) ×6 [18]
- (2 sc, inc) ×6 [24]
- (3 sc, inc) ×6 [30]
- (4 sc, inc) ×6 [36]
7–11. sc around [36] - Switch to navy blue for hem trim, sc around [36]; FO.
Stuff lightly.
👖 Shorts (Navy Blue → Black)
Join navy yarn to shirt base:
- sc around [36]
2–8. sc around [36]
Switch to black:
9–11. sc around [36]; FO.
✅ Adds contrast between blue shorts and black shoes — exactly as shown in the photo.
🦶 Legs & Shoes (×2)
Shoes (Black):
- MR 6 sc [6]
- inc ×6 [12]
3–4. sc around [12]
Switch to navy blue:
5–8. sc around [12]
Switch to white: - FLO sc around [12]; FO.
Stuff and sew to body.
💪 Arms (×2 – Skin → White)
- MR 6 sc [6]
- (1 sc, inc) ×3 [9]
3–4. sc around (skin)
Switch to white:
5–7. sc around [9]; FO.
Stuff lightly and sew at sides of shirt.
🧥 Sailor Collar (Navy)
- Ch 20
- Hdc in 2nd ch and across [19]
- Ch 1, turn, sc across [19]; FO.
Shape into a “V” and sew neatly around neckline.
Add white embroidered trim along the outer edge for the authentic sailor look.
🧣 Red Scarf
- Ch 22
- Sc across [21]; FO.
Tie or stitch loosely beneath collar in front.
🎩 Sailor Hat (White with Blue Band)
- MR 6 sc [6]
- inc ×6 [12]
- (1 sc, inc) ×6 [18]
- (2 sc, inc) ×6 [24]
- (3 sc, inc) ×6 [30]
- (4 sc, inc) ×6 [36]
7–9. sc around [36] - BLO sc around [36] for brim line.
11–12. sc around [36]; FO.
Hat Band:
Attach blue yarn at Round 9 (the BLO ridge).
sc around once, sl st join; FO.
✅ Produces the wide, structured brim and blue hat band seen in the image.
⚓ Anchor (Beige or Cream)
Top Ring:
- MR 6 sc [6]
- inc ×6 [12]
- sc around [12]; FO.
Anchor Shaft:
Ch 22, sc in 2nd ch and across [21]; FO.
Sew ring to top.
Crossbar:
Ch 10, sc back across; FO.
Attach horizontally across the shaft about 1 inch below the ring.
Bottom Arms (×2):
Ch 6, sc back; FO.
Sew to lower shaft ends in a curve.
Add small triangle “flukes”:
Ch 3, sc, hdc, dc in same st; FO and attach.
Stuff lightly or reinforce with wire if desired.
Sew or tie anchor to sailor’s right hand.
🪡 Assembly Order
1️⃣ Attach head securely to shirt body.
2️⃣ Sew arms to sides below collar.
3️⃣ Stitch collar and scarf in place.
4️⃣ Sew hat slightly tilted forward.
5️⃣ Attach legs under shorts.
6️⃣ Add anchor accessory.
💡 Customization Tips
- Swap the red scarf for yellow or white for different naval themes.
- Add a stripe detail on the hat or shorts using surface crochet.
- Turn the anchor into a separate keychain gift.
- Make a girl version by adding long braids or a skirt.
🌟 Final Thoughts
This adorable Sailor Boy Amigurumi captures the spirit of the sea — with his bright smile, crisp uniform, and anchor in hand.
It’s a joyful project that makes a wonderful handmade gift, perfect for beach decor, nautical nurseries, or collectors who love maritime charm.
⚓ Stitch your way to adventure — one wave at a time! 🌊