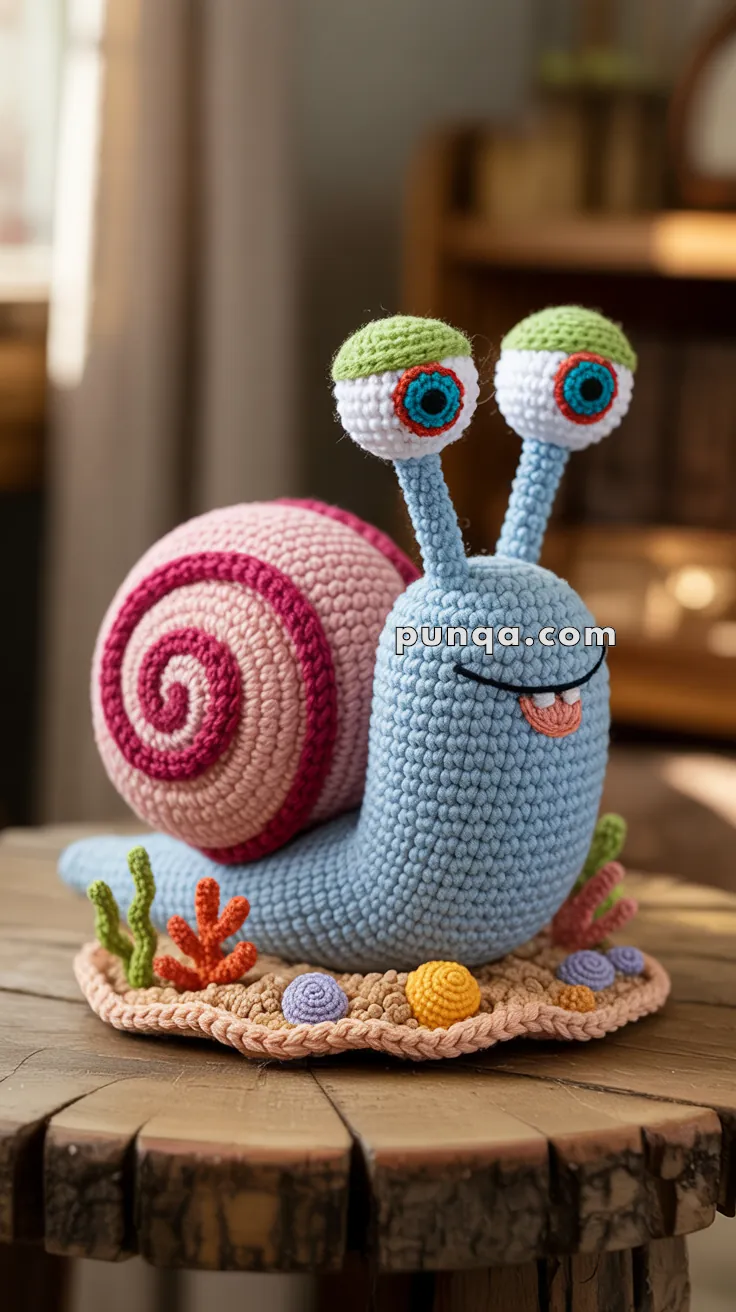
Bring the quirky charm of Bikini Bottom to life with this Amigurumi Gary the Snail crochet pattern! Inspired by SpongeBob’s lovable pet, this adorable design captures Gary’s signature pink shell, bright blue body, and curious expression in every stitch. Whether you’re crafting for cartoon fans, adding a playful touch to your collection, or simply enjoy making character-inspired amigurumi designs, this pattern lets you stitch up a miniature Gary bursting with personality! Perfect for brightening up any space, this crochet creation brings a touch of handmade underwater magic to your collection. 🐌✨
Designed for customization, this pattern allows you to experiment with different shades of pink and blue, embroidered details, or even tiny accessories like a miniature food bowl or bubbles for extra flair. Craft a classic Gary with his iconic look, create a whimsical version with pastel hues, or even stitch up a full set of SpongeBob-inspired amigurumi for a delightful display! Whether gifted as a quirky keepsake, displayed as a charming accent, or made simply for the joy of crafting, this Amigurumi Gary the Snail is a fun and creative project—perfect for bringing a touch of handmade cartoon magic to every stitch! 🧶💖✨

🐌 Amigurumi Gary the Snail – Final Photo-Accurate Crochet Pattern
This refined version ensures your Gary matches the photo in every stitch — from the sculpted 3D shell spiral to the clean embroidered smile and perfectly positioned eyes.
✨ Skill Level
Intermediate – Includes 3D shaping, multiple color transitions, structured assembly, and embroidery detail.
📏 Finished Size
Approx. 10 in (25 cm) tall including eyes, and 8 in (20 cm) long.
🧶 Materials
Yarn (Worsted weight, 100 g ≈ 180–200 m):
Light Blue – Body (60 g)
Light Pink – Shell base (40 g)
Magenta/Dark Pink – Shell spiral (20 g)
White – Eyes (10 g)
Green – Eyelids (5 g)
Teal – Iris (scrap)
Red – Eye ring (scrap)
Peach – Tongue (scrap)
White – Teeth (scrap)
Assorted bright colors – Coral and base details
Other Supplies
3.5 mm crochet hook
Polyester fiberfill stuffing
Tapestry needle
Stitch marker
Thin wire (for eyestalk support)
Hot glue (optional for base pieces)
🧵 Abbreviations (US Terms)
MR – Magic Ring
sc – Single Crochet
inc – Increase (2 sc in same stitch)
dec – Decrease (sc2tog)
sl st – Slip Stitch
ch – Chain
st(s) – Stitch(es)
FO – Fasten Off
BLO – Back Loop Only
🟦 Body (Soft Egg Shape)
With light blue yarn:
R1 MR, 6 sc
R2 inc ×6 (12)
R3 (1 sc, inc) ×6 (18)
R4 (2 sc, inc) ×6 (24)
R5 (3 sc, inc) ×6 (30)
R6 (4 sc, inc) ×6 (36)
R7–16 sc around (36)
R17 (5 sc, inc) ×6 (42) ← adds fuller bottom
R18–26 sc around (42)
R27 (5 sc, dec) ×6 (36)
R28 (4 sc, dec) ×6 (30)
R29 (3 sc, dec) ×6 (24)
R30 (2 sc, dec) ×6 (18)
Stuff firmly, shaping lower half wider and flatter.
FO and close flat bottom.
🌀 3D Shell (Integrated Spiral)
With light pink yarn:
R1 MR, 6 sc
R2 inc ×6 (12)
R3 (1 sc, inc) ×6 (18)
R4 (2 sc, inc) ×6 (24)
R5 (3 sc, inc) ×6 (30)
R6 (4 sc, inc) ×6 (36)
R7 (5 sc, inc) ×6 (42)
R8 (6 sc, inc) ×6 (48)
R9 (7 sc, inc) ×6 (54)
To create the bold spiral ridge:
Switch to magenta.
Work Rounds 10 – 12 in BLO to form raised spiral texture.
R10–12 BLO sc around (54)
R13 (7 sc, dec) ×6 (48)
R14 (6 sc, dec) ×6 (42)
R15 (5 sc, dec) ×6 (36)
R16 (4 sc, dec) ×6 (30)
R17 (3 sc, dec) ×6 (24)
Stuff firmly as you go.
Twist gently while decreasing so magenta ridge forms a visible swirl.
Tip: To match the photo’s deep contrast, you can switch to magenta every 2 rounds during the decrease phase for layered color depth.
FO and leave long tail.
Attach to body at a slight backward tilt, centered along upper back curve.
👀 Eye Stalks (×2)
With light blue yarn:
R1 MR, 6 sc
R2–22 sc around (6)
Insert wire or pipe cleaner for stability; stuff lightly.
FO.
👁️ Eyeballs (×2)
White section:
R1 MR, 6 sc
R2 inc ×6 (12)
R3 (1 sc, inc) ×6 (18)
R4 (2 sc, inc) ×6 (24)
R5–6 sc around (24)
Iris (teal): MR, 6 sc, FO.
Red ring: MR, 6 sc, sl st to join, FO.
Sew ring around iris center.
Eyelid (green): ch 10, sc 9, FO.
Curve around top third of eye for half-covered look.
Eye placement:
Sew each eyeball to a stalk, angled slightly outward.
Position stalks 1 – 1.5 in (2.5–4 cm) apart on top of head.
Attach so they tilt forward just slightly.
👅 Mouth & Face Details
Smile:
Using black yarn, embroider a bold curve about ⅓ down from the eyes, spanning about 1.5 in (4 cm).
Use a backstitch or satin stitch for a smooth line.
Tongue (Peach):
R1 MR, 6 sc
R2 (1 sc, inc) ×3 (9)
R3 sc around (9)
Flatten slightly; FO.
Sew flat under smile so only the tip is visible.
Teeth (White):
Ch 3, sc 2 rows, FO. Make 2.
Sew above tongue with small gap in center.
🌊 Coral Reef Base (Optional)
Sand base:
With beige yarn:
R1 MR, 6 sc
R2 inc ×6 (12)
R3 (1 sc, inc) ×6 (18)
R4 (2 sc, inc) ×6 (24)
Continue increasing to ≈ 6–7 in diameter (42–48 sts).
Add ruffled edge for decorative border:
(sc, hdc, dc, hdc, sc) in same st, skip next) repeat around.
Coral & shells:
Ch 8, sl st back for seaweed; MR 6 sc for shells; use orange, purple, yellow, green for contrast.
Attach around base with needle or glue.
Sew Gary securely to center of base.
🧩 Optional Micro-Refinements
- Eyeball stuffing:
Add one line under “Eyeballs (×2)” →
Stuff lightly before closing to keep the round shape firm and smooth.
- Shell firmness note:
After stuffing the shell →
Stuff firmly, especially toward the center, to preserve the swirl’s definition.
- Base shaping (optional):
At the end of the base section →
You may add a thin cardboard or plastic circle inside the base before closing to keep it perfectly flat.
- Whisker-like texture (optional):
Gary doesn’t have whiskers, but if readers want to echo the coral or seafloor look, suggest:
For extra realism, surface-stitch a few tiny curved coral arms near his sides.
⚙️ Assembly Checklist
- Sew shell to Gary’s back at slight upward angle.
- Attach eyestalks to top of head ≈ 1.25 in apart.
- Sew eyes and eyelids; add white highlights to irises (optional).
- Embroider smile, attach tongue and teeth.
- Mount Gary on coral base and decorate.
✨ Finishing Touches
• Add a touch of blush under eyes with pastel chalk or yarn.
• Gently bend stalks forward for expressive look.
• Adjust shell spiral for even magenta ridge visibility.
• Use satin stitch on smile for photo-smooth finish.
🎉 You Did It!
Your photo-accurate Amigurumi Gary the Snail is complete!
With his soft pastel shell, bold spiral, and signature grin, he’s ready to brighten any room or delight any SpongeBob fan.


