Gallop into style with this Amigurumi Horse Shaped Handbag crochet pattern! Designed for horse lovers and crochet enthusiasts alike, this charming bag combines practicality with whimsical flair. With its adorable equine shape, detailed features, and sturdy design, this crochet handbag is perfect for adding a unique touch to your accessories. Whether you’re crafting for yourself, gifting to a fellow horse lover, or simply enjoy making creative amigurumi designs, this pattern lets you stitch up a delightful handbag bursting with personality! 🐴✨
Designed for customization, this pattern allows you to experiment with different colors, embroidered details, or even tiny accessories like a miniature bridle or decorative saddle for extra charm. Craft a classic horse handbag with earthy tones, create a pastel version for a dreamy aesthetic, or even stitch up a full set of animal-inspired amigurumi bags for a fun collection! Whether gifted as a cherished keepsake, displayed as a stylish accent, or made simply for the joy of crafting, this Amigurumi Horse Shaped Handbag is a fun and creative project—perfect for bringing a touch of handmade equestrian magic to every stitch! 🧶💖
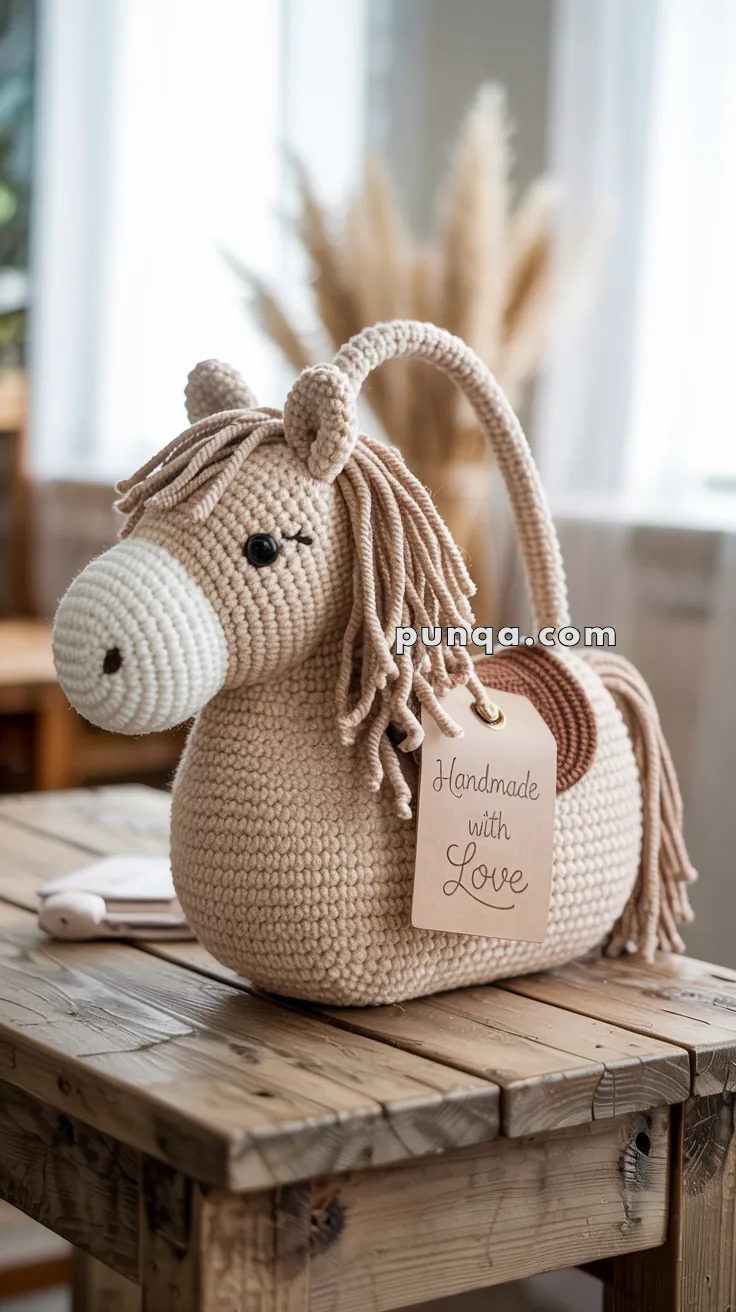
🐴 Amigurumi Horse-Shaped Handbag Crochet Pattern
Create an adorable horse-shaped handbag with a chubby barrel body, a separate round head with a long muzzle, a flowing yarn mane, and a sturdy tubular handle. This open-top functional bag is both cute and practical—perfect for everyday use or as a standout handmade gift!
✨ Skill Level
Intermediate — includes 3D shaping, separate piece assembly, and tubular handle construction.
📏 Finished Size
Approx. 28–32 cm long × 22–24 cm tall × 14–16 cm wide when made with bulky/chunky yarn and a 5.0–5.5 mm hook.
🧶 Materials
- Bulky #5 or chunky yarn (critical for the plush look!)
- Color A – Light beige (body, head, ears, handle): 250–300 g
- Color B – Cream/white (muzzle): 60 g
- Color C – Light brown/caramel (mane, tail, nose tip, saddle): 80 g
- Color D – Medium/dark brown (saddle inner circle): 20 g
- Crochet hook: 5.0–5.5 mm (US H-8 to I-9)
- Safety eyes: 12–14 mm (2 pcs)
- Yarn needle, stitch markers, scissors
- Polyester fiberfill
- Optional: Foam sheet or thin plastic canvas (structure)
- Optional: Cardboard circle for base
Important Notes:
👉 Open-top bag — no zipper
👉 Chunky yarn is essential
👉 Handle must be a tubular/i-cord style, not a flat strap
🧵 Abbreviations (US Terms)
MR – Magic Ring
sc – Single Crochet
inc – Increase (2 sc in same stitch)
dec – Decrease (sc2tog)
ch – Chain
sl st – Slip Stitch
BLO – Back Loop Only
FO – Fasten Off
🧺 BODY – Main Bag (Color A)
The body forms a wide rounded barrel shape with a flat base and open top.
✨ Base – Work in Continuous Spiral
- R1: MR, 8 sc [8]
- R2: inc ×8 [16]
- R3: (sc, inc) ×8 [24]
- R4: (2 sc, inc) ×8 [32]
- R5: (3 sc, inc) ×8 [40]
- R6: (4 sc, inc) ×8 [48]
- R7: (5 sc, inc) ×8 [56]
- R8: (6 sc, inc) ×8 [64]
Insert a cardboard circle for firmness (optional).
✨ Side Walls
- R9–30: sc around [64]
Work 22 rounds for height.
Top remains open. FO and weave in the end.
Structure Tips:
- Lightly stuff bottom 3–4 rounds.
- Optional foam sheet strip to keep bag upright.
🐴 HEAD (Color A)
- R1: MR, 6 sc [6]
- R2: inc ×6 [12]
- R3: (sc, inc) ×6 [18]
- R4: (2 sc, inc) ×6 [24]
- R5: (3 sc, inc) ×6 [30]
- R6: (4 sc, inc) ×6 [36]
- R7: (5 sc, inc) ×6 [42]
- R8–15: sc around [42]
👁️ Eye Placement
Insert 12–14 mm safety eyes between Rounds 11–12, spaced 10–11 stitches apart.
Decrease & Finish
- R16: (5 sc, dec) ×6 [36]
- R17: (4 sc, dec) ×6 [30]
- R18: (3 sc, dec) ×6 [24]
(Firmly stuff.) - R19: (2 sc, dec) ×6 [18]
- R20: (sc, dec) ×6 [12]
- R21: dec ×6 [6]
FO and close.
🐽 MUZZLE / SNOUT (Color B)
- R1: MR, 6 sc
- R2: inc ×6 [12]
- R3: (sc, inc) ×6 [18]
- R4: (2 sc, inc) ×6 [24]
- R5: (3 sc, inc) ×6 [30]
- R6–18: sc around [30]
- R19: (3 sc, dec) ×6 [24]
- R20: sc around [24]
Stuff firmly. FO with a long tail.
🟤 Nose Tip (Color C)
- R1: MR, 6 sc
- R2: (sc, inc) ×3 [9]
FO.
Sew centered at the muzzle tip.
👂 EARS (Make 2 – Color A)
- R1: MR, 6 sc
- R2: (sc, inc) ×3 [9]
- R3: (2 sc, inc) ×3 [12]
- R4: (3 sc, inc) ×3 [15]
- R5–8: sc around [15]
Lightly stuff. Flatten and pinch base. FO with long tail.
🧶 MANE (Color C)
Cut 40–50 strands, each 22–25 cm.
Attach Using Lark’s Head Knots
Add strands along:
- Forehead (Rounds 3–5)
- Crown and back of head (Rounds 6–12)
- After attaching head, continue down neck and upper body
Create the signature long flowing style.
🪶 TAIL (Color C)
Cut 18–22 strands at 20–22 cm.
Fold bundle, knot, and sew to the back (5–6 rounds below top edge).
Optional decorative knot 5–7 cm down.
🐎 SADDLE PATCH (Colors C & D)
Outer Ring (Color C)
- R1: MR, 6
- R2: inc ×6 [12]
- R3: (sc, inc) ×6 [18]
- R4: (2 sc, inc) ×6 [24]
Inner Circle (Color D)
- R1: MR, 6
- R2: inc ×6 [12]
- R3: (sc, inc) ×6 [18]
Sew inner circle to outer ring.
Attach saddle to right side of the body (around R15–20).
👜 HANDLE (Color A – Tubular)
Method 1: Crochet Tube (Recommended)
- R1: Ch 40, sl st to form ring
- R2–45: sc around
Stuff lightly while working. FO with long tail.
Attachment
Sew ends to the top rim:
- Front: 8–10 stitches behind head
- Back: 8–10 stitches before tail
Ensure no twisting.
🧩 FINAL ASSEMBLY
1️⃣ Attach Muzzle to Head
Center on rounds 10–18 with slight downward tilt.
2️⃣ Attach Ears
Between rounds 4–7, angled slightly outward.
3️⃣ Attach Head to Body
Place head slightly forward-leaning, overlapping top rim.
4️⃣ Attach Handle
Sew firmly at marked points.
5️⃣ Add Mane Extensions
Continue strands onto upper body.
6️⃣ Attach Tail
Sew securely centered on body back.
7️⃣ Add Saddle Patch
Place on right side as described.
✨ Finishing Touches
- Weave all ends
- Shape muzzle and head
- Trim mane very lightly
- Add optional eyelashes
- Test handle strength
- Add handmade label if desired
💡 Troubleshooting
Too floppy:
• Add foam sheet
• Stuff base more
• Tighten tension
Head falls back:
• Add more stuffing
• Add extra stitches at base
• Tilt slightly forward
Handle twisting:
• Stuff evenly
• Pin before sewing
Muzzle too short:
• Ensure full R6–18
• Stuff firmly
📝 Accuracy Checklist
✅ Chunky yarn
✅ Open-top bag
✅ Tubular handle
✅ 64-stitch base
✅ Rounded head
✅ Long muzzle
✅ Large eyes
✅ Two-tone saddle
✅ Long flowing mane
✅ Nose tip attached
✅ Forward-leaning head
🎉 Enjoy Your Horse Handbag!
You now have a beautifully structured, functional, and adorable horse-shaped handbag pattern. Perfect for gifting or adding charm to your handmade collection.