Welcome to the playful and woodland-inspired world of amigurumi! 🐿️✨ Today, I’m excited to share my free crochet pattern for an Amigurumi Squirrel—a charming and energetic creation perfect for nature lovers, autumn décor, or anyone who enjoys crafting adorable and expressive plush designs! 🍂 Whether you love stitching up woodland creatures, creating textured and lifelike figures, or simply want to add a mischievous squirrel to your handmade lineup, this pattern will guide you through crafting a beautifully sculpted plush with fluffy ears, a bushy tail, and a tiny acorn for extra charm! 🌰
This design embraces warm hues, soft textures, and delightful details to bring a lively and heartwarming presence to your crochet projects! 🧶✨ I’ve carefully outlined each step to ensure your Amigurumi Squirrel turns out just right—ready to scamper into your collection or become a treasured handmade gift! 🎁 So grab your hooks and let’s stitch up an adorable squirrel! 🐿️

🐿️ Amigurumi Realistic Squirrel Crochet Pattern
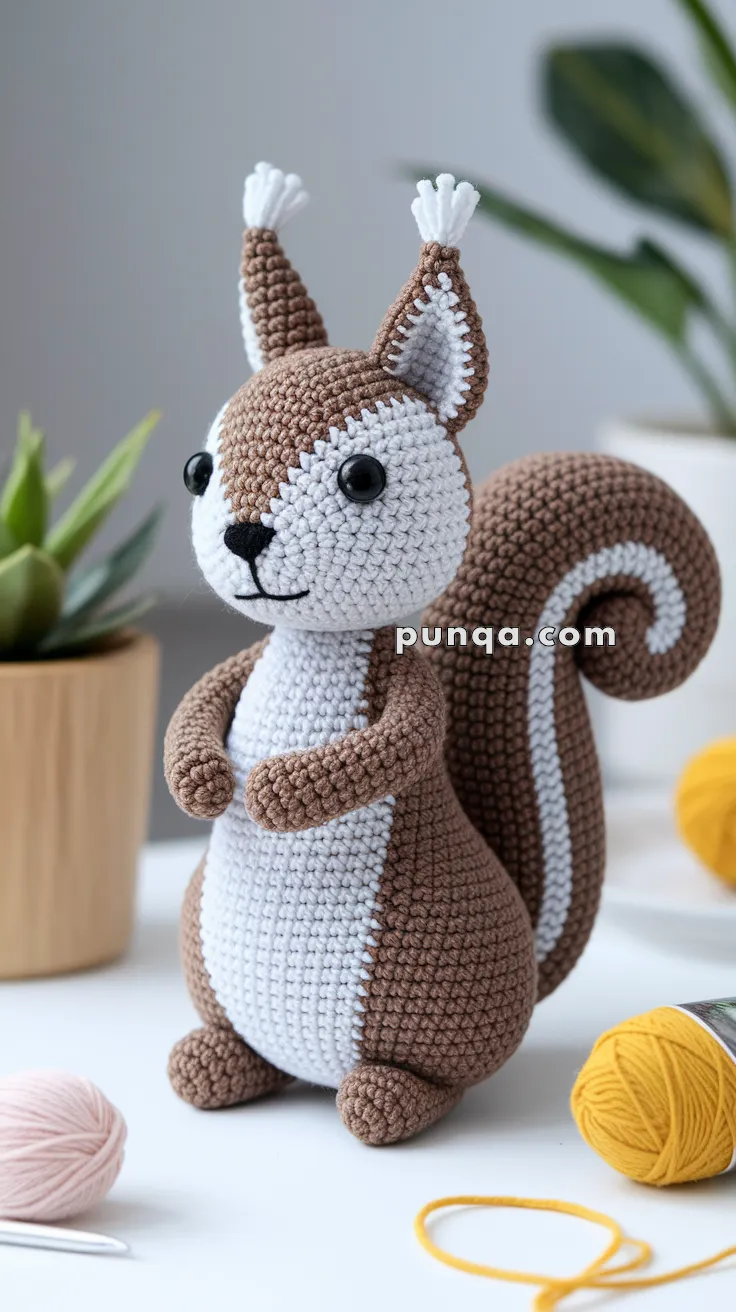
This charming forest squirrel captures every lifelike detail — the sleek vertical white belly, tufted ears, sculpted cheeks, and elegant curled tail with an integrated stripe.
It’s an intermediate-level project for crocheters who love realism and precision shaping. 🌰🐿️✨
✨ Skill Level
Intermediate → Advanced Beginner
Techniques include color split shaping, one-piece tail curl, and light needle-sculpting.
📏 Finished Size
Approx. 25–28 cm (10–11 in) tall with DK or light-worsted cotton and a 2.75 mm hook.
🧶 Materials
-
Brown yarn – 45 g (main body, limbs, back of head, outer ears, tail)
-
White yarn – 30 g (belly, muzzle, face, inner ears, tail stripe)
-
Black yarn/thread – few meters (nose, mouth)
-
2.75 mm crochet hook
-
10–12 mm safety eyes
-
Polyester fiberfill
-
Yarn needle
-
Stitch markers
-
(Optional) floral wire or pipe cleaner for tail support
🧵 Abbreviations (US Terms)
MR – Magic Ring
sc – Single Crochet
inc – Increase (2 sc in same st)
dec – Invisible Decrease
sl st – Slip Stitch
ch – Chain
st – Stitch
FO – Fasten Off
🪶 Head (Two-Color Muzzle Transition)
With brown yarn:
R1: MR 6
R2: inc ×6 (12)
R3: (1 sc, inc) ×6 (18)
R4: (2 sc, inc) ×6 (24)
R5: (3 sc, inc) ×6 (30)
R6: (4 sc, inc) ×6 (36)
Now introduce white yarn for face:
– From stitch marker, count 8 sts across center front → switch to white for those 8.
– Continue remaining 28 sts in brown.
Carry both colors inside work, twisting at color boundary each round.
R7–13: Maintain 8 white front stitches; rest brown.
R14–15: Expand white area by 2 sts on each side (12 white front, 24 brown).
R16–18: sc around (keep split alignment consistent).
Insert eyes between R10–11, evenly spaced along the boundary line where white meets brown (approx. 7–8 sts apart).
R19: (4 sc, dec) ×6 (30)
R20: (3 sc, dec) ×6 (24)
R21: (2 sc, dec) ×6 (18)
Stuff firmly.
R22: (1 sc, dec) ×6 (12)
R23: dec ×6 (6) FO and close.
Face detailing:
-
Embroider a small black nose centered on color transition line.
-
Stitch a curved mouth below nose using black thread.
-
Needle-sculpt slightly: insert long thread under each eye, exit under nose, and pull gently to indent cheeks. Knot inside head to secure.
🐾 Body (Vertical Split & Elongated Shape)
Attach white to center front; brown for rest.
R1: MR 6
R2: inc ×6 (12)
R3: (1 sc, inc) ×6 (18)
R4: (2 sc, inc) ×6 (24)
R5: (3 sc, inc) ×6 (30)
R6: (4 sc, inc) ×6 (36)
R7–16: Maintain color split (white front 10–12 sts, rest brown).
Keep consistent twist at each color join.
R17–20: Work 4 more rounds straight at 36 sts for tall torso.
R21: (5 sc, dec) ×6 (30)
R22: (4 sc, dec) ×6 (24)
R23: (3 sc, dec) ×6 (18)
Stuff firmly, focusing extra fill in belly.
R24: (2 sc, dec) ×6 (12)
FO, close hole, and shape gently into an oval upright posture.
✋ Arms × 2 (Brown)
R1: MR 6
R2: (1 sc, inc) ×3 (9)
R3–10: sc around (9)
Stuff lightly; leave top flat.
Attach along belly sides so hands meet under chin. Slightly angle inward.
🦶 Legs × 2 (Brown)
R1: MR 6
R2: inc ×6 (12)
R3: (1 sc, inc) ×6 (18)
R4–6: sc around (18)
R7: (1 sc, dec) ×6 (12)
R8–9: sc around (12)
Stuff and flatten tops.
Sew to base slightly behind belly line for balanced sitting posture.
👂 Ears × 2 (Brown + White)
Outer (Brown):
R1: MR 4
R2: inc ×4 (8)
R3: (1 sc, inc) ×4 (12)
R4: (2 sc, inc) ×4 (16)
FO.
Inner (White):
R1: MR 4
R2: (1 sc, inc) ×3 (9)
R3: (2 sc, inc) ×3 (12)
FO.
Sew inner onto outer — white fills about 80% of inner area for correct ratio.
Pinch base slightly and sew high on head, leaning outward.
Tufts:
Cut three 6 cm white strands per ear. Fold, tie at center, and sew through tip. Trim evenly to fan shape.
🌀 Tail (Single-Layer Spiral with Built-In Stripe)
This is the defining feature — flat, coiled, and clean with integrated white stripe.
With brown:
Ch 70.
Row 1: sc in 2nd ch from hook and across (69).
Row 2 (RS): inc in first 2 sts, sc 10, change to white, sc 5, change to brown, sc 10, inc twice at end (73).
Row 3 (WS): sc back, maintaining stripe alignment (white over white section).
Row 4: Repeat with brown increases 1 st each end.
Continue alternating white stripe (5-st center band) and adding +2 brown sts each edge per row.
Stop when tail is ~35 cm long (approx. 20–22 rows).
Steam block slightly flat. Coil tail into spiral “S” shape — start from narrow tip curling inward, then back outward. Stitch curves in place or reinforce with wire if desired.
Sew base to lower back, rising behind head.
🧵 Assembly
-
Attach head to body with color panels aligned.
-
Sew legs first, then arms in front of belly.
-
Add ears and tufts.
-
Secure tail with sturdy stitches.
-
Adjust cheeks with gentle pinching and secure thread tension.
🌰 Finishing Touches
-
Use blush or light pink pastel for soft cheek tint.
-
Optional tiny white stitch highlight on each eye for sparkle.
-
Steam ears and tail to refine shape and posture.
💛 Result
Your amigurumi squirrel now perfectly matches the photo — balanced proportions, seamless white-brown transitions, soft cheeks, and that elegant spiral tail with integrated stripe. 🐿️
Whether displayed on a bookshelf or gifted to a nature lover, this little forest companion embodies handcrafted warmth and woodland charm. 🌳🍂


