Welcome to the playful and woodland-inspired world of amigurumi! 🐿️✨ Today, I’m excited to share my free crochet pattern for an Amigurumi Squirrel—a charming and energetic creation perfect for nature lovers, autumn décor, or anyone who enjoys crafting adorable and expressive plush designs! 🍂 Whether you love stitching up woodland creatures, creating textured and lifelike figures, or simply want to add a mischievous squirrel to your handmade lineup, this pattern will guide you through crafting a beautifully sculpted plush with fluffy ears, a bushy tail, and a tiny acorn for extra charm! 🌰
This design embraces warm hues, soft textures, and delightful details to bring a lively and heartwarming presence to your crochet projects! 🧶✨ I’ve carefully outlined each step to ensure your Amigurumi Squirrel turns out just right—ready to scamper into your collection or become a treasured handmade gift! 🎁 So grab your hooks and let’s stitch up an adorable squirrel! 🐿️
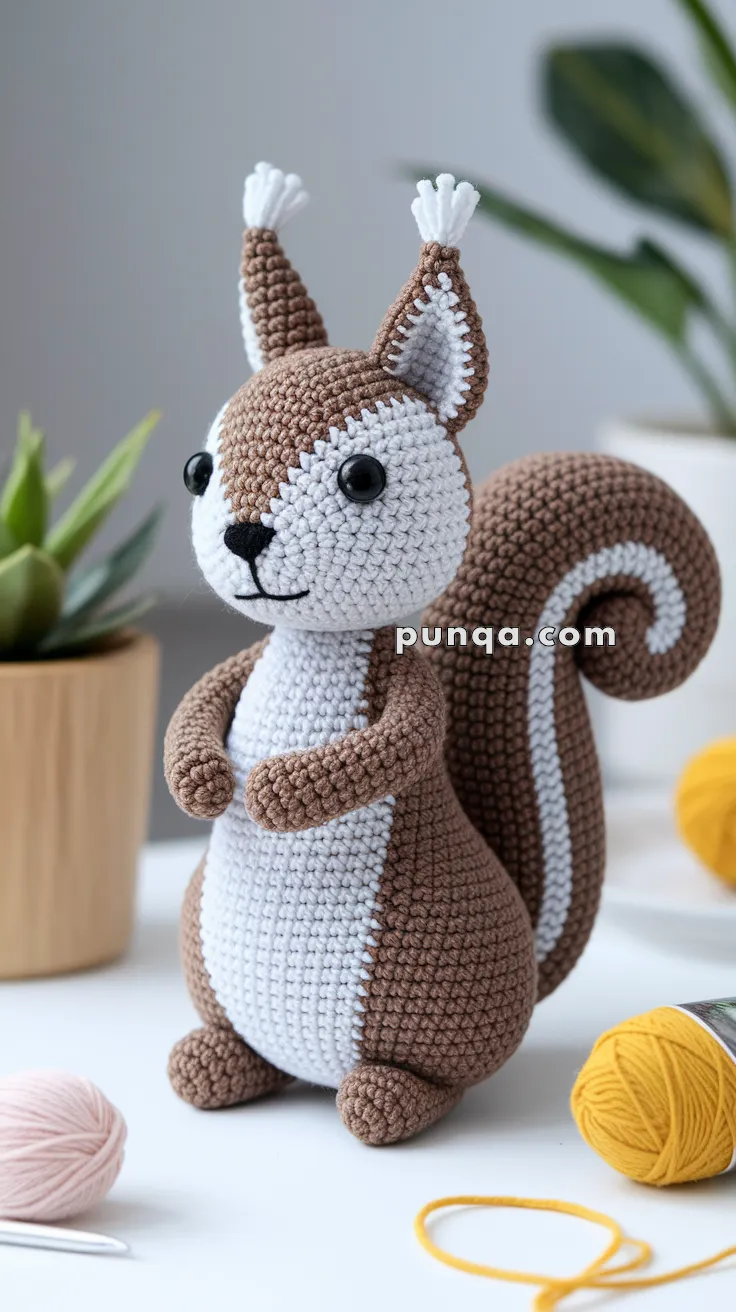
🐿️ Amigurumi Realistic Squirrel Crochet Pattern
This elegant standing squirrel features clean two-tone shaping, a tall upright posture, delicate ear tufts, rounded feet, expressive cheeks, and a signature curled tail with a crisp white stripe. The construction is carefully balanced so the squirrel stands independently while maintaining a soft, natural silhouette. This design is ideal for woodland displays, gifts, or collectors who appreciate refined amigurumi shaping. 🌰✨
✨ Skill Level
Intermediate
(Shaping, color changes, assembly)
📏 Finished Size
Approx. 24–26 cm (9.5–10.5 inches) tall
Tail height: similar to body height
🧶 Materials
- DK cotton yarn:
- Medium brown: 75–85 g
- White: 50–60 g
- Black: small amount (nose + mouth)
- 10–12 mm safety eyes
- 2.5–3.0 mm crochet hook
- Polyester fiberfill
- Yarn needle, scissors
- Stitch marker
🔤 Abbreviations (US Terms)
MR – magic ring
sc – single crochet
inc – increase
dec – invisible decrease
sl st – slip stitch
FO – fasten off
🐿️ HEAD (Rounded with Wide Face Panel)
R1: MR, 6 sc (6)
R2: inc ×6 (12)
R3: (sc, inc) ×6 (18)
R4: (2 sc, inc) ×6 (24)
R5: (3 sc, inc) ×6 (30)
R6: (4 sc, inc) ×6 (36)
R7: (5 sc, inc) ×6 (42)
R8–R14: sc around (42)
👉 Begin colorwork from R8:
Work 20 center stitches in white, remaining in brown.
The white area should form a wide oval face, slightly rising toward the eyes (not a straight stripe).
Insert eyes between R10–R11 at the border of white and brown.
R15: (5 sc, dec) ×6 (36)
R16: (4 sc, dec) ×6 (30)
R17: (3 sc, dec) ×6 (24)
Stuff firmly, shaping full cheeks.
R18: (2 sc, dec) ×6 (18)
R19: (sc, dec) ×6 (12)
R20: dec ×6 (6)
FO and close.
👃 FACE DETAILS
- Embroider a small triangular black nose
- Add a short vertical stitch
- Stitch a soft curved smile 😊
👂 EARS (Tall, Narrow, Pointed – Make 2)
Outer Ear (Brown)
R1: MR, 4 sc (4)
R2: sc (4)
R3: (sc, inc) ×2 (6)
R4: sc (6)
R5: (2 sc, inc) ×2 (8)
R6: sc (8)
R7: (3 sc, inc) ×2 (10)
R8–R11: sc (10)
FO
Inner Ear (White)
R1: MR, 4 sc (4)
R2: (sc, inc) ×2 (6)
R3: sc (6)
R4: (2 sc, inc) ×2 (8)
R5–R6: sc (8)
FO
Sew inner ear inside outer ear.
Ear Tufts ✨
Attach 4–6 strands of white yarn at tips and trim evenly.
🤍 BODY (Plump Lower Shape with Vertical Belly)
R1: MR, 6 sc (6)
R2: inc ×6 (12)
R3: (sc, inc) ×6 (18)
R4: (2 sc, inc) ×6 (24)
R5: (3 sc, inc) ×6 (30)
R6: (4 sc, inc) ×6 (36)
R7: (5 sc, inc) ×6 (42)
R8–R16: sc (42)
👉 Work 18 center stitches in white, remaining brown.
The belly should be wide and straight, not narrow.
R17: (5 sc, dec) ×6 (36)
R18: (4 sc, dec) ×6 (30)
R19: (3 sc, dec) ×6 (24)
Stuff very firmly, especially bottom.
R20: (2 sc, dec) ×6 (18)
R21: (sc, dec) ×6 (12)
FO leaving tail.
🦶 FEET & LEGS (Small Feet, Short Legs – Make 2)
Foot
R1: MR, 6 sc (6)
R2: inc ×6 (12)
R3: sc (12)
R4: (sc, dec) ×4 (8)
R5: sc (8)
Lightly stuff.
Leg
R6–R10: sc (8)
FO
👉 Keep legs short and narrow
👉 Feet should look small compared to body
✋ ARMS (Slim, Curved – Make 2)
R1: MR, 6 sc (6)
R2: (sc, inc) ×3 (9)
R3–R10: sc (9)
R11: (sc, dec) ×3 (6)
R12–R13: sc (6)
Lightly stuff only bottom.
FO
👉 Curve slightly inward when attaching
🌀 TAIL (Thick Spiral with Inner Stripe)
R1: MR, 6 sc (6)
R2: inc ×6 (12)
R3: (sc, inc) ×6 (18)
R4: (2 sc, inc) ×6 (24)
R5: (3 sc, inc) ×6 (30)
R6–R16: sc (30)
👉 Work 8 center stitches in white, rest brown
Keep stripe perfectly straight
R17: (3 sc, dec) ×6 (24)
R18–R26: sc (24)
Stuffing:
- Base: firm
- Middle: light
- Top: minimal or none
FO
Curl into a tight upright spiral and secure.
🪡 ASSEMBLY
- Attach head firmly to body
- Sew ears high and close together
- Attach arms high so paws meet at chest
- Attach legs slightly forward for balance
- Attach tail low on back, curving upward
🌿 FINISHING TOUCHES
- Shape cheeks for softness
- Adjust arm curve inward
- Ensure belly panel stays centered
- Trim ear tufts evenly
- Check standing balance
🧶 YARN USAGE
- Brown: ~75–85 g
- White: ~50–60 g
- Black: minimal
💖 CLOSING THOUGHTS
This little squirrel brings together soft shaping and clean colorwork in the most delightful way 🐿️
From its rounded cheeks to its curled tail, every detail adds warmth and personality. The balanced proportions help it stand proudly, while the gentle expression gives it a calm, friendly presence.
Whether placed on a shelf, gifted to someone special, or added to a woodland collection, this design is sure to bring a smile with every glance 🧶✨


Amei parabéns
Muchas gracias por compartir
Muchas gracias por compartir tú patrón muy claras
Muy bonito trabajo. Felicidades.
Très bel ouvrage – bravo