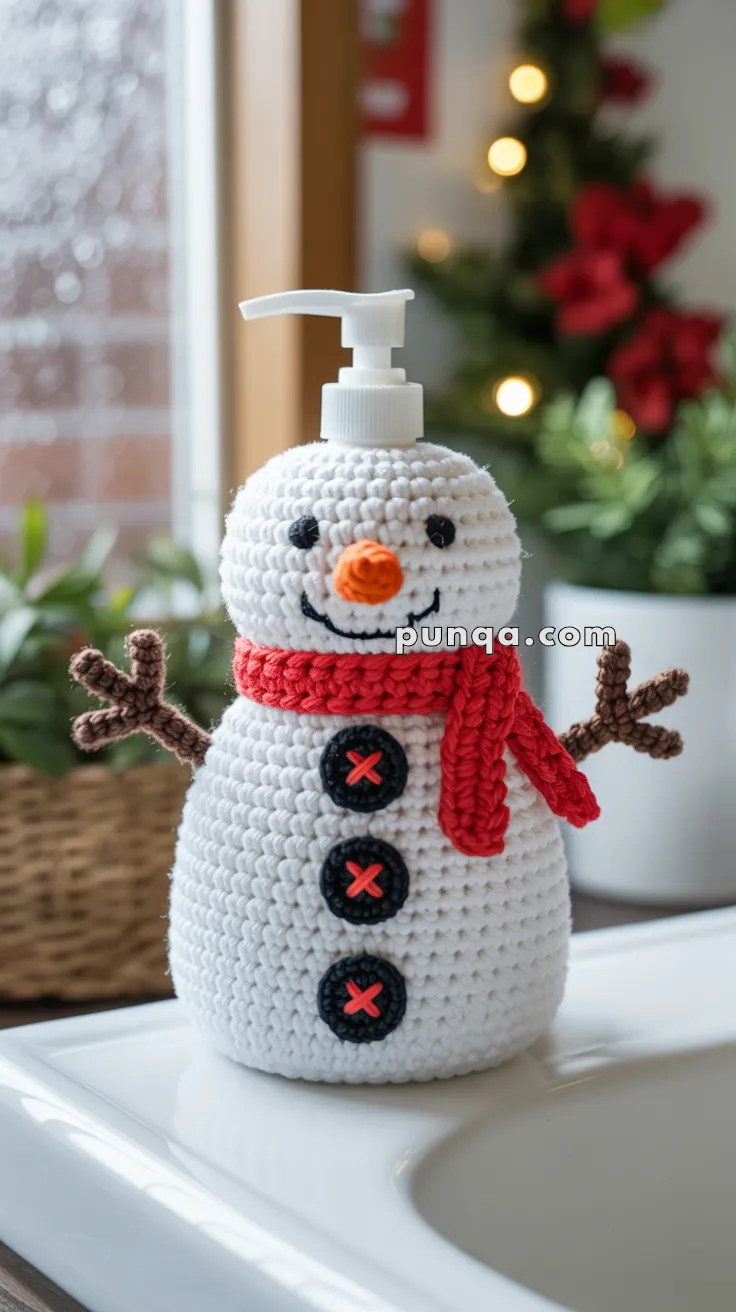
Add a frosty splash of fun to your sink with the Snowman Soap Dispenser Cover, a cheerful crochet project that’s perfect for winter decorating! ⛄🧼 With its round carrot nose, twig-like arms, and cozy red scarf, this festive little snowman brings seasonal charm to your kitchen or bathroom. It’s a quick and delightful way to turn an everyday item into a heartwarming holiday accent.
Perfect for crocheters who love playful details and functional décor, this pattern invites you to explore simple shaping, bold colorwork, and a touch of whimsy. Whether you’re crafting it for your own home, gifting it to a snow-loving friend, or adding a handmade touch to your winter market table, the Snowman Soap Dispenser Cover is a joyful way to stitch up holiday spirit—one loop at a time! 🧵❄️
☃️ Crochet Snowman Soap Dispenser Cover Pattern
Add a cozy touch of winter charm to your kitchen or bathroom with this adorable crochet snowman soap dispenser cover!
With his carrot nose, bright red scarf, twig arms, and buttoned belly, this little snowman will bring festive cheer to every wash.
Perfect for gifting or decorating during the holidays! 🎄🧼
✨ Skill Level
Intermediate – Basic amigurumi experience required (magic ring, increases, decreases, and sewing small parts).
📏 Finished Size
Designed to fit a standard soap dispenser (approx. 18–20 cm / 7–8 in tall, 7–9 cm / 3–3.5 in wide).
You can adjust the height or circumference by adding or removing rounds.
🧶 Materials
Yarn (Worsted-weight cotton):
- 🤍 White – Body
- 🧡 Orange – Nose
- 🖤 Black – Buttons, eyes, mouth
- ❤️ Red – Scarf
- 🤎 Brown – Arms
Other Supplies:
- 3.5 – 4.0 mm crochet hook
- 6 – 8 mm safety eyes (or black yarn for embroidery)
- Yarn needle & scissors
- Stitch marker
- Polyester stuffing (for nose only)
- Optional: thin floral wire or pipe cleaner (to stiffen arms)
🧵 Abbreviations (US Terms)
MR – Magic Ring
sc – single crochet
inc – increase (2 sc in same st)
dec – decrease (sc2tog)
sl st – slip stitch
ch – chain
FO – fasten off
🧊 Snowman Body (Dispenser Sleeve)
With white yarn:
1️⃣ MR, 6 sc (6)
2️⃣ inc × 6 (12)
3️⃣ (1 sc, inc) × 6 (18)
4️⃣ (2 sc, inc) × 6 (24)
5️⃣ (3 sc, inc) × 6 (30)
6–10️⃣ sc around (30) → head section
👉 Check fit: The top opening should sit snugly around the neck of your dispenser bottle.
If needed, adjust by increasing or decreasing a few stitches.
Add gentle neck shaping for realism:
11️⃣ (4 sc, dec) × 6 (25) → soft neck taper
12️⃣ (4 sc, inc) × 6 (30) – return to base width
Continue:
13️⃣ (4 sc, inc) × 6 (36)
14️⃣ (5 sc, inc) × 6 (42)
15–22️⃣ sc around (42) → belly section
👉 Adjust height by adding or removing rows to match your dispenser.
Finish the top edge neatly:
23️⃣ Work 1 round of BLO sl st or reverse sc (crab stitch) to prevent stretching and give a crisp rim.
Base:
End with 2–3 rounds of sc (42) to keep the bottom edge flat.
FO and weave in ends.
🥕 Carrot Nose
With orange yarn:
1️⃣ MR, 4 sc (4)
2️⃣ sc around (4)
3️⃣ (1 sc, inc) × 2 (6)
4–5️⃣ sc around (6)
FO, stuff lightly, and sew to center of face.
👀 Eyes (×2)
Option 1️⃣: Insert 6–8 mm safety eyes just above nose.
Option 2️⃣: Embroider black circles using yarn.
Position symmetrically for a friendly look.
😊 Smile
Using black yarn, embroider a small curved smile under the nose (about 3–4 stitches wide) for a gentle expression.
🔘 Buttons (2–3)
With black yarn:
1️⃣ MR, 6 sc, sl st to join, FO.
Sew vertically down the belly (2 if your bottle is short, 3 if tall).
With red yarn, embroider an “X” on each button for a festive touch.
🧣 Scarf
With red yarn:
1️⃣ ch 50 (or long enough to wrap once around neck).
2️⃣ sc in 2nd ch from hook and across (49).
3️⃣ ch 1, turn, sc across (49).
FO.
Wrap snugly around the neck, tie or sew in place with one end hanging forward just like in the photo.
🌿 Twig Arms (×2)
With brown yarn:
1️⃣ ch 12, sc back along chain. FO.
2️⃣ For branches: re-attach yarn at st 5, ch 4, sc back; repeat at st 7 for second branch.
👉 Insert wire or pipe cleaner if you want poseable arms.
👉 Sew arms at scarf level, angled outward.
🧷 Assembly
1️⃣ Remove the soap pump and slide the crocheted sleeve over the bottle.
2️⃣ Reinsert the pump through the top opening.
3️⃣ Sew nose, eyes, and embroider smile.
4️⃣ Attach buttons vertically down the front.
5️⃣ Wrap and secure scarf around neck.
6️⃣ Sew twig arms just below scarf so they peek out naturally.
🌟 Final Touch
Your snowman soap dispenser is ready to bring smiles! ☃️
With his bright carrot nose, buttoned belly, cozy scarf, and twiggy arms, he’ll make every sink look merry and magical.
Perfect for holiday décor or a heartfelt handmade gift. 🎁✨
💡 Pro Tips
- Use cotton yarn for durability and easy washing.
- To prevent slipping, add a rubber band or elastic loop inside the top edge.
- For a mini version, use DK yarn and a 3 mm hook.
🧹 Care Instructions
Store flat to prevent stretching.
Hand-wash gently in cool water, reshape, and air dry.
Remove from dispenser before washing.