Transform your holiday dining space with the Santa Hat Chair Cover, a crochet project that’s as festive as it is fun! 🎅🧶 Designed to slip right over the back of your chair, this cozy cover features the classic tapered red hat shape, trimmed with fluffy white edging and topped with a cheerful pom-pom. It’s a simple yet eye-catching way to bring Christmas spirit to your table setting and make every meal feel extra magical.
Quick to stitch and full of personality, this chair cover is perfect for holiday gatherings, family dinners, or just adding a playful touch to your everyday décor. Whether you make a full set for the dining room or a single cover to brighten up a favorite chair, the Santa Hat Chair Cover is a joyful way to crochet celebration, coziness, and a sprinkle of handmade magic—one loop at a time! 🧵✨🎄
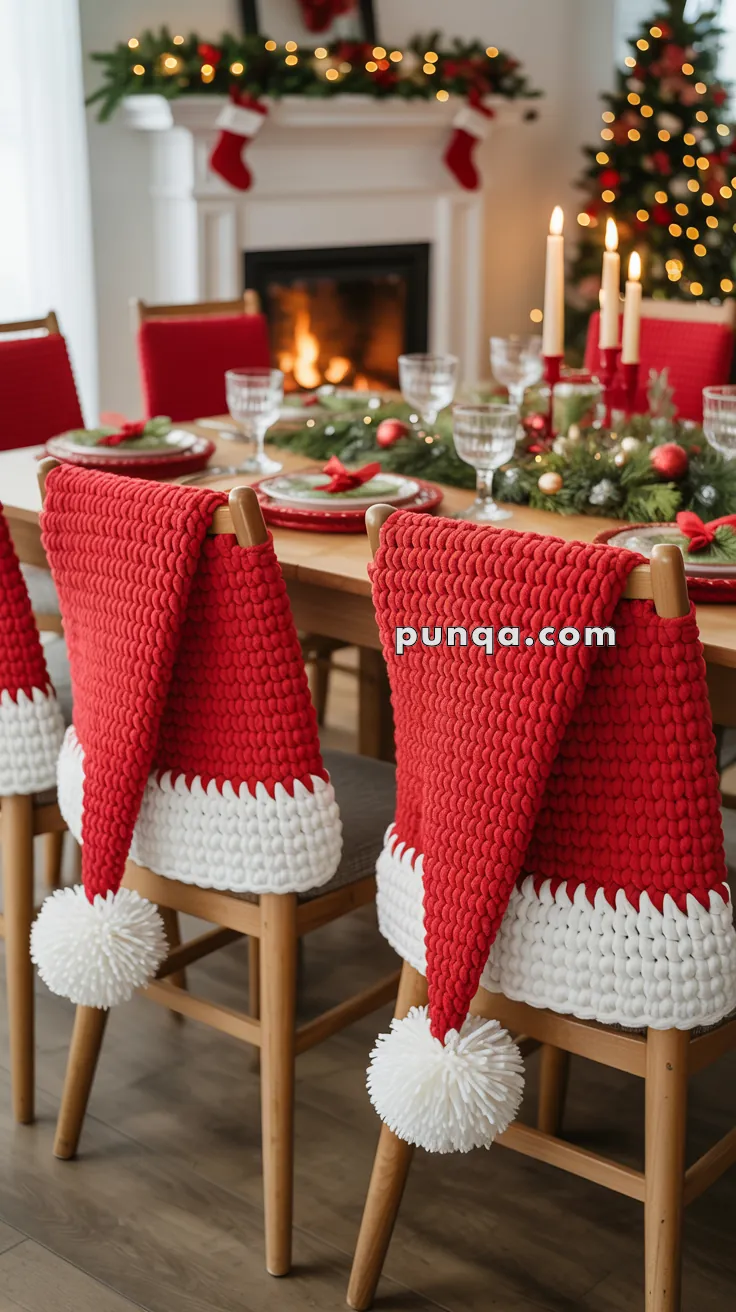
🎅 Santa Hat Chair Cover Crochet Pattern
Bring festive charm right to the dining table with these beautifully handcrafted Santa hat chair covers. Designed to match the reference photo stitch-for-stitch, this pattern recreates every defining feature: the deep velvet-red body, the crisp zigzag edging where the colors meet, the structured white trim, and the long whimsical drop ending in an oversized pom-pom that hangs almost to the floor.
These covers are worked flat, folded neatly over the chair back, and finished with simple shaping that creates an unmistakable Santa silhouette—bold, cozy, and irresistibly festive. Whether you’re preparing for holiday dinners, decorating for family gatherings, or simply adding seasonal magic to your home, this easy yet eye-catching project will instantly set the mood. Grab your bulky yarn, settle in with a warm drink, and let’s bring a little North-Pole cheer to your chairs.
✨ Skill Level
Advanced Beginner
Only basic stitches are required, but shaping and tension matter.
📏 Finished Size
• Width: 40–42 cm
• Height before taper begins: 64–68 cm
• Total height to pom-pom: 82–90 cm
• White band height: 14–15 cm
• Pom-pom diameter: 10–11 cm
Pom-pom should hang below seat level, nearly brushing the floor — exactly as in the photo.
🧶 Materials
Yarn: Velvet-style bulky
(to achieve the same plush texture as shown)
• Red: approx. 300–330 g
• White: approx. 150–180 g
Hook: 6 mm
Notions:
• Tapestry needle
• Large pom-pom maker (10–11 cm)
• Scissors
🔤 Abbreviations (US Terms)
ch – chain
sc – single crochet (through both loops)
sl st – slip stitch
st(s) – stitch(es)
dec – invisible decrease (insert into front loops of next 2 sts, yarn over, pull up loop, yarn over, pull through)
All stitches are standard SC — the velvet yarn provides the plush look naturally.
🪄 Construction Notes
• Worked as a flat rectangle, not a tube
• Folded over chair back
• No seams
• Long red section
• Short taper
• Zigzag white join added after red panel is complete
• White band worked downward from join
• Pom-pom hangs low
🟥 Red Panel
Foundation:
ch 70
Row 1
sc in 2nd ch from hook and in each st across (69)
ch 1, turn
Rows 2–66
sc across (69)
ch 1, turn
Your panel height should now measure approx. 64–68 cm before shaping begins.
🎄 Begin Taper
Row 67
dec 2 evenly across (67 sts)
ch 1, turn
Rows 68–69
sc even (67)
Row 70
dec 2 (65)
ch 1, turn
Rows 71–72
sc even (65)
Row 73
dec 2 (63)
Rows 74–75
sc even (63)
Row 76
dec 2 (61)
Rows 77–78
sc even (61)
Row 79
dec 2 (59)
Row 80
sc even (59)
Row 81
dec 2 (57)
Row 82
sc even (57)
Row 83
dec 2 (55)
Row 84
sc even (55)
Row 85
dec 2 (53)
Row 86
sc even (53)
Row 87
dec 2 (51)
Row 88
sc even (51)
Row 89
dec 2 (49)
Row 90
sc even (49)
Row 91
dec 2 (47)
Row 92
sc even (47)
Row 93
dec 2 (45)
Row 94
dec evenly down to 40 sts
Row 95
dec down to 34
Row 96
dec down to 28
Row 97
dec down to 20
Row 98
dec down to 14
Row 99
dec down to 10
Fasten off, leaving a long tail to secure the last stitches neatly.
This forms the short, forward-sloped Santa tip shown in the image.
❄ Zigzag Join (White to Red)
Attach white yarn along the bottom edge of the red panel.
This technique forms the pointed decorative transition visible in the photo.
Repeat the following sequence across:
(sl st into bottom stitch of red, then spike sl st into the stitch one row below)
Do not chain between stitches.
The tighter that spike slip stitch is drawn, the sharper the peaks become.
Continue until the full width is complete.
You should see an even pattern of small peaks and valleys, perfectly matching the photograph.
⬜ White Band
Now work downward to build the thick white trim.
Row 1
sc evenly across (69)
ch 1, turn
Rows 2–15
sc across (69)
ch 1, turn each row
Band height should be 14–15 cm.
Fasten off and weave ends.
The zigzag join and thick white sc rows form the distinct tiered look exactly as shown.
🎀 Pom-Pom
Use white yarn and a large pom-pom maker (10–11 cm).
Wrap heavily — at least 230–280 wraps — to achieve a dense, spherical pom-pom with a short trim. It should not look sparse or stringy.
Attach securely to the very end of the taper.
Position check:
With the panel folded over the chair back, the pom-pom should hang well below the seat, bouncing just above the floor.
🪑 Fitting
Fold the panel evenly over the chair.
Front and back should mirror each other with straight sides and no seam.
The zigzag join should face outward, the white band hugging the lower backrest, and the pom-pom dropping freely.
The silhouette should unmistakably resemble a Santa hat:
long red body, sharp white trim, and a playful, oversized pom-pom dancing near the floor.
🎁 Final Touch
These chair covers store flat, slip on easily, and instantly turn any dining space into a warm holiday setting. Whether you’re hosting a family gathering or just love festive décor, they add a joyful sparkle that feels straight out of a Christmas catalog.


merci beaucoups pour les explications c’est très joli