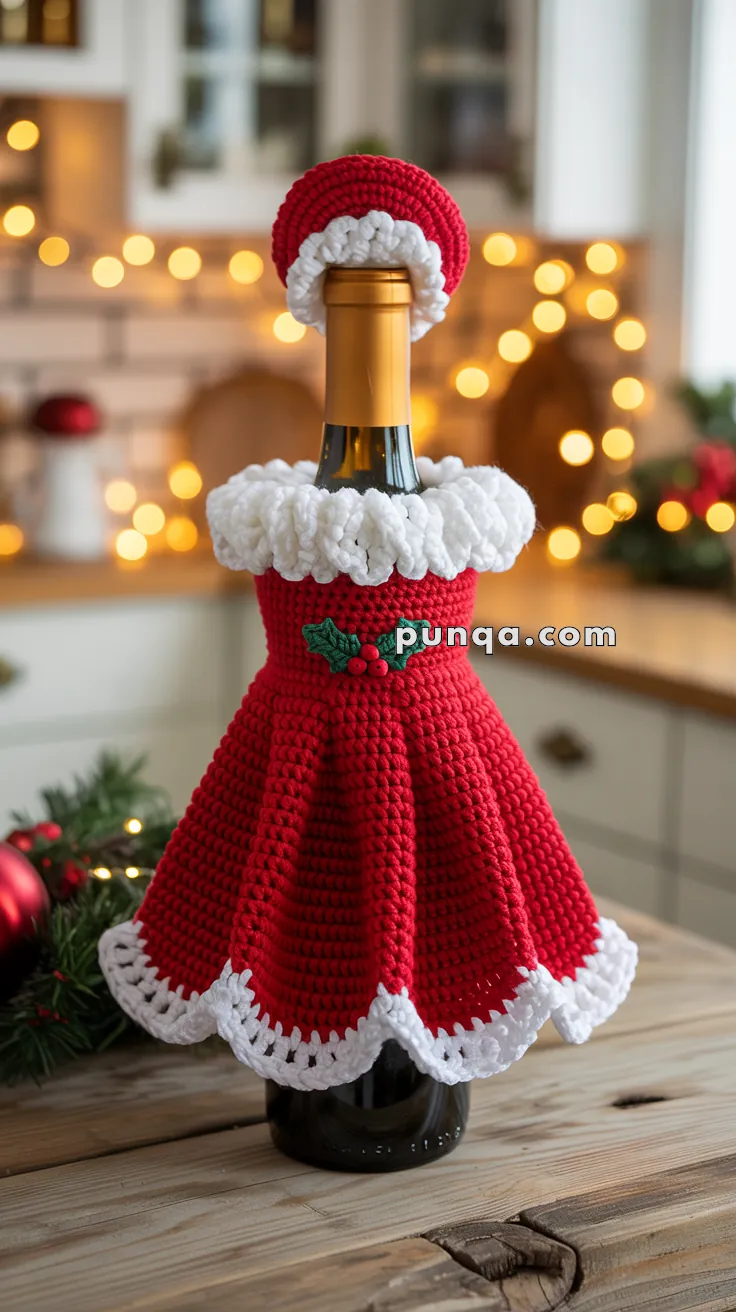
Bring a touch of holiday elegance to your table with the Mrs. Claus Wine Bottle Holder, a festive crochet project that’s as charming as it is practical! 🎄🍷 With her classic red dress, dainty white apron, and sweet embroidered features, Mrs. Claus adds a warm, handmade hug to any bottle she wraps. Whether she’s part of your holiday décor or dressing up a gift for someone special, this cozy cover is sure to spread seasonal cheer.
This pattern is perfect for crocheters who love adding personality to their creations. You can customize her look with sparkly yarn, tiny glasses, or even a holly brooch for extra flair. Whether paired with a Santa bottle holder or standing proudly on her own, the Mrs. Claus Wine Bottle Holder is a delightful way to celebrate the magic of the season—one joyful stitch at a time! 🧶❤️
🎀 Crochet Mrs. Claus Wine Bottle Holder Pattern
Add a handmade holiday touch to your Christmas table with this adorable Mrs. Claus Wine Bottle Holder! With a flowing red skirt, scalloped trim, fluffy neckline, holly accents, and matching bonnet hat, this festive crochet project is perfect for hostess gifts, party decor, or just spreading Christmas cheer.
✨ Skill Level
Intermediate – requires shaping, surface crochet, and appliqué work
📏 Finished Size
- Fits standard 750ml wine bottle
- Dress length: ~25-28 cm from neck to hem
🧶 Materials
Yarn (Worsted/Aran weight):
- Red: 150-200g (main dress)
- White chenille/velvet or bulky: 50g (collar and trims)
- White worsted: 30g (scallops)
- Green: small amount (holly leaves)
- Red: small amount (holly berries)
Other supplies:
- Crochet hooks: 4.0mm (dress), 5.0mm (fluffy parts)
- Tapestry needle
- Scissors
- Stitch markers
- Wine bottle for sizing
🔤 Abbreviations (US Terms)
- MR = Magic Ring
- ch = Chain
- sc = Single crochet
- hdc = Half double crochet
- dc = Double crochet
- inc = Increase (2 sc in same stitch)
- sl st = Slip stitch
- BLO = Back Loop Only
- FLO = Front Loop Only
- st(s) = Stitch(es)
- FO = Fasten off
🧵 PATTERN INSTRUCTIONS
🍷 DRESS BODY (Red)
Foundation:
- Ch 36, join with sl st to form ring (adjust to fit your bottle neck snugly)
- Place marker at beginning of round
Rounds 1-3: sc in each st around (36) This creates the fitted neckline
Round 4: (5 sc, inc) ×6 (42)
Round 5: sc around (42)
Round 6: (6 sc, inc) ×6 (48)
Round 7: sc around (48)
Round 8: (7 sc, inc) ×6 (54)
Rounds 9-10: sc around (54)
Round 11: (8 sc, inc) ×6 (60)
Rounds 12-13: sc around (60)
Round 14: (9 sc, inc) ×6 (66)
Rounds 15-16: sc around (66)
Round 17: (10 sc, inc) ×6 (72)
Rounds 18-19: sc around (72)
Round 20: (11 sc, inc) ×6 (78)
Rounds 21-22: sc around (78)
Round 23: (12 sc, inc) ×6 (84)
Rounds 24-26: sc around (84)
Round 27: (13 sc, inc) ×6 (90)
Rounds 28-29: sc around (90)
FO red yarn, weave in ends.
❄️ WHITE SCALLOPED HEM
Attach white worsted yarn to bottom edge of red dress.
Round 1: sc in each st around (90)
Round 2 (Scallop edge):
- Skip 2 sts, work (hdc, 2 dc, hdc) in next st, skip 2 sts, sl st in next st
- Repeat * around
- Join with sl st, FO
This creates the wavy scalloped edge visible at the hem.
🌊 DECORATIVE SIDE SCALLOPS (Make 4-6 panels)
These are the white scalloped strips that cascade down the sides of the red dress.
For each panel:
- Ch 25-30 (length depends on where you want to place them)
Row 1: sc in 2nd ch from hook, sc across, turn
Row 2 (Scallop edge):
- Skip 1 st, (hdc, dc, hdc) in next st, skip 1 st, sl st in next st
- Repeat * across
- FO, leaving long tail
Placement:
- Evenly space 4-6 panels around the dress
- Sew the straight edge along the red dress vertically from neckline area down toward hem
- Let the scalloped edge face outward for dimension
- In the photo, panels appear to be placed approximately every 60-90 degrees around the bottle
🎀 FLUFFY WHITE COLLAR
This wraps around the actual bottle neck, between the glass and the red dress.
Using white chenille/bulky yarn and 5.0mm hook:
Foundation: Ch 30-32 (adjust to wrap snugly around bottle neck)
Round 1: Join with sl st to form ring, ch 1, sc in each ch around (30-32)
Rounds 2-4:
- Work loosely: sc in next st, ch 1 around
- This creates an airy, fluffy texture
- Alternative: work puff stitches for extra fluffiness
Puff stitch option:
- (Yo, insert hook, pull up loop) ×3 in same st, yo and pull through all loops
- Creates the cloud-like texture seen in photo
FO, weave in ends. The collar should be fluffy and full.
🍃 HOLLY LEAF APPLIQUÉ
Make 2 leaves (Green):
Ch 8
Row 1:
- Sc in 2nd ch from hook
- Hdc in next ch
- Dc in next 3 ch
- Hdc in next ch
- 3 sc in last ch (leaf tip)
- Rotate to work down opposite side
- Hdc, dc 3, hdc, sc
- Join with sl st, FO
Shape the leaves:
- Pinch at center to create the pointed holly shape
- Block slightly if needed
🔴 HOLLY BERRIES
Make 3-4 berries (Red):
- MR, 6 sc in ring (6)
- Pull tight, sl st to join, FO leaving long tail
- Stuff very lightly or leave flat
👒 BERET-STYLE HAT
This sits on top of the bottle cap like a flat beret, not a dome.
Using red yarn:
Round 1: MR, 6 sc (6)
Round 2: inc in each st around (12)
Round 3: (sc, inc) ×6 (18)
Round 4: (2 sc, inc) ×6 (24)
Round 5: (3 sc, inc) ×6 (30)
Round 6: (4 sc, inc) ×6 (36)
Round 7: (5 sc, inc) ×6 (42)
Round 8: (6 sc, inc) ×6 (48)
Round 9: (7 sc, inc) ×6 (54)
Rounds 10-11: sc around (54) This creates the flat top of the beret
Round 12: Switch to white chenille/bulky yarn
- BLO: sc around (54)
Round 13:
- Work loosely: (sc, ch 1) around for fluffy texture
- OR work puff stitches around
Round 14 (Optional – for extra brim fluff):
- (Sc, hdc) in each st around
- FO
Shaping:
- The white brim should naturally roll outward
- Gently shape and fluff the white edge
- The hat should sit flat on top of the bottle cap, not fit over it
🪡 ASSEMBLY
Step 1: Prepare the Bottle
- Remove any labels
- Ensure bottle is clean and dry
- Keep cork/cap on
Step 2: Attach Collar
- Slide the white fluffy collar onto the bottle neck (the glass part above the main body)
- Position it just below where the red dress will start
- It should sit snugly around the neck
Step 3: Add the Dress
- Carefully slide the red dress over the bottle from the top
- The neckline should sit at or just above the collar
- Adjust so it sits evenly
Step 4: Attach Side Scallops
- Pin or mark where you want each white scallop panel
- Using tapestry needle and matching thread, sew the straight edge of each panel vertically onto the red dress
- Space evenly around (4-6 panels total)
- Ensure scalloped edges face outward
Step 5: Add Holly
- Arrange 2 green leaves and 3-4 red berries at center front
- Position just below the neckline where collar meets dress
- Sew securely with matching thread
- Layer leaves slightly for dimension
Step 6: Place Hat
- Set the beret on top of the bottle cap
- Adjust so it sits flat and centered
- The white brim should face outward evenly
- Optional: secure with a dot of fabric glue if needed for display
🎨 STYLING TIPS
- Extra Sparkle: Weave thin metallic thread through white scallops
- Sturdier Structure: Add light starch to white trims for crisp scallops
- Custom Fit: Adjust foundation chain to match your specific bottle diameter
- Fluffier Collar: Use 2 strands of chenille yarn held together
- Holly Variation: Add tiny white French knots as snow on holly leaves
💡 TROUBLESHOOTING
Dress too tight?
- Increase foundation chain by 6 sts (multiples of 6)
- Add extra increase rounds in body
Dress too loose?
- Decrease foundation chain
- Work with smaller hook
Collar not fluffy enough?
- Use thicker chenille yarn
- Add more rounds
- Work puff stitches instead of sc
Hat doesn’t sit flat?
- Block it flat while damp
- Add more increase rounds for wider diameter
- Ensure you’re not pulling stitches too tight
Scallops curling?
- Block pieces before attaching
- Use slightly larger hook for scallop round
- Add light starch
🎁 VARIATIONS
Mrs. Claus in Blue: Use royal blue instead of red Sparkle Version: Add sequin yarn to white trims Mini Version: Scale down for champagne splits or small bottles Matching Set: Make a Santa version with beard!
🎉 FINAL TOUCHES
Your Mrs. Claus Wine Bottle Dress is complete!
This elegant holiday decoration features:
- ✨ Flowing red gown with graduated fullness
- ❄️ Delicate white scalloped hem
- 🌊 Cascading side scallop panels
- ☁️ Fluffy cloud-like collar
- 🍃 Festive holly accent
- 👒 Charming flat beret with rolled white brim
Perfect for holiday parties, hostess gifts, or festive table décor. Pair with candles, greenery, and other Christmas decorations for maximum impact!
Makes a wonderful gift filled with a bottle of wine, or use year after year as reusable holiday décor.
Enjoy your handmade Mrs. Claus creation! 🎄🍷


Gracias por compartir tu conocimiento 🙏🏻