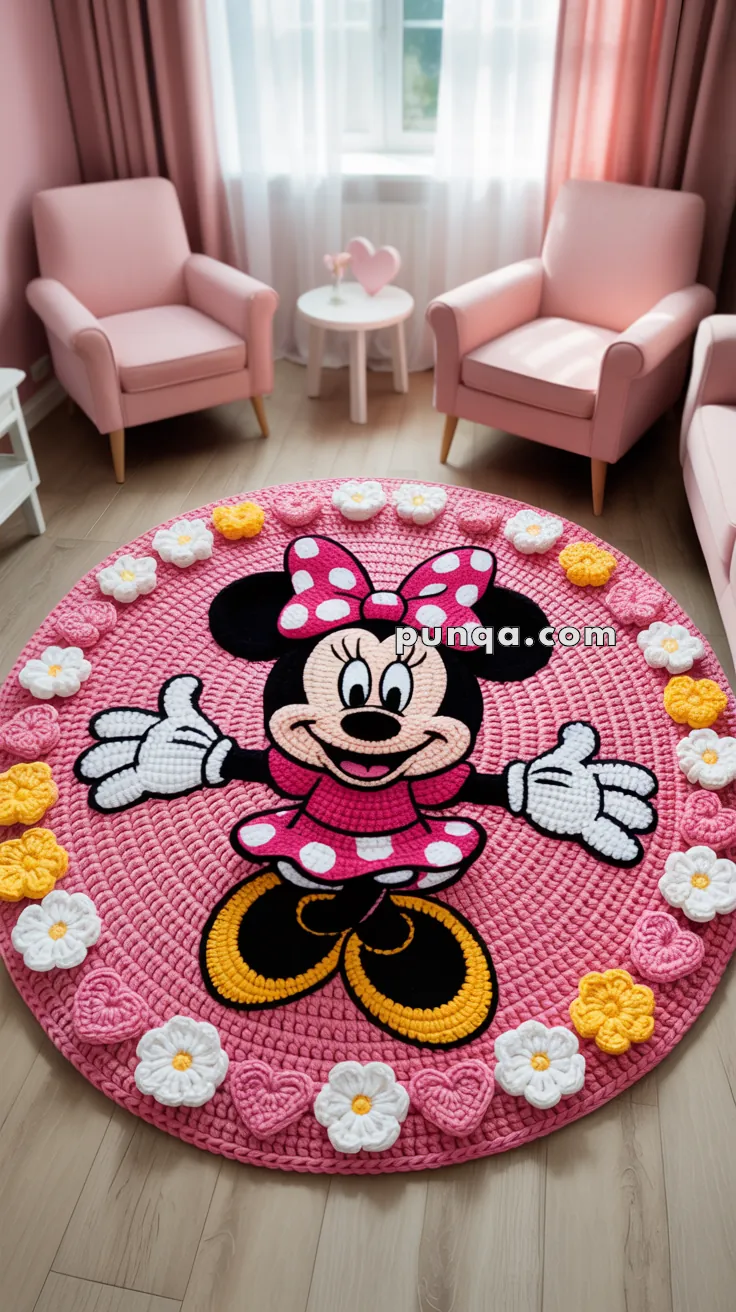
Add a sprinkle of Disney magic to your floors with this Minnie Mouse Crochet Rug pattern! Featuring Minnie’s iconic silhouette, complete with her signature bow and sweet charm, this rug is a delightful way to brighten up a child’s room, play area, or cozy corner. Whether you’re crafting for a little Disney fan or simply want to bring a touch of nostalgia into your home, this pattern lets you stitch up a whimsical piece that’s as fun to make as it is to display. 🐭🎀🧶
Designed for playful flair, this pattern invites you to work with bold colors, soft textures, and simple shaping to bring Minnie’s lovable look to life. Add a scalloped border, polka dots, or even a splash of sparkle for extra personality. Whether it’s used as a cozy playmat, a cheerful accent rug, or a handmade gift, this Minnie Mouse Crochet Rug is a joyful and satisfying project—perfect for bringing a touch of handmade Disney delight to every stitch! 💖🏡✨
🎀 Minnie Mouse Crochet Rug Pattern
Bring a splash of magic and Disney charm into your little one’s room with this adorable Minnie Mouse crochet rug! With her signature bow, bright smile, and playful pose, Minnie becomes the star of any space—perfect for nurseries, playrooms, or cozy reading nooks.
Skill Level: Intermediate – requires colorwork, joining motifs, and tapestry crochet.
📏 Finished Size
Approx. 100–120 cm (40–48 in) diameter, depending on yarn and hook size.
🧶 Materials
- Chunky/Bulky weight yarn (or t-shirt yarn):
- Pink (Background + hearts)
- Black (Ears, outline, shoes, gloves)
- White (Eyes, gloves, polka dots, flowers)
- Yellow (Shoes, flower centers)
- Red or Hot Pink (Bow, dress)
- Skin tone/Beige (Face)
- Hook: 6 mm or suitable for your yarn
- Tapestry needle
- Stitch markers
- Scissors
- Optional: rug grip or anti-slip backing
🧵 Abbreviations (US Terms)
- MR – Magic Ring
- ch – Chain
- sc – Single Crochet
- hdc – Half Double Crochet
- dc – Double Crochet
- inc – Increase
- dec – Decrease
- sl st – Slip Stitch
- BLO – Back Loop Only
🌸 Part 1: Circular Base (Pink)
Base Circle (Start with Pink)
- MR, 6 sc
- inc x6 (12)
- (sc, inc) x6 (18)
- (2 sc, inc) x6 (24)
- Continue increasing evenly: (3 sc, inc), (4 sc, inc)… up to 20–24 rounds or until desired diameter is reached.
Keep circle flat by adjusting increase spacing. Use BLO in 1 round every few rows for texture rings.
🧷 Part 2: Minnie Motif (Tapestry Crochet or Appliqué)
Option 1: 🧶 Tapestry Crochet (Best for advanced crocheters)
- Create a pixel chart (gridded chart of Minnie’s face, 1 square = 1 sc). You can use tools like StitchFiddle or graph paper.
- Begin tapestry colorwork in the center of the circle once base is ~½ complete.
- Use intarsia-style tapestry crochet:
- Carry unused yarn inside stitches (do not float it across back).
- Switch colors cleanly by finishing the last pull-through of the previous stitch with the new color.
- Use stitch markers to define Minnie’s start point on circle.
- Tapestry chart order: work in continuous spiral or joined rounds depending on your comfort.
🧠 Tips:
- Use bobbins for each color block (especially for eyes, cheeks, bow).
- Keep tension even to avoid puckering.
- Practice with a small swatch first.
Option 2: 🧵 Appliqué Method (Easier)
- Crochet each Minnie part separately using sc/hdc shapes:
- Head: Black semicircle + ears
- Face: Beige oval
- Eyes: White ovals + black pupils
- Bow: Hot pink bow shape
- Dress: Semicircle with frills
- Gloves & Shoes: Oval shapes + small details
- Use felt backing templates to help shape and size.
- Sew each piece onto the circle base using whip stitch or invisible join with matching yarn.
🔸 Minnie Mouse Appliqué Pattern Instructions
🖤 Head & Ears (Make 1)
With black yarn:
- Round 1: MR, 6 sc [6]
- Round 2: inc around [12]
- Round 3: (sc, inc) x6 [18]
- Round 4: (2 sc, inc) x6 [24]
- Continue increasing until the circle reaches approx. 6” diameter. Flatten and fasten off.
Ears (Make 2):
- MR, 6 sc [6]
- inc around [12]
- (sc, inc) x6 [18]
Fasten off, sew to the sides of the head.
😊 Face Base (Make 1)
With beige:
- Ch 11
- Row 1: sc in 2nd ch, sc across [10]
- Rows 2–6: sc across, inc at each end [12 → 16]
- Shape rounded edges using dc/htr increases.
- Fasten off and stitch onto head.
👀 Eyes (Make 2 white ovals + 2 black pupils):
White:
- Ch 6, sc in 2nd ch from hook, hdc, dc, hdc, sc.
- Mirror for other side to create an oval. Fasten off.
Black Pupils:
- MR, 6 sc. Fasten off.
Sew onto white, then onto face.
💋 Mouth & Tongue
Mouth: Embroider with black yarn in a curve.
Tongue: With red yarn, embroider or crochet a small oval and attach to the lower mouth area.
🎀 Bow (Make 1 in Pink with White Dots)
Right Loop (Make 2):
- MR, ch 1, 3 sc, 3 hdc, 3 dc, 3 hdc, 3 sc into MR.
- Pull tight, sl st to join, fasten off.
Center Knot:
- With pink yarn, ch 5, sc rows back and forth to create a small rectangle.
- Wrap around the middle and sew bow in place.
White dots (Make 6–8):
- MR, 6 sc in ring, pull tight. Stitch onto bow.
👗 Dress Skirt (Make 1)
- Ch 25 with pink yarn
- Row 1: hdc across
- Row 2: (hdc, inc) across
- Row 3–5: Continue increases to form flare
- Fasten off. Add white spots as per bow.
✋ Gloves (Make 2)
With white yarn:
- Ch 5
- Row 1–3: sc rows, increasing ends for palm shape
- Fingers: ch 3, sc back for each (make 4 fingers)
- Embroider black outline.
👠 Shoes (Make 2 in Yellow & Black)
- MR with yellow, 6 sc
- (inc) around to 18 sts
- Shape to oval with rows of sc + hdc on ends
- Add black sole
- Stitch or glue under the dress.
🧵 Assembly Tips:
- Use pins to position all pieces before sewing.
- For tapestry joining: sc through applique & base rug with matching yarn.
- Optional: outline with black slip stitches for a cartoon finish.
🌼 Part 3: Flower & Heart Border
💛 Yellow & 🤍 White Flowers (Make 8–10 total)
Petal (Make 5 per flower):
- MR, (ch 2, 3 dc, ch 2, sl st) x5
- Pull ring tight, sew center with yellow yarn
💕 Pink Hearts (Make 10+)
- MR, ch 2
- 3 dc, 3 hdc, ch 1, sc, ch 1, 3 hdc, 3 dc, ch 2, sl st into ring
- Pull tight into heart shape
Attach all flowers and hearts around the edge using matching yarn and tight whip stitching.
🪡 Final Touches
- Add non-slip grip to the back
- Steam block the entire rug if needed
- Optional: Add a crocheted edge using crab stitch or picot in a contrasting color
Congratulations—you’ve just added a sprinkle of Disney magic to your home! This Minnie Mouse rug isn’t just a floor piece, it’s a handmade treasure full of charm, color, and heart. Whether it’s used for playtime, photo ops, or simply to brighten up the space, this rug is sure to bring smiles all around.💖🏡🎀