Simplicity meets holiday sparkle with the Minimalist Christmas Tree Ornament—a crochet pattern that proves less can be oh-so-lovely! 🎄✨ With clean lines, subtle texture, and a modern silhouette, this ornament is perfect for those who love understated elegance in their festive décor. Whether you’re trimming a tree, crafting handmade gifts, or adding a personal touch to your seasonal setup, this little tree brings cozy charm without the clutter.
Quick to stitch and endlessly versatile, you can play with yarn weights, muted tones, or even metallic threads to match your holiday vibe. Hang one for a pop of texture or create a whole forest for a beautifully cohesive look. Whether you’re a minimalist at heart or just looking for a fresh twist on tradition, the Minimalist Christmas Tree Ornament is a joyful project—perfect for stitching up serenity, one loop at a time. 🧶🌟

🎄 Minimalist Crochet Christmas Tree Ornaments Pattern
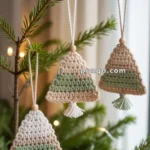
These minimalist crochet Christmas trees combine texture and elegance in one quick project! Crafted with chunky cotton cord and accented by a wooden bead and tassel, each ornament features soft folds that mimic a layered evergreen tree — no stuffing or sewing triangles needed. 🌿
They’re fast, beginner-friendly, and look stunning on rustic, Scandinavian, or modern holiday trees.
🎯 Skill Level
Beginner to Intermediate – You only need to know chain, single crochet, and basic assembly.
📏 Finished Size
Approximately 13–14 cm (5–5.5 in) tall including tassel and bead.
🧶 Materials
- Yarn: Chunky cotton cord (3–5 mm thick) – Sage green, cream, or dusty rose (~20 g per ornament)
- Hook: 5 mm
- Wooden bead: 10–12 mm
- Yarn needle
- Scissors
- Cardboard (8–10 cm wide) for tassel
📖 Abbreviations (US Terms)
ch – chain
sc – single crochet
dec – decrease (sc2tog)
st(s) – stitch(es)
sl st – slip stitch
FO – fasten off
🌲 Version 1: Folded One-Piece Tree (Flat Design)
This tree is worked flat in one continuous strip, then folded to create three stacked tiers.
Step 1: Crochet the Tree Body
Row 1: Ch 13
Row 2: Sc in 2nd ch from hook and across. (12 sc)
Row 3: Ch 1, turn. Sc across. (12 sc)
Row 4: Ch 1, turn. Dec, sc across to last 2 sts, dec. (10 sc)
Row 5: Ch 1, turn. Sc across. (10 sc)
Row 6: Ch 1, turn. Dec, sc across to last 2 sts, dec. (8 sc)
Row 7: Ch 1, turn. Sc across. (8 sc)
Row 8: Ch 1, turn. Dec, sc across to last 2 sts, dec. (6 sc)
Row 9: Ch 1, turn. Sc across. (6 sc)
Row 10: Ch 1, turn. Dec, sc across to last 2 sts, dec. (4 sc)
Row 11: Ch 1, turn. Sc across. (4 sc)
Row 12: Ch 1, turn. Dec twice. (2 sc)
FO, leaving a 20 cm (8 in) tail for assembly.
➡️ You now have a long triangle-shaped strip.
Step 2: Shape the Tree
Lay the strip flat with the wide base at the bottom.
Fold it in an accordion style to form 3 layers:
- Bottom section (largest)
- Middle section (folded backward)
- Top section (folded forward)
Pin the folds to hold shape.
Step 3: Create the Center Seam
Thread the yarn tail on your needle.
Sew vertically through all folds, catching each layer once to secure.
Make 3–4 small passes. Hide the end inside folds.
Step 4: Add Hanging Loop and Bead
Cut a 40 cm (16 in) strand of yarn.
Fold in half, pass through the wooden bead, leaving a loop on top.
Insert both ends through the top of the tree and pull snugly.
Tie or stitch in place.
Step 5: Make the Tassel “Trunk”
Wrap yarn around cardboard (8–10 cm wide) 25–30 times.
Slide off, tie tightly at top, cut loops at bottom.
Wrap a strand 1 cm below top, trim bottom to 5–6 cm.
Sew the tassel to the tree’s bottom center.
💡 Finishing Touches
- No stuffing needed — folds give natural dimension.
- Steam-block lightly for crisp edges.
- Adjust starting chain length (11–15) to vary size.
🌲 Version 2: Three Separate Layers (Stacked Tree Variation)
This version uses three triangles crocheted separately and stacked for a flatter, clean look — ideal for color gradients or simple assembly.
Bottom Triangle (Large)
Row 1: Ch 13
Row 2: Sc in 2nd ch and across. (12 sc)
Row 3: Ch 1, turn. Dec, sc to last 2 sts, dec. (10 sc)
Row 4: Ch 1, turn. Sc across. (10 sc)
Row 5: Ch 1, turn. Dec, sc to last 2 sts, dec. (8 sc)
Row 6: Ch 1, turn. Sc across. (8 sc)
Row 7: Ch 1, turn. Dec twice. (6 sc)
FO and weave in ends.
Middle Triangle (Medium)
Row 1: Ch 9
Row 2: Sc in 2nd ch and across. (8 sc)
Row 3: Ch 1, turn. Dec, sc to last 2 sts, dec. (6 sc)
Row 4: Ch 1, turn. Sc across. (6 sc)
Row 5: Ch 1, turn. Dec twice. (4 sc)
FO and weave in ends.
Top Triangle (Small)
Row 1: Ch 7
Row 2: Sc in 2nd ch and across. (6 sc)
Row 3: Ch 1, turn. Dec, sc to last 2 sts, dec. (4 sc)
Row 4: Ch 1, turn. Sc across. (4 sc)
Row 5: Ch 1, turn. Dec twice. (2 sc)
FO, leaving long tail for sewing.
Assembly:
Stack all three triangles, overlapping each layer by about 1–1.5 cm.
Sew through the center or glue lightly between layers.
Attach loop, bead, and tassel as above.
🌿 Version 3: Puffy Tree (Dense Stitch Method – For 3D Texture Like the Photo)
If you prefer the soft, rounded, and more dimensional look — like the trees in the photo — use puff or bobble stitches instead of single crochet.
These stitches create raised loops that make each tier thicker and more plush, giving the tree a beautiful 3D layered texture.
How to Crochet Puff Stitches:
Yarn over, insert hook, pull up a loop (you have 3 loops).
Yarn over, insert hook again, pull up another loop (5 loops).
Repeat until you have 7 loops total.
Yarn over, pull through all loops. Ch 1 to close.
Example Pattern (for bottom section):
Row 1: Ch 13
Row 2: Puff stitch in 2nd ch from hook, ch 1, skip 1, repeat across. (6 puffs)
Row 3: Ch 1, turn. Puff in first ch-1 space, ch 1, repeat.
Row 4: Ch 1, turn. Dec by skipping first puff, work 1 puff less each row.
Repeat this shaping pattern (reducing by 1 puff per tier) until top tip has 1 puff stitch remaining.
👉 Fold or stack as in Version 1 or 2 for the same tree silhouette — but with a luxurious, cushiony look.
✨ Texture Comparison
| Method | Look | Feel | Difficulty |
|---|---|---|---|
| Single crochet (Version 1–2) | Flat, crisp edges | Light & modern | Beginner |
| Puff/bobble stitch (Version 3) | Rounded, dimensional | Soft & plush | Intermediate |
(table removed per your request – text version below)
- Single crochet versions create clean, folded layers — minimalistic and sleek.
- Puff stitch version produces plump, sculpted layers that look handwoven and cozy.
Both styles are beautiful; the puff version just adds that “handcrafted luxury” feel you see in the photo.
🎨 Suggested Color Palettes
🌿 Natural Minimalist: Sage, Cream, Dusty Rose
❤️ Classic Christmas: Pine Green, Ivory, Red
❄️ Winter Calm: White, Silver Gray, Ice Blue
🍂 Rustic Warmth: Beige, Taupe, Burnt Orange
💖 Final Thoughts
Whether you choose the simple folded tree or the puffy, dimensional version, these crochet ornaments bring warmth and handmade charm to your holiday décor. 🎄
They work up in under 30 minutes — perfect for quick gifts, market tables, or cozy crafting nights.
Crochet joyfully and fill your season with handmade beauty! 🎄💫


Thank you. For the pattern. Highly appreciate it.
Wonderfully done.