Kick back in style with the High-Top Sneaker Slippers, a bold and cozy crochet project that brings streetwear vibes straight to your feet! 👟🧶 With their classic high-top shape, detailed laces, and sporty flair, these slippers are perfect for lounging in comfort while showing off your love for all things cool and handmade. Whether you’re crafting for yourself or surprising a sneaker-loving friend, this pattern turns everyday footwear into a fun, fashion-forward statement.
This design is ideal for crocheters who enjoy playful details and wearable creations. You can customize your slippers with team colors, funky stripes, or even add a logo patch for extra personality. Whether you’re padding around the house or gifting with flair, the High-Top Sneaker Slippers are a creative way to combine comfort and style—one sporty stitch at a time! 💥🧵

👟 Crochet High-Top Sneaker Slippers Pattern
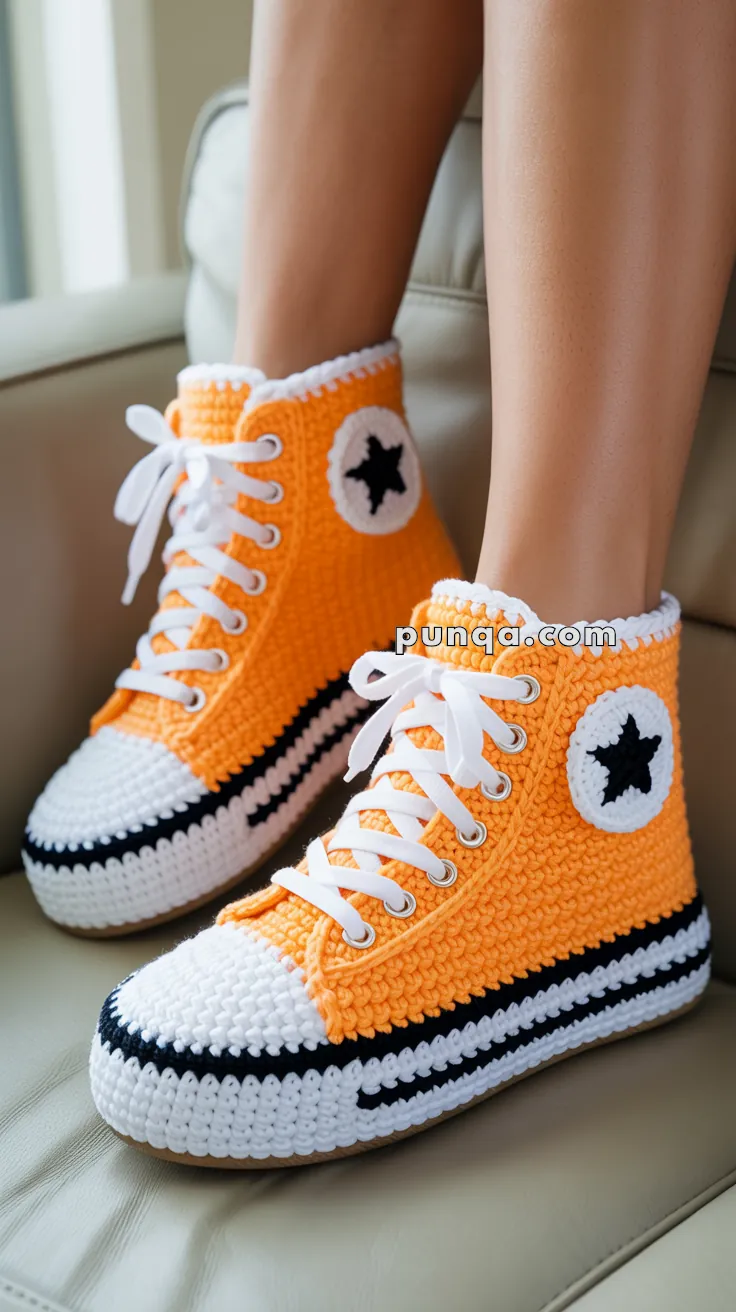
Bring street style indoors with these cozy Crochet High-Top Sneaker Slippers! Inspired by the classic Converse look, they feature a layered sole with a prominent black stripe, white rounded toe cap, tall orange high-top body, side patch with a star, and real shoelaces. Finished with crisp white edging, they’re both stylish and comfy – the perfect handmade lounge sneakers!
✨ Skill Level
Intermediate – involves shaping, color changes, appliqué, and surface crochet.
📏 Finished Size
Adjustable to adult sizes US 6–10 (EU 36–42). Add/remove sole rounds to size up or down.
🧶 Materials
Worsted weight yarn:
- Orange – body
- White – sole, toe cap, patch, edging
- Black – stripe, outlines, star
Tools & Notions:
- Crochet hook: 4.0 mm (tight stitches recommended)
- White shoelaces (80–100 cm each)
- Optional: small metal eyelets
- Optional: foam insoles, plastic canvas, or leather/felt inserts for sturdier soles
- Yarn needle, stitch markers, scissors
🔤 Abbreviations (US Terms)
- MR – Magic Ring
- sc – single crochet
- hdc – half double crochet
- sl st – slip stitch
- ch – chain
- inc – increase (2 sc in same st)
- dec – decrease (sc2tog)
- FO – fasten off
🧵 Pattern Instructions
1️⃣ Sole (White, worked in oval)
Ch 22 (for women’s US 6–9). Adjust: Ch 18 (kids) / Ch 26 (men).
R1: Sc in 2nd ch from hook, sc across until last st. In last st: 3 sc. Rotate, sc along other side. In final st: 2 sc. (~44 sts)
R2: Sc around, placing inc at toe and heel ends.
R3–7: Continue sc around, increasing at toe & heel only.
👉 Sole length should measure ~9.5 in (24 cm) for women.
Optional: Make 2 soles per slipper and sandwich foam/leather between for durability. Whipstitch together.
2️⃣ Sole Stripe (Photo-Accurate: Prominent Black Band)
Attach white: Sc around × 2 rounds.
Switch to black: Sc around × 2–3 rounds (creates the prominent black stripe visible in photo).
Switch back to white: Sc around × 2 rounds. FO.
👉 Photo Note: The black stripe should be thick and visible all around the sole, not thin.
3️⃣ Toe Cap (White)
MR, 6 sc (6)
R2: Inc ×6 (12)
R3: (sc, inc) ×6 (18)
R4: (2 sc, inc) ×6 (24)
R5: (3 sc, inc) ×6 (30)
R6: (4 sc, inc) ×6 (36)
👉 For larger sizes, add R7: (5 sc, inc) ×6 (42).
FO, leave long tail.
Assembly:
- Sew toe cap onto front ⅓ of sole (slightly larger coverage than original pattern).
- Curve upward slightly for authentic sneaker shape.
- Add 1 round black surface slip stitch around edge for outline.
4️⃣ Sneaker Body (Orange)
Attach orange yarn at side edge of sole, behind toe cap.
Work continuous sc rounds around.
Work 18–20 rounds (women) / 22–24 rounds (men) for high-top height.
Optional: Dec once at each side of heel for 2 rounds for shaping. FO.
5️⃣ Tongue (Orange)
Ch 12.
R1: Sc in 2nd ch and across (11).
R2–18: Sc back and forth. FO.
Assembly: 👉 Sew tongue centered behind toe cap. Should extend 2–3 rows taller than body.
6️⃣ Patch (White Circle + Black Star)
White Circle:
MR, 6 sc (6)
R2: Inc ×6 (12)
R3: (sc, inc) ×6 (18)
R4: (2 sc, inc) ×6 (24). FO.
Black Star:
Ch 3, sl st into 1st ch (small ring).
Ch 4, sl st in 2nd ch, sc next, hdc next, sl st back into ring → 1 star point.
Repeat ×5 for 5 points. FO.
Assembly: 👉 Sew star to circle. Attach patch to outer ankle side, about 3–4 rounds below ankle edge.
7️⃣ Lacing & Eyelets
Mark 7–8 holes evenly up each side of tongue opening.
Surface crochet or sew small reinforced loops.
Optional: Install craft eyelets for durability.
Thread white shoelaces (or crochet chain cords) in criss-cross pattern.
8️⃣ Final Details
Black Stripe Around Sole:
- The black stripe created in Step 2 goes all the way around the sole as a continuous prominent band (photo-accurate).
Ankle Edge:
- Finish with 1 round of reverse single crochet (crab stitch) in white for the crisp rope-like edging.
Weave in all ends neatly.
📏 Size Adjustment Guide
KIDS SIZE:
- Sole Chain: Ch 18
- Sole Rounds: R3–5
- Body Rounds: 14–16
- Toe Cap: Stop at R5 (30 sts)
- Lacing Holes: 5–6
- Patch Size: 2 rounds
WOMEN SIZE:
- Sole Chain: Ch 22
- Sole Rounds: R3–7
- Body Rounds: 18–20
- Toe Cap: Stop at R6 (36 sts)
- Lacing Holes: 7
- Patch Size: 4 rounds
MEN SIZE:
- Sole Chain: Ch 26
- Sole Rounds: R3–8
- Body Rounds: 22–24
- Toe Cap: Stop at R6–7 (36–42 sts)
- Lacing Holes: 8
- Patch Size: 4 rounds
🎉 Final Look
Your Photo-Accurate Crochet High-Top Sneaker Slippers are complete!
✔ Thick layered sole with prominent black stripe band
✔ White toe cap covering ⅓ of sole with thin black outline
✔ Tall orange body with crisp shape
✔ White circle patch with black star
✔ Real shoelaces threaded through eyelets
✔ White rope-like edging around ankle
They look just like the photo – handmade comfort meets street style!
💡 Pro Tips
- Always double the sole and add an insert for best durability and support
- Use tight, even stitches throughout for a professional finish
- The black stripe should be 2–3 rounds thick to match the photo’s prominent look
- Make sure the toe cap is generous (⅓ coverage) for authentic proportions


