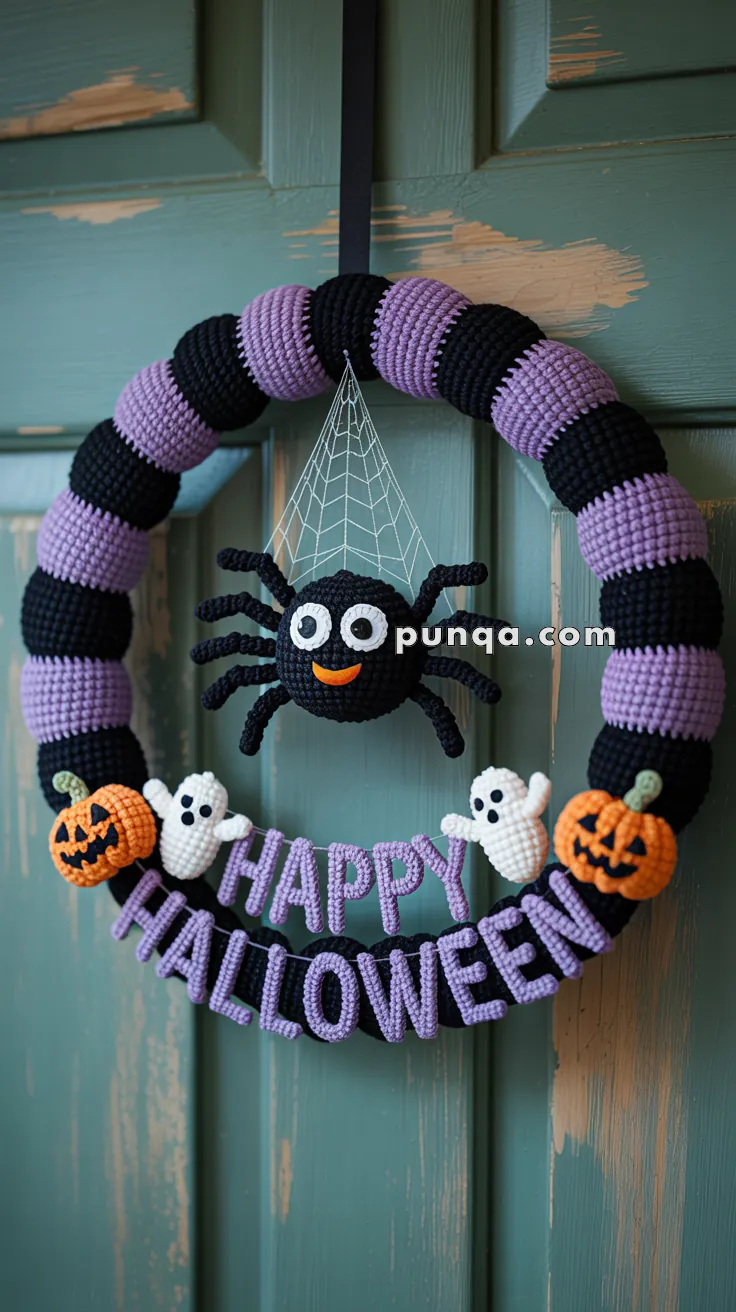
Celebrate the spooky season in style with the Happy Halloween Wreath, a playful crochet project that’s bursting with festive fright and handmade delight! 🎃🕸️ With cheerful pumpkins, grinning ghosts, and a bold spider perched on its web, this wreath is the perfect mix of spooky and sweet. The bold “Happy Halloween” lettering ties it all together, making it a standout piece for your front door, party décor, or cozy corner of seasonal fun.
This pattern is a treat for crocheters who love mixing textures, colors, and character-driven details. You can customize each element—give your ghosts rosy cheeks, make your spider extra fuzzy, or play with pumpkin expressions to suit your vibe. Whether you’re welcoming trick-or-treaters or crafting a centerpiece for your haunted home, the Happy Halloween Wreath is sure to cast a spell of joy—one stitch at a time! 🧶👻
Crochet Happy Halloween Wreath Pattern
Bring a touch of spooky charm to your home this Halloween with this delightful crochet wreath! Featuring bold purple-and-black stripes, cheeky pumpkins, friendly little ghosts, and a big-eyed spider dangling from its web, this project is the perfect mix of creepy and cute. Whether you’re a seasoned crocheter or just looking for a festive weekend project, this wreath will make your front door or wall pop with handmade Halloween spirit.
✨ Skill Level – Intermediate
This project is rated Intermediate because it combines several techniques:
- Amigurumi basics – crocheting in the round, increasing, and decreasing (for pumpkins, ghosts, spider, and letters)
- Shaping and assembly – attaching small parts like ghost arms, spider legs, pumpkin stems, and threading letters in place
- Color changes – making the striped black-and-purple wreath base
- Appliqué and embroidery – adding pumpkin faces, ghost mouths, and spider smiles with yarn embroidery
- Structural work – creating a geometric web with chains and attaching it firmly so the spider can “hang” in the middle
👉 If you’re comfortable with making amigurumi shapes and sewing parts together neatly, you’ll be able to complete this wreath. Beginners who want a challenge can also attempt it by taking it step by step.
📏 Finished Size
~30–35 cm diameter (with 30 cm foam base)
🧶 Materials
- Black yarn – wreath stripes, spider, letter shaping
- Purple yarn – wreath stripes, “HAPPY HALLOWEEN” letters
- Orange yarn – pumpkins, spider mouth
- Green yarn – pumpkin stems
- White yarn – ghosts, spider eyes, web
- Black yarn/thread – facial embroidery
- Foam wreath base – 30 cm diameter
- Safety eyes (10 mm) for ghosts (optional)
- Crochet hook: 3.0–3.5 mm
- Yarn needle, stuffing, scissors, stitch markers
- Black ribbon for hanging loop
🧾 Abbreviations (US Terms)
- MR = magic ring
- sc = single crochet
- inc = increase (2 sc in same st)
- dec = decrease (sc2tog)
- ch = chain
- sl st = slip stitch
- st(s) = stitch(es)
- FO = fasten off
🎃 Component Instructions
Wreath Base (Striped Black & Purple)
Make long tubes to cover foam ring.
- Ch enough to wrap snugly around foam (~36). Join to form ring.
- Work sc in rounds until tube length = 10–12 rows.
- Alternate 10–12 rows purple, 10–12 rows black for chunky bands.
- Make enough sections to cover wreath, slide tubes on, sew closed at back.
Pumpkins (Make 2)
Body (Orange):
- MR, 6 sc (6)
- inc around (12)
- (sc, inc) × 6 (18)
- (2 sc, inc) × 6 (24)
- –8. sc around (24)
- (2 sc, dec) × 6 (18)
- (sc, dec) × 6 (12)
- dec around (6)
- FO, stuff.
👉 Slightly flatten pumpkin. With orange yarn, embroider vertical ridges from top to bottom to create “segments.”
Stem (Green):
- MR, 6 sc (6)
- sc around (6) for 2 rows only
- FO. Sew stem to top.
Face:
Embroider triangle eyes and jagged smile with black yarn to create jack-o’-lantern face.
Ghosts (Make 2)
Body (White):
- MR, 6 sc (6)
- inc around (12)
- (sc, inc) × 6 (18)
- –7. sc around (18)
- (sc, dec) × 6 (12)
- sc around (12)
- FO, stuff lightly.
Ruffle Bottom:
Attach white yarn at base. (ch 3, sl st in next st) repeat around for wavy hem.
Arms (Make 2 per ghost = 4 total):
Ch 7, sc back (6). FO. Attach to sides of ghost body, angled upward.
Face:
- Use safety eyes or crochet mini circles (MR, 6 sc, FO) and sew on.
- Embroider small oval mouth with black yarn below eyes.
Spider 🕷️
Body (Black):
- MR, 6 sc (6)
- inc around (12)
- (sc, inc) × 6 (18)
- (2 sc, inc) × 6 (24)
- –7. sc around (24)
- (2 sc, dec) × 6 (18)
- (sc, dec) × 6 (12)
- dec around (6)
- FO, stuff firmly.
Legs (Make 6):
Ch 15, sc across (14). FO. Sew 3 legs to each side of spider body, spacing them evenly. Curve them slightly outward and position so they’re visible from the front.
👉 Note: While spiders naturally have 8 legs, this design uses 6 legs for aesthetic balance and visibility when displayed.
Eyes (Make 2):
- White bases: MR, 6 sc, FO (make 2)
- Black pupils: MR, 4 sc, FO (make 2)
- Sew black pupils centered on white bases
- Attach eyes to spider face, positioned close together
Mouth:
With orange yarn, ch 6, sc back. Sew as a curved smile below the eyes.
Web 🕸️
Use white thread or thin white yarn for a delicate look.
Structure:
- Create a hanging strand from the top center of wreath to spider’s head (~15-20 cm). Secure firmly to both points.
- From the spider, create 6-8 anchor strands radiating outward to different points around the inner wreath ring, forming a geometric pattern.
- The web should have a triangular/geometric appearance rather than circular:
- Focus strands going upward to create triangle shape above spider
- Add supporting cross-strands between the main radiating lines
- Keep lower area more open so letters and decorations show
👉 Spider should dangle centered inside wreath, with web creating a geometric backdrop.
HAPPY HALLOWEEN Letters (3D)
Make letters as thick stuffed tubes that will be threaded onto yarn or ribbon.
General Method (Purple):
For each letter:
- Ch desired length for letter part
- Work sc in rounds around chain to make narrow tube (~6 sts around)
- Continue for 8-10 rounds to create tube length needed for letter shape
- Stuff lightly as you go
- Shape tubes into letters (H, A, P, P, Y, H, A, L, L, O, W, E, E, N)
- Sew tube ends together to form letter shapes
Letter Construction Tips:
- H: Two vertical tubes + one horizontal crossbar
- A: Two angled tubes meeting at top + crossbar
- P: Vertical tube + curved top
- Y: Two angled tubes meeting + vertical drop
- L: Vertical tube + horizontal bottom
- O: Circular tube sewn into ring
- W: Series of angled tubes forming W shape
- E: Vertical tube + three horizontal bars
- N: Two vertical tubes + diagonal connector
Threading Letters:
- Cut a length of purple yarn or narrow ribbon (approximately 60-70 cm)
- Thread through each letter in order: H-A-P-P-Y (space) H-A-L-L-O-W-E-E-N
- Leave small gaps between letters for natural spacing
- Position along bottom curve of wreath
- Tie ends at back of wreath to secure
👉 Letters should curve along the bottom of the wreath. The threading method allows them to drape naturally.
🪡 Assembly Order
- Cover wreath with striped tubes (alternating purple and black sections)
- Create and attach web structure in center using white yarn
- Attach spider so it hangs centered in the web
- Position pumpkins at bottom left and right sides of wreath
- Sew ghosts beside pumpkins (left ghost by left pumpkin, right ghost by right pumpkin), with arms raised
- Thread letters onto yarn/ribbon and position along bottom curve, spelling “HAPPY HALLOWEEN”
- Tie letter strand securely at back of wreath
- Add black ribbon loop at top back for hanging
🎃 Display Tips
- Hang on front door, interior wall, or above fireplace
- Ensure spider is securely attached so it doesn’t sag
- Fluff ghost ruffles and arrange arms for maximum charm
- Position pumpkins so faces are clearly visible from the front
- Letters should follow the natural curve of the wreath bottom
And there you have it – your very own Halloween wreath, stitched with love and just the right amount of spookiness! With its playful ghosts, grinning pumpkins, and centerpiece spider, it’s sure to bring smiles (and maybe a few fun shivers) to everyone who sees it. Hang it proudly on your door, gift it to a Halloween-loving friend, or use it as a unique party decoration – either way, this handmade wreath will become a festive favorite year after year. 🎃👻🕷️