Hey there, fellow crochet enthusiast! 🌟 Let me tell you about the pure joy of creating a granny square throw pillow. It’s like a delightful journey back to simpler times, where each stitch connects you to generations of crocheters before us. Granny squares are those timeless little gems that offer endless possibilities in terms of color and design. They allow you to experiment with your creativity, mixing and matching hues until your heart’s content. The process of crafting these squares is mesmerizing, as you watch a simple hook and yarn transform into intricate patterns right before your eyes. It’s not just about making a pillow; it’s about weaving memories and warmth into something tangible.
Getting started on a granny square throw pillow is a breeze, even for beginners! 😊 The beauty of this project lies in its simplicity and adaptability. You start by creating individual squares, each a mini masterpiece on its own. Once you’ve gathered enough squares, it’s time to join them together, like putting together pieces of a colorful puzzle. The sense of accomplishment is fantastic when you see the pillow cover coming together, each square adding its own unique charm to the final piece. And let’s not forget the finishing touches—choosing the perfect pillow insert and marveling at your creation, nestled perfectly on your couch or bed. It’s a rewarding experience that combines creativity, relaxation, and a touch of nostalgia, all wrapped into one cozy package! 🧶💖
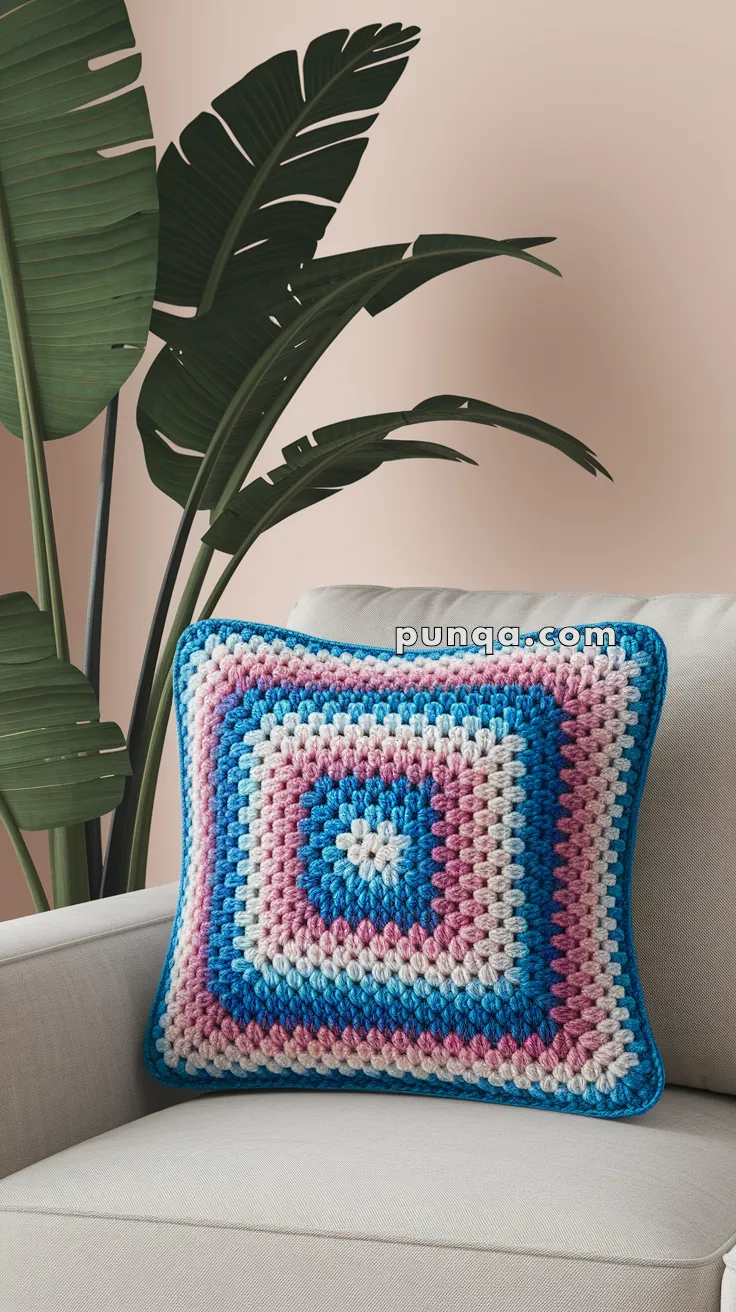
Granny Square Throw Pillow Pattern
Skill Level: Beginner
Finished Size: 16 x 16 inches (40 x 40 cm)
Materials
– Worsted weight yarn in four colors (A, B, C, D)
– Crochet hook size H/8 (5 mm)
– Tapestry needle
– 16 x 16 inch pillow insert
Abbreviations (US Terminology)
– ch: chain
– sl st: slip stitch
– sc: single crochet
– dc: double crochet
– sp: space
– st: stitch
Pattern Instructions
Front Granny Square
1. Round 1: With color A, ch 4, join with a sl st to form a ring. Ch 3 (counts as dc), 2 dc in ring, ch 2, *3 dc in ring, ch 2; repeat from * 2 more times, join with sl st to top of ch-3. (12 dc, 4 ch-2 sps)
2. Round 2: Sl st to next ch-2 sp, ch 3, 2 dc in same sp, ch 2, 3 dc in same sp (corner made), ch 1, *(3 dc, ch 2, 3 dc) in next ch-2 sp, ch 1; repeat from * 2 more times, join with sl st to top of ch-3. (24 dc, 4 ch-2 sps)
3. Round 3: Join color B, sl st into ch-2 sp, ch 3, 2 dc in same sp, ch 2, 3 dc in same sp, *ch 1, 3 dc in next ch-1 sp, ch 1, (3 dc, ch 2, 3 dc) in next ch-2 sp; repeat from * 3 more times, join with sl st to top of ch-3.
4. Round 4-8: Continue as established, alternating colors C and D for each round, increasing the number of ch-1 sps between corners as the square grows.
Back Granny Square
– Repeat the instructions for the Front Granny Square, maintaining the same color order and number of rounds.
Assembly
1. Place the front and back squares together with the right sides facing out.
2. Using color A, join yarn in any corner and sc through both layers in each st around, placing 3 sc in each corner ch-2 sp.
3. Leave one side partially open to insert the pillow.
Finishing Touches
1. Insert the pillow form.
2. Continue to sc across the open side to close.
3. Fasten off and weave in all ends with a tapestry needle.
Tips:
– To customize your pillow, experiment with different color patterns! 🌈
– This granny square pattern is perfect for beginners and a great way to use up leftover yarn. Happy crocheting! 🧶✨
🧵 You’ve brought the Granny Square Throw Pillow Pattern crochet project to life! Take a moment to admire your beautiful handmade work, and feel free to customize it with your favorite yarns and embellishments. 🎨💖