Welcome to the cozy and colorful world of crochet! 🧶✨ Today, I’m excited to share my free crochet pattern for a Granny Square Sweater—a stylish and nostalgic creation perfect for vintage lovers, boho fashion enthusiasts, or anyone who enjoys crafting wearable art! Whether you love stitching up classic motifs, experimenting with bold color combinations, or simply want to add a handmade touch to your wardrobe, this pattern will guide you through crafting a beautifully textured sweater with connected granny squares, elegant borders, and a touch of retro charm! 🏡
This design embraces vibrant hues, intricate stitches, and thoughtful details to bring a warm and inviting presence to your crochet projects! 🧶✨ I’ve carefully outlined each step to ensure your Granny Square Sweater turns out just right—ready to brighten up your outfit or become a treasured handmade gift! 🎁 So grab your hooks, pick out your favorite color palette, and let’s stitch up a stunning sweater!
🧶 Granny Square Sweater – Free Crochet Pattern
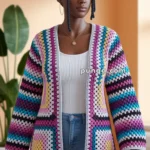
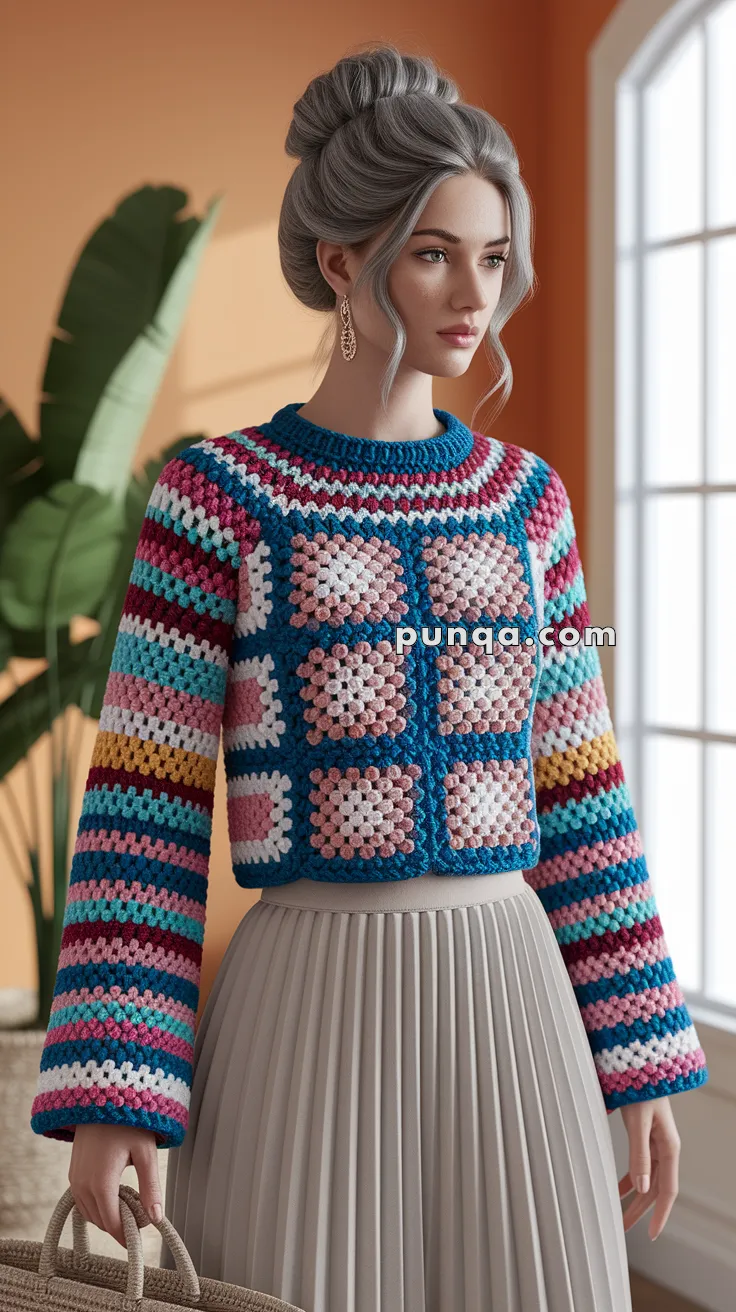
Colorful, cozy, and stylish — this granny square sweater brings a modern twist to a retro classic. Great for beginners ready to piece motifs together and for anyone looking to brighten up their handmade wardrobe.
✨ Skill Level
Advanced Beginner to Intermediate – Includes granny square motif construction, seaming, and ribbing.
📏 Finished Size
Instructions fit S/M – easily adjustable by increasing/decreasing square count or rows.
🧵 Materials
-
Worsted weight yarn in:
-
Main colors (at least 6 shades: rose, pink, white, blue, burgundy, mustard)
-
-
Hook: 5.0 mm
-
Yarn needle for seaming
-
Stitch markers
-
Scissors
🔤 Abbreviations (US Terms)
-
ch – chain
-
sl st – slip stitch
-
sc – single crochet
-
dc – double crochet
-
st – stitch
-
sp – space
-
rnd – round
-
FO – fasten off
🟪 Granny Square Motif (make 12)
Each square uses 4 colors, alternating every round
-
Rnd 1: With Color A, MR, ch 3 (counts as dc), 2 dc in ring, ch 2, [3 dc, ch 2] x3, join with sl st to top of ch 3. FO.
-
Rnd 2: Join Color B in any ch-2 sp, ch 3, (2 dc, ch 2, 3 dc) in same sp, [3 dc in next space between clusters], (3 dc, ch 2, 3 dc) in next ch-2 sp x3, 3 dc in next sp, join, FO.
-
Rnd 3: Join Color C in any ch-2 sp, ch 3, (2 dc, ch 2, 3 dc) in same sp, 3 dc in each space between clusters across to next corner, repeat around. Join, FO.
-
Rnd 4: Join Color D, repeat round as above, forming square shape. FO and weave in ends.
Make 12 total.
🧥 Body Assembly
Front & Back Panels:
-
Sew 6 granny squares (2 rows of 3) for each panel.
-
Use sc or whip stitch to seam.
Side Seams & Shoulder Join:
-
Sew shoulders together (1 square width per side).
-
Leave armholes by skipping the sides of top square on each side when joining front and back panels.
💪 Sleeves
Striped Granny Stitch in the Round:
Start with foundation chain (approx. 36 chains, or enough to match armhole) and join to ring.
-
Rnd 1: Ch 3 (counts as dc), 2 dc in same sp, skip 2, 3 dc in next, repeat around, join.
-
Change color every 2 rounds to match photo. Work even for 40–45 rounds or desired sleeve length.
-
Tapering optional: Decrease 1 cluster every 8–10 rounds to slightly shape the sleeve.
Repeat for second sleeve.
🧶 Cuffs & Neckline
Neckline (sc or rib):
-
Attach yarn to neckline, sc around evenly. Optionally, do 2–3 rounds in contrasting color for a ribbed look.
-
For ribbing: ch 8, sc back loop only and sl st join around neckline (repeat until fully around).
Bottom & Sleeve Cuffs:
-
Optional ribbed border using same ribbing method as neckline.
-
Or, sc 2–3 rounds with matching yarn.
🎨 Color Placement Tips
-
Body Squares: Use a fixed layout (e.g., same outer border color for all squares).
-
Sleeves: Follow a stripe pattern: 2 rounds per color, matching both sleeves for symmetry.
-
Use bold contrasts for neckline and cuffs for a framed look.
🧵 Finishing
-
Block all squares before joining for neatness.
-
Weave in all ends.
-
Light steam block after assembly if needed.
💫 You’re Done!
You’ve just crocheted a wearable art piece — a bold and bright granny square sweater! Pair it with a neutral skirt like the model, or jeans for a casual boho look. 🌈🧥